
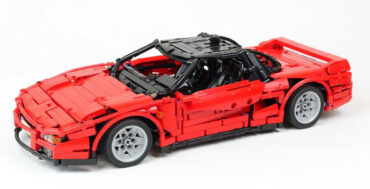
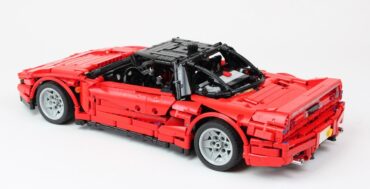
A reproduction of an iconic car from the 90’s : the honda NSX type 1 featured V6 fake engine with rear wheel drive, steering with steering wheel, double wishbone suspensions, pop-up headlight, opening doors, hood, trunk and rear glass roof, and adjustable seats.

The story of this project
I am a big fan of Honda (no really ?), but it is not a big deal, I am trying to cure myself.. by buying Honda car and motorcycle. I own a 89′ Transalp, and recently a Honda legend Ka8, but having a NSX is still not in my budget ! So I planned a long time ago to make one in lego. In beginning of 2017, a fan of lego and honda named Elvis, contacted me for questions about the Honda Ra300 I made in lego. Following some discussions about Lego and Honda, I discovered that he ownes the legendary Honda NSX. After that we met in order that I give him some parts to finish his Honda RA300 and it gives me the opportunity to see in real the NSX, take detailed pictures and drive it ! Then, I decided to make the NSX in lego.

Engineering
I have started to use the 53mm wheel instead of big 68mm because of the scale and the result in quantity of parts. I think it is a good scale for manual car. Then I started with the chassis, trans-axle, and finished by the bodywork. The reproduction of the NSX in lego is equipped with full suspensions, as double wishbone inspired by the Groupe B Rally Car.

The trans-axle is a rear wheel drive, due to the scale it is always complicated to have wheel drive and double wishbone suspensions. On the Group B rally car I used soft ribbed hose to connected the wheel to the differential, because these parts are 2-stud wide, instead of the 3L U-join but it works only by friction, excluding motorization. But for the NSX, I figured out to find an other way. I use in fact a floating differential enables me to not use U-joint for the axle, only Cv-join connected to the wheel hub. For that I use a 4L old differential which drives couple of 16t gear, and then 24t/12t to drive the V6 engine. Of course at this scale this is not possible to have a gearbox, or with removing the detailed of the interior which I did not want.
The steering is classical made with rack and pinion on the front, with an axle for the hand of god (which is by the way removable) and an other with a gearing and 2 U-join to operate the steering wheel in the interior.

The pop-up headlight are operated by a lever in the dashboard. This lever drives a connectig rod which is also connected to a lever. And this lever command the displacement of the headlight by pushing the base, which causes the small rotation of them. It was a bit tricky to pass the whole connecting rod and system in it but it works fine and can be operated from the interior which was important for me.

Design
The design was of course the most difficult part to do. It was also the most important ! Because the Honda in lego need to be realistic but also easy identifiable, that is why there are some interesting and important parts to reproduce, like the rear wings, the black roof, pop up headlight, shape of opening parts and so on. The only compromise that I did is for the doors, which do not respect the airflow intake shape.
I started the design by the rear parts with the bumper, exhaust and rear wing. I wanted to reproduce the gap between the bodywork and the wing and use simple configuration of panels, which I did. Then I do the opening trunk and started to build the front. I made the front bumper, originally with more parts and more bulky but I restarted it by using some black parts to give the front bumper enough stiffness but also aggressive look. After that I build the black roof with the opening glass roof and the important C-pillars which are oblique. Then I finally make the windscreen and the opening hood and pop-up headlight.

I have to restart many time to get the correct shape of this hood including the system for the headlight and have a correct opening shape, which was very difficult. You can see some holes without parts near the headlight, which is a compromise because of the room I have a steering wheels. You can see also on the video that I implement (at the end) a system to release the hood with a lever between the hood and windscreen.

Then I finished the design by the doors, which have been also complicated because of the airflow shape. I would like to reproduce the thickness and the curving shape of the doors, and also include the airflow shape, which was not possible at the end. Maybe with bigger scale. But at the end, the shape is a bit here and there are also the two big airflow intake just after the doors before the wheel arch.
I made the interior at the end, which was not complicated with the dashboard, central console, lever and parking lever. Then added two bucket seat thanks to many panel and made the adjustable position which is in fact a slidding connector on axle.

Conclusion
To conclude, I have tried many time to do the honda NSX in lego, but this time I started by the most difficult parts : the rear with the wings, and then build the other parts. Make the correct opening shape with the functions like pop-up headlight was complicated, that is why I have to do compromise (like the hole near the headlight, and the shape of the doors) but at the end, I am really happy with this car. On some views, the shape of the car is well done and respected, plus the distinctive parts like the wing, roof, and headlight make it easy identifiable. I could say that I find the front parts a bit bulky and more heavy in style that the rear, and some continuity problems of the panels near the doors (again for enabling the opening). But making lego scaling is always compromise to find the correct parts and assembly to fit, with good homogeneity and continuity, and respecting the functions ! I do my best for it and at final thing that the bodywork is rather successful.


How to build ?
📕 You only need the parts and the instructions. You can purchase the PDF instructions on the shop and build with your own parts.
Inspired by Honda NSX
The partlist is available at the end of the instructions preview on this page, and is also available on Rebrickable.
🎁 If you want to purchase the LEGO parts + PDF instructions, have a look to my creator page or request a quote from Buildamoc.
(not official LEGO or Honda Product)


Free Photo Sequence
Please note that the bill of material can be different for the free version, because the bill of material has been generated by the CAD model of the NSX of for sale instructions which is an improved version. The free version of the instructions refer to the first edition of the NSX, therefore watch carefully the parts you need before (not big change, some pins, conenctor, front hub wheel).
You can download the Photo sequence instructions here (62mo)
(9) Comments
Hello, the PDF version is a step by step instructions with partlist at each step generated by rendering computer, so it is is high quality and easy to follow. That is why it is for sale. The photo sequence is more complicated to follow, as it is only picture and that you have to look which part are used. It may have some difference also in the partlist from photo sequence and the partlist from PDF or Rebrickable, as the PDF,version is always an enhanced version.
Lovely MOC of a great car! Just curious about one thing: What are the differences between the Photo sequence and the pdf versions of the NSX here
build it .
Costs wasn’t zoo expensive , had a lot off parts all ready.
Look forward till the next build of you.
Happy New year.
Soon, the building instructions is on the way, in beginning of 2018 I think. I do not know if it will be on mochub because there are many rare and expensive parts so I think it would not be cost effective.
Wow! I love this design! I was wondering the same as Andre. Will there be a parts list available? Also will you have this for sale via Mochub? Thank you
Hello, not yet but soon !
love the Honda .
is there a parts list available ??
[…] The first model that caught our attention is the Honda NSX. […]
[…] Nico’s Honda NSX is – much like the real car – a triumph of mechanical engineering, and well worth a closer look. Check out the full details at Nico’s discussion topic at the Eurobricks forum, and you can find all the images, a video of the model’s features and instructions (yes, really, so we we won’t be getting the usual ‘Can I have instructions?’ messages for once!) at Nico’s own excellent website – Click here to take a look. […]
Comments are closed.