An alternate model of the #42082 Lego Technic set, featured 4×4 drivetrain with fake engine, steering, lockable leaf suspensions, motorised outriggers, manipulator crane and two ways tipper, with openable elements and building instructions.
How to build ?
Using Genuine LEGO Parts : If you own the 42082 Lego Technic Set – Rough Terrain Crane, you can build this creation without any additional parts. You only need to purchase the instructions on this page. You can check the exact bill of material on rebrickable or in the instructions previews below.
Using non-Genuine LEGO Parts : This model is available on LesDiy Store in a complete package, including the parts (alternative bricks from China) and PDF Instructions (the same as on this page).
Direct purchase of the instructions (All alternate model I have created with the 42082 LEGO Set)

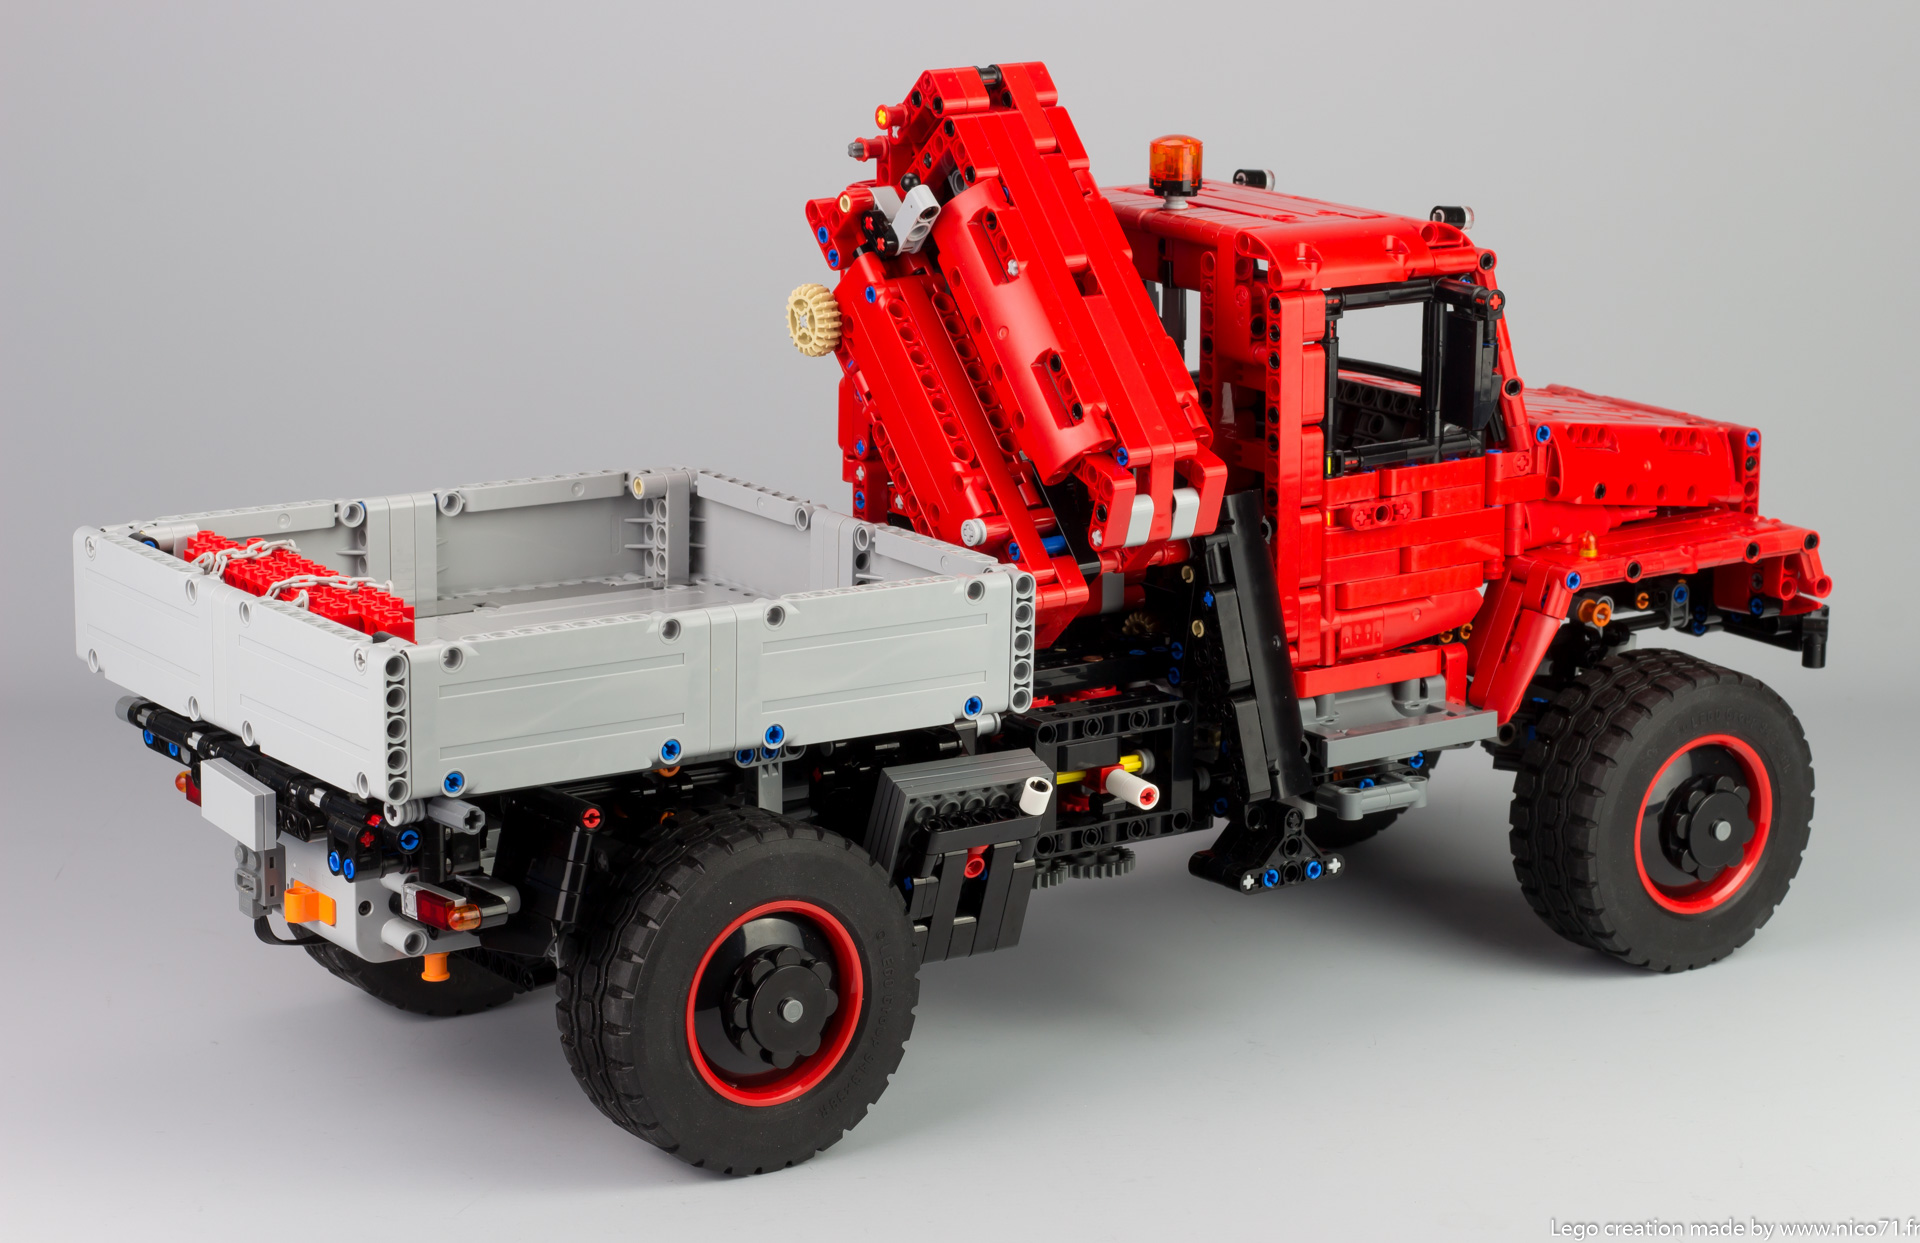
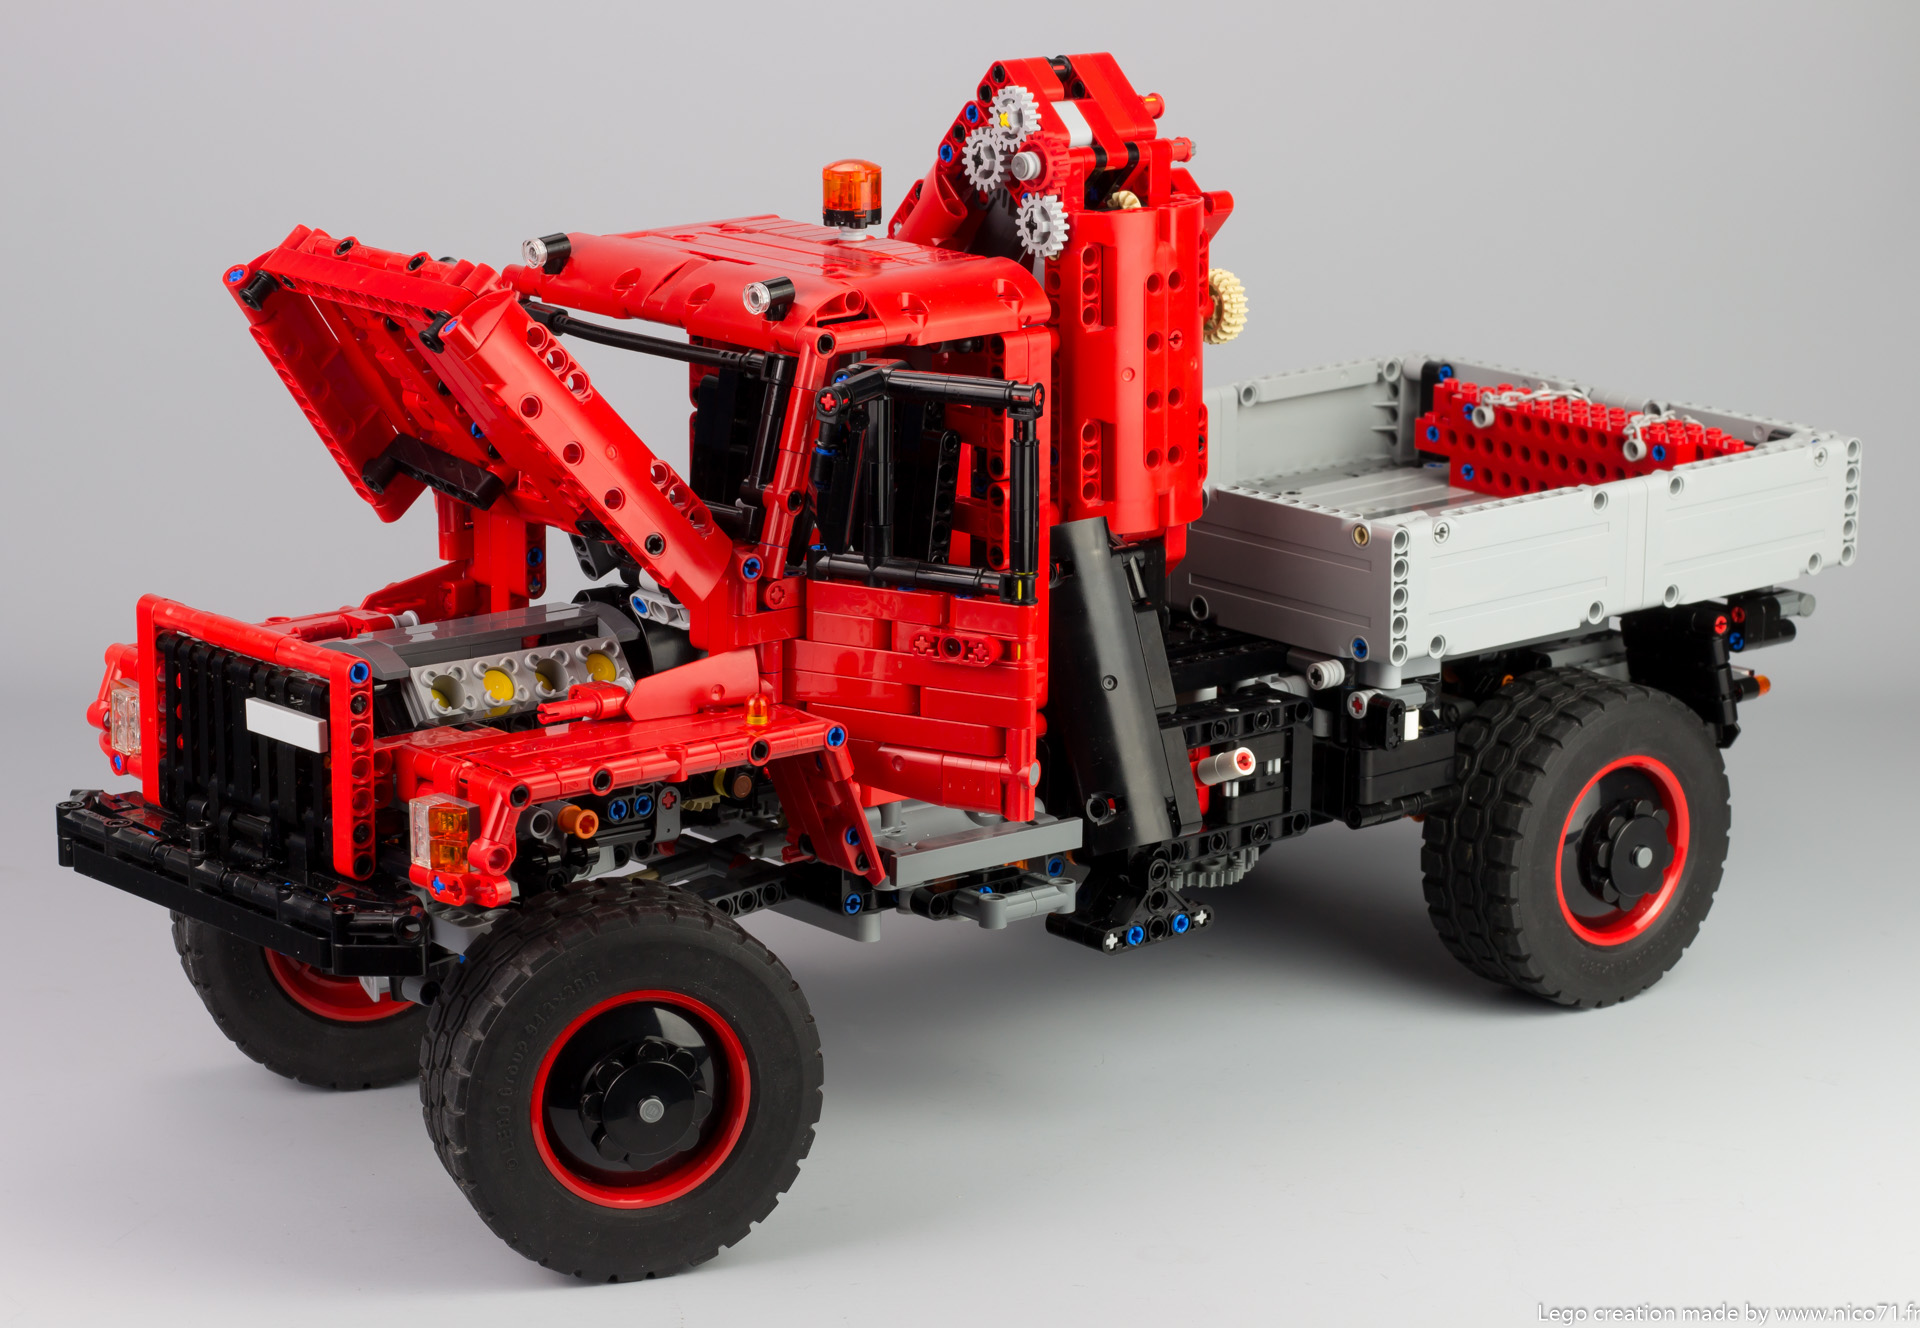
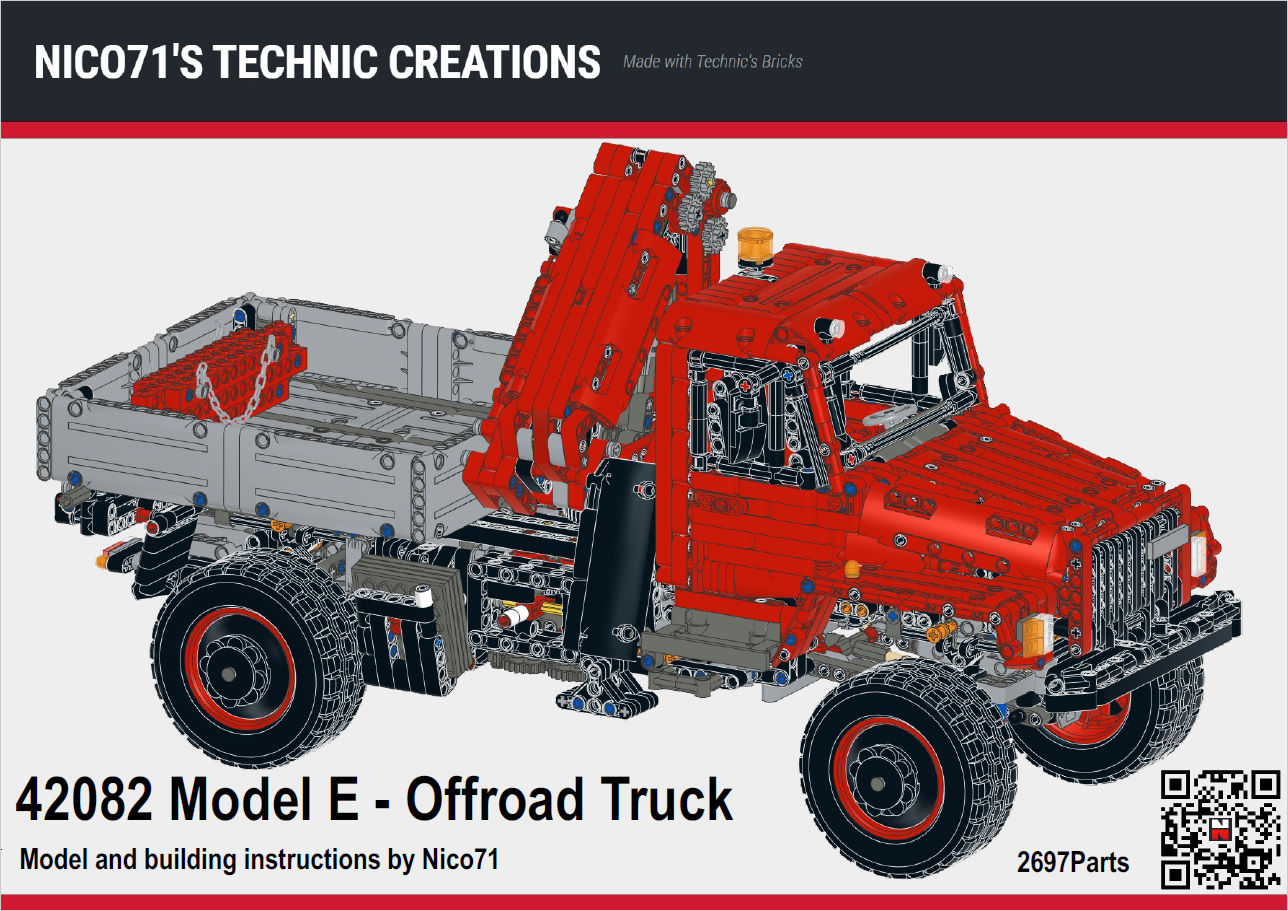
42082 Model E – Offroad Truck
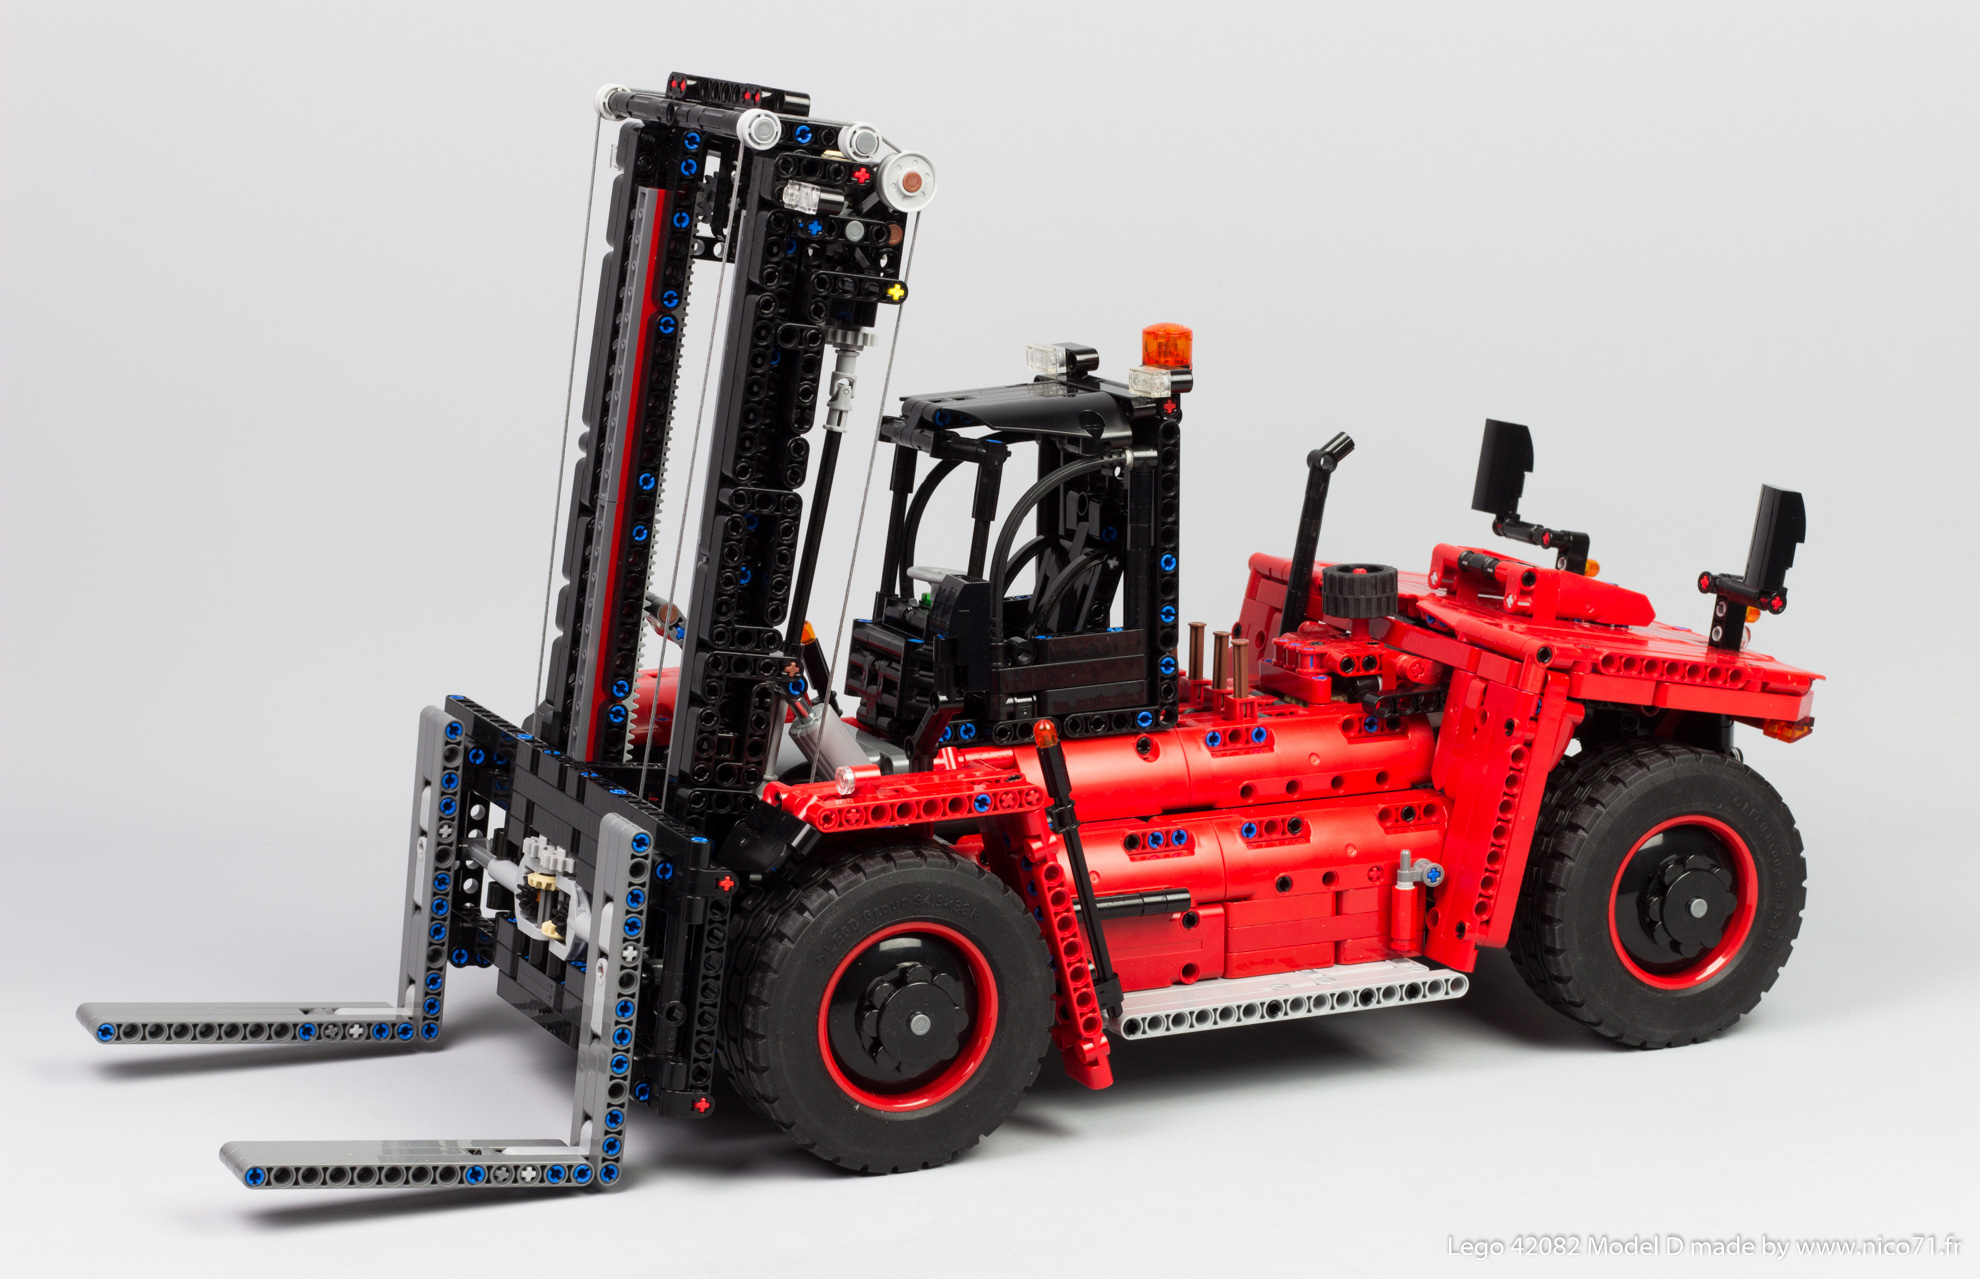
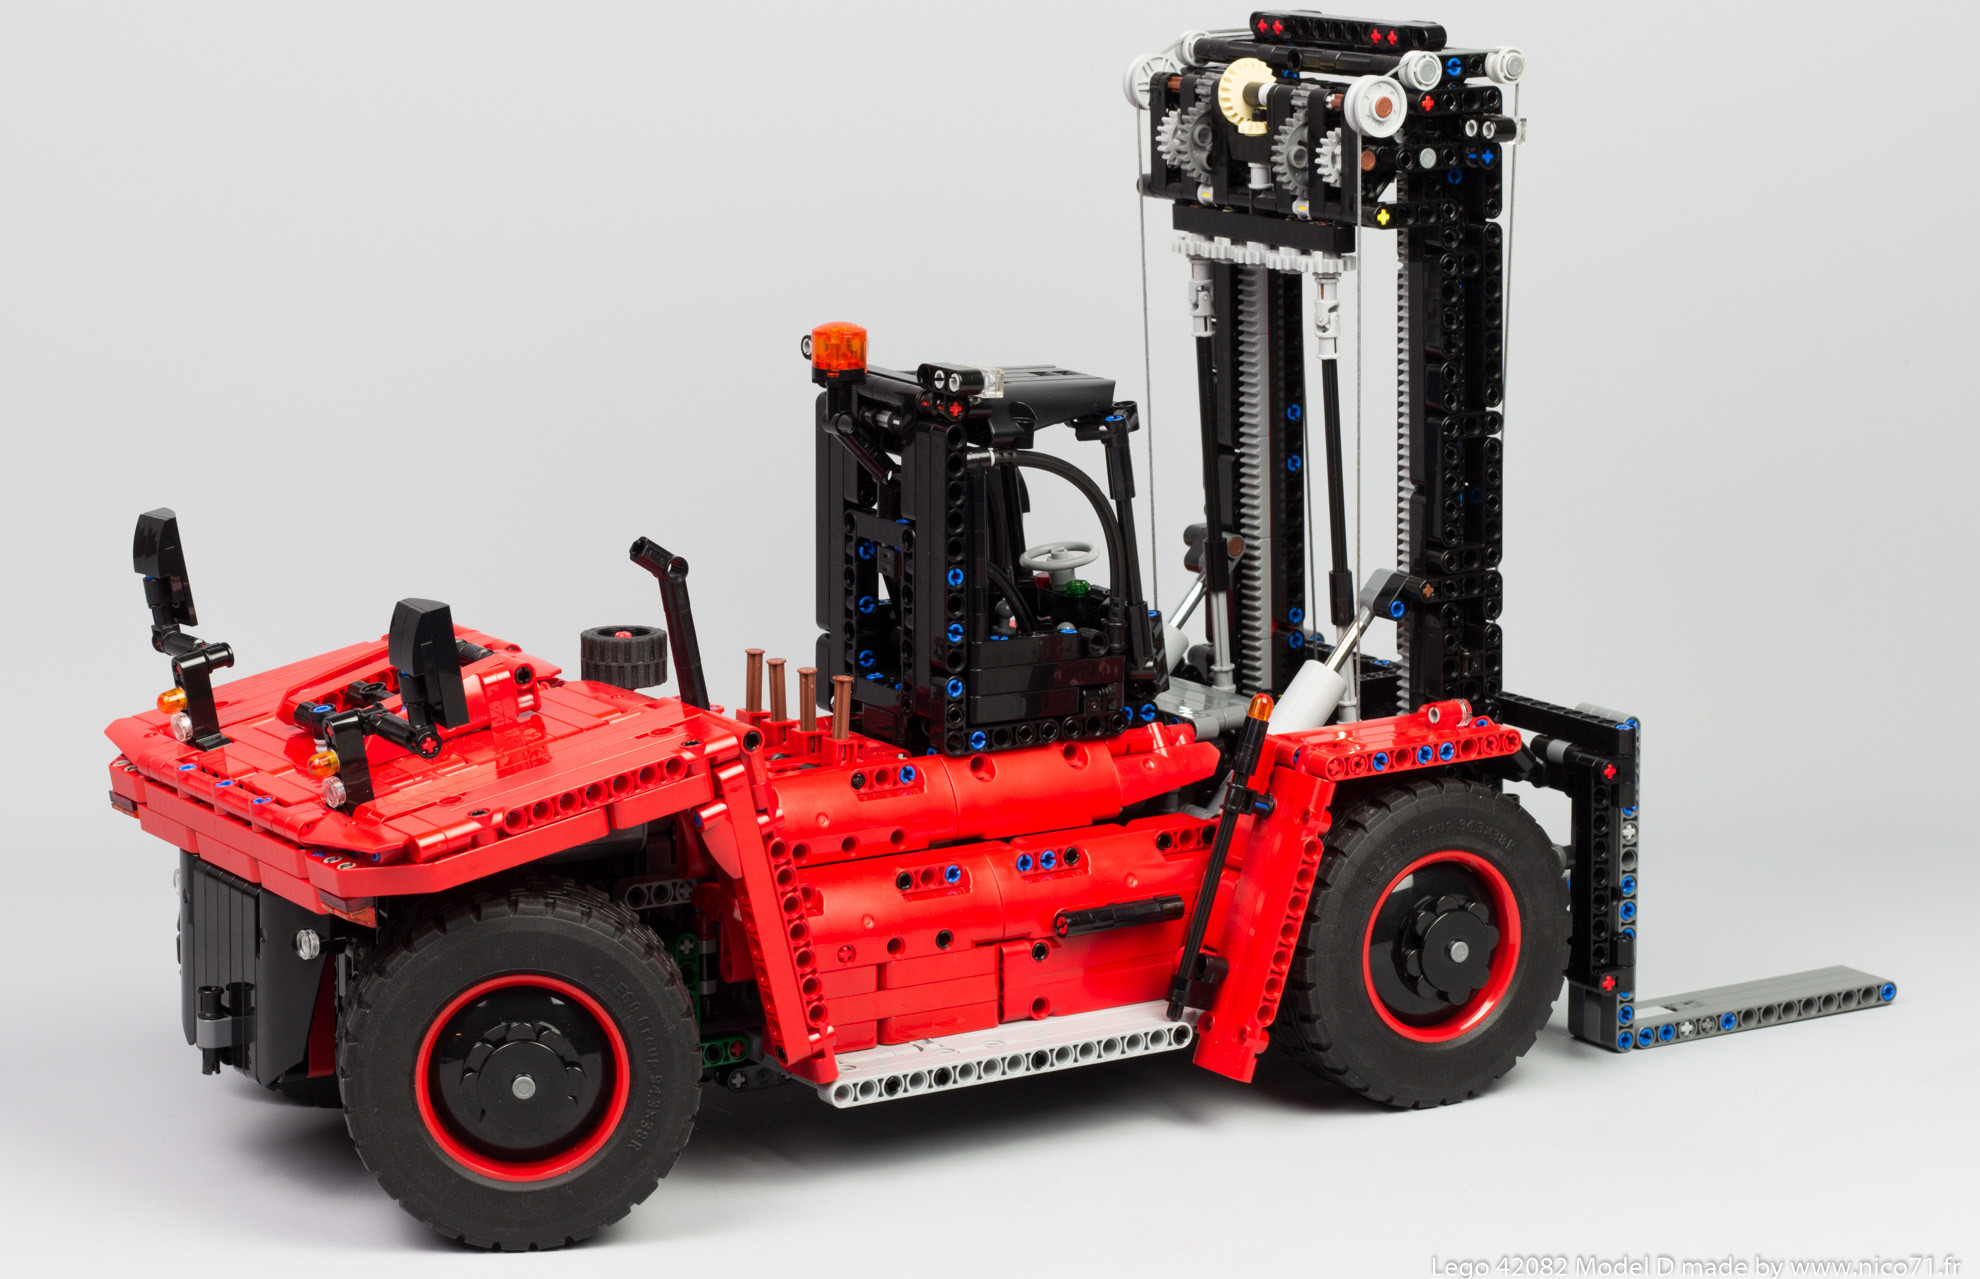
42082 Model D – Forklift Truck
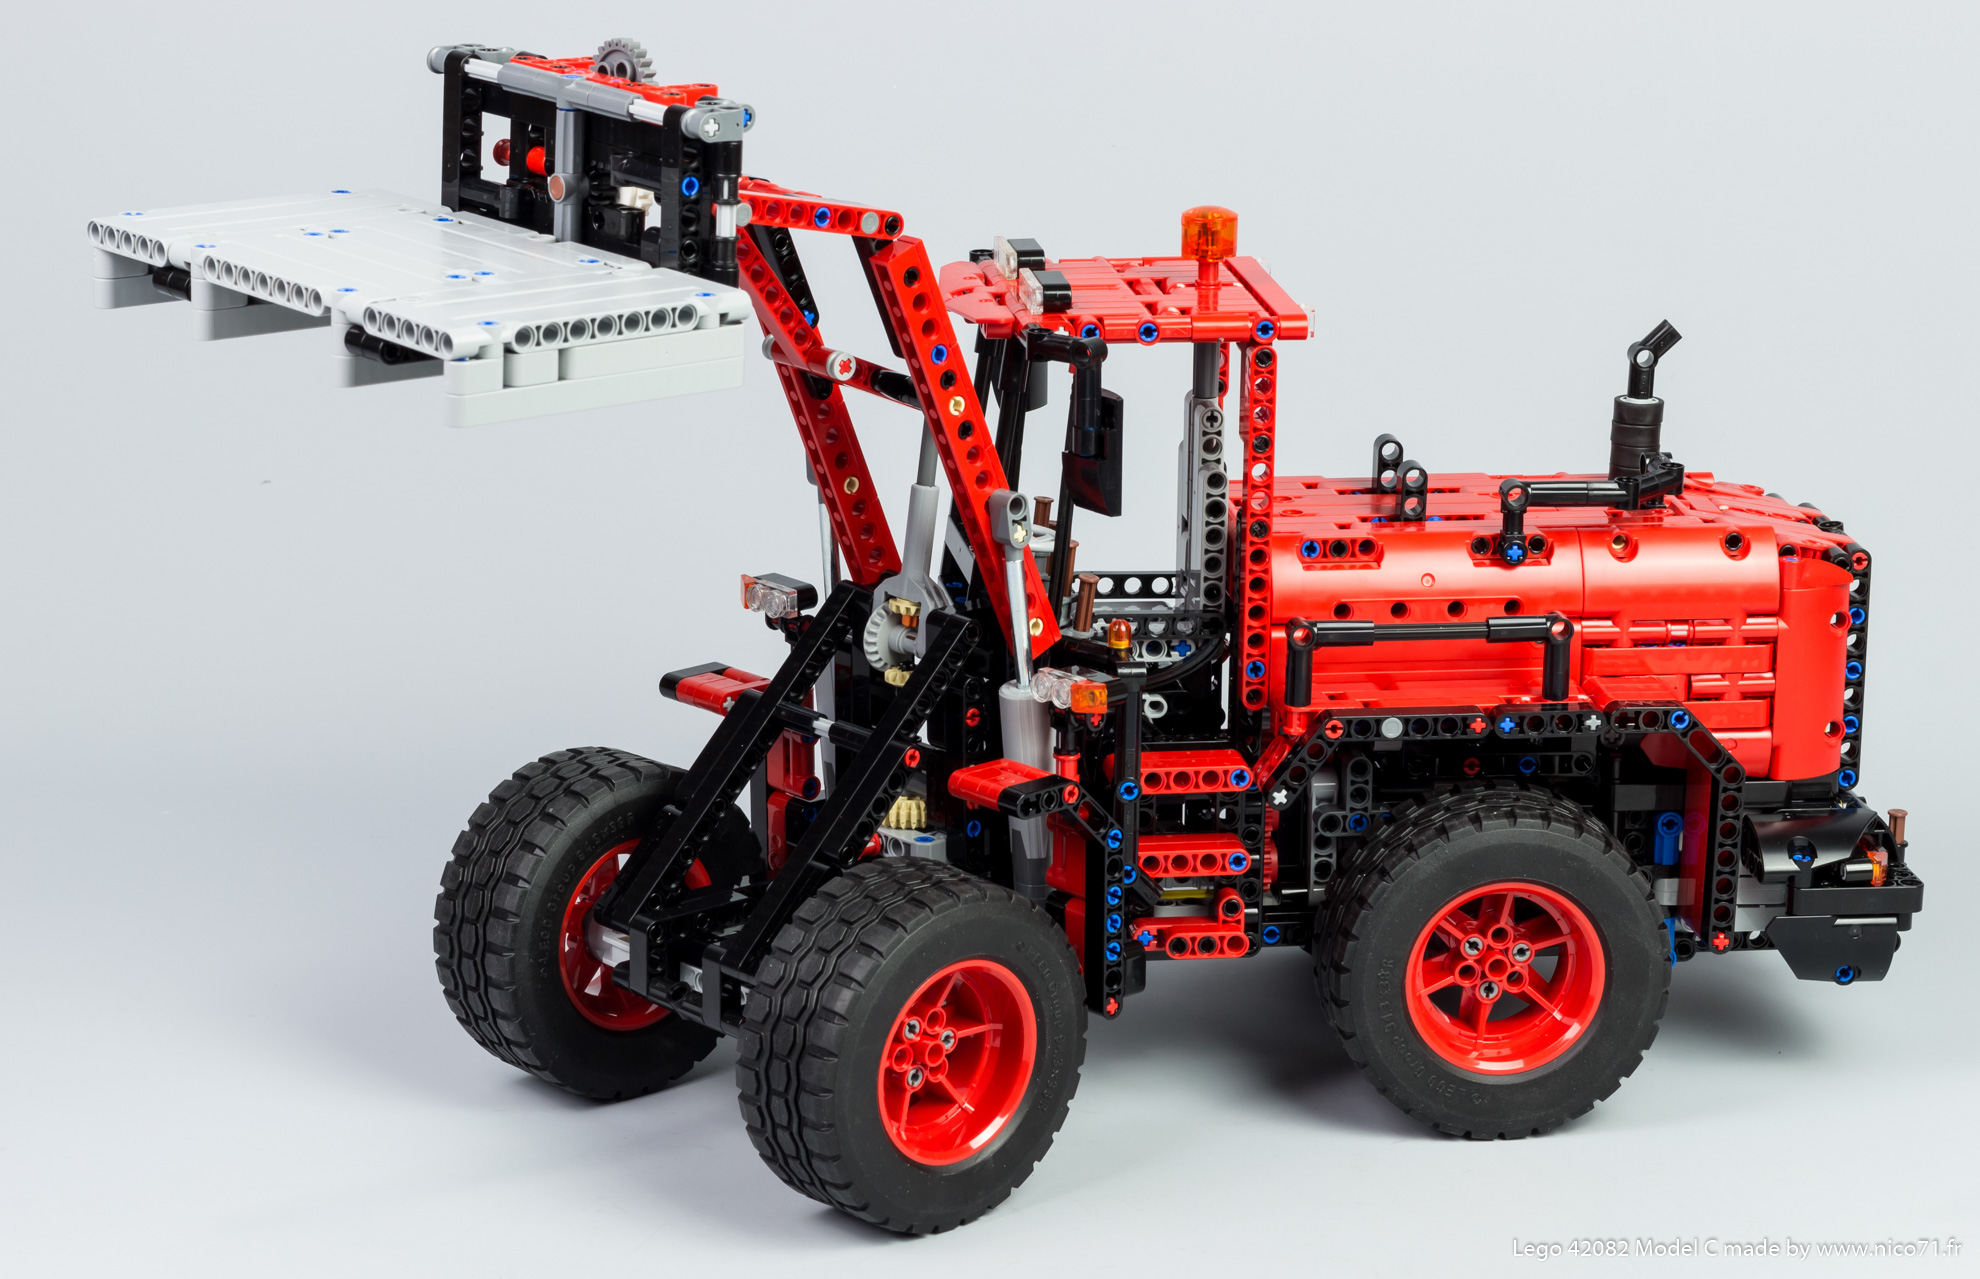
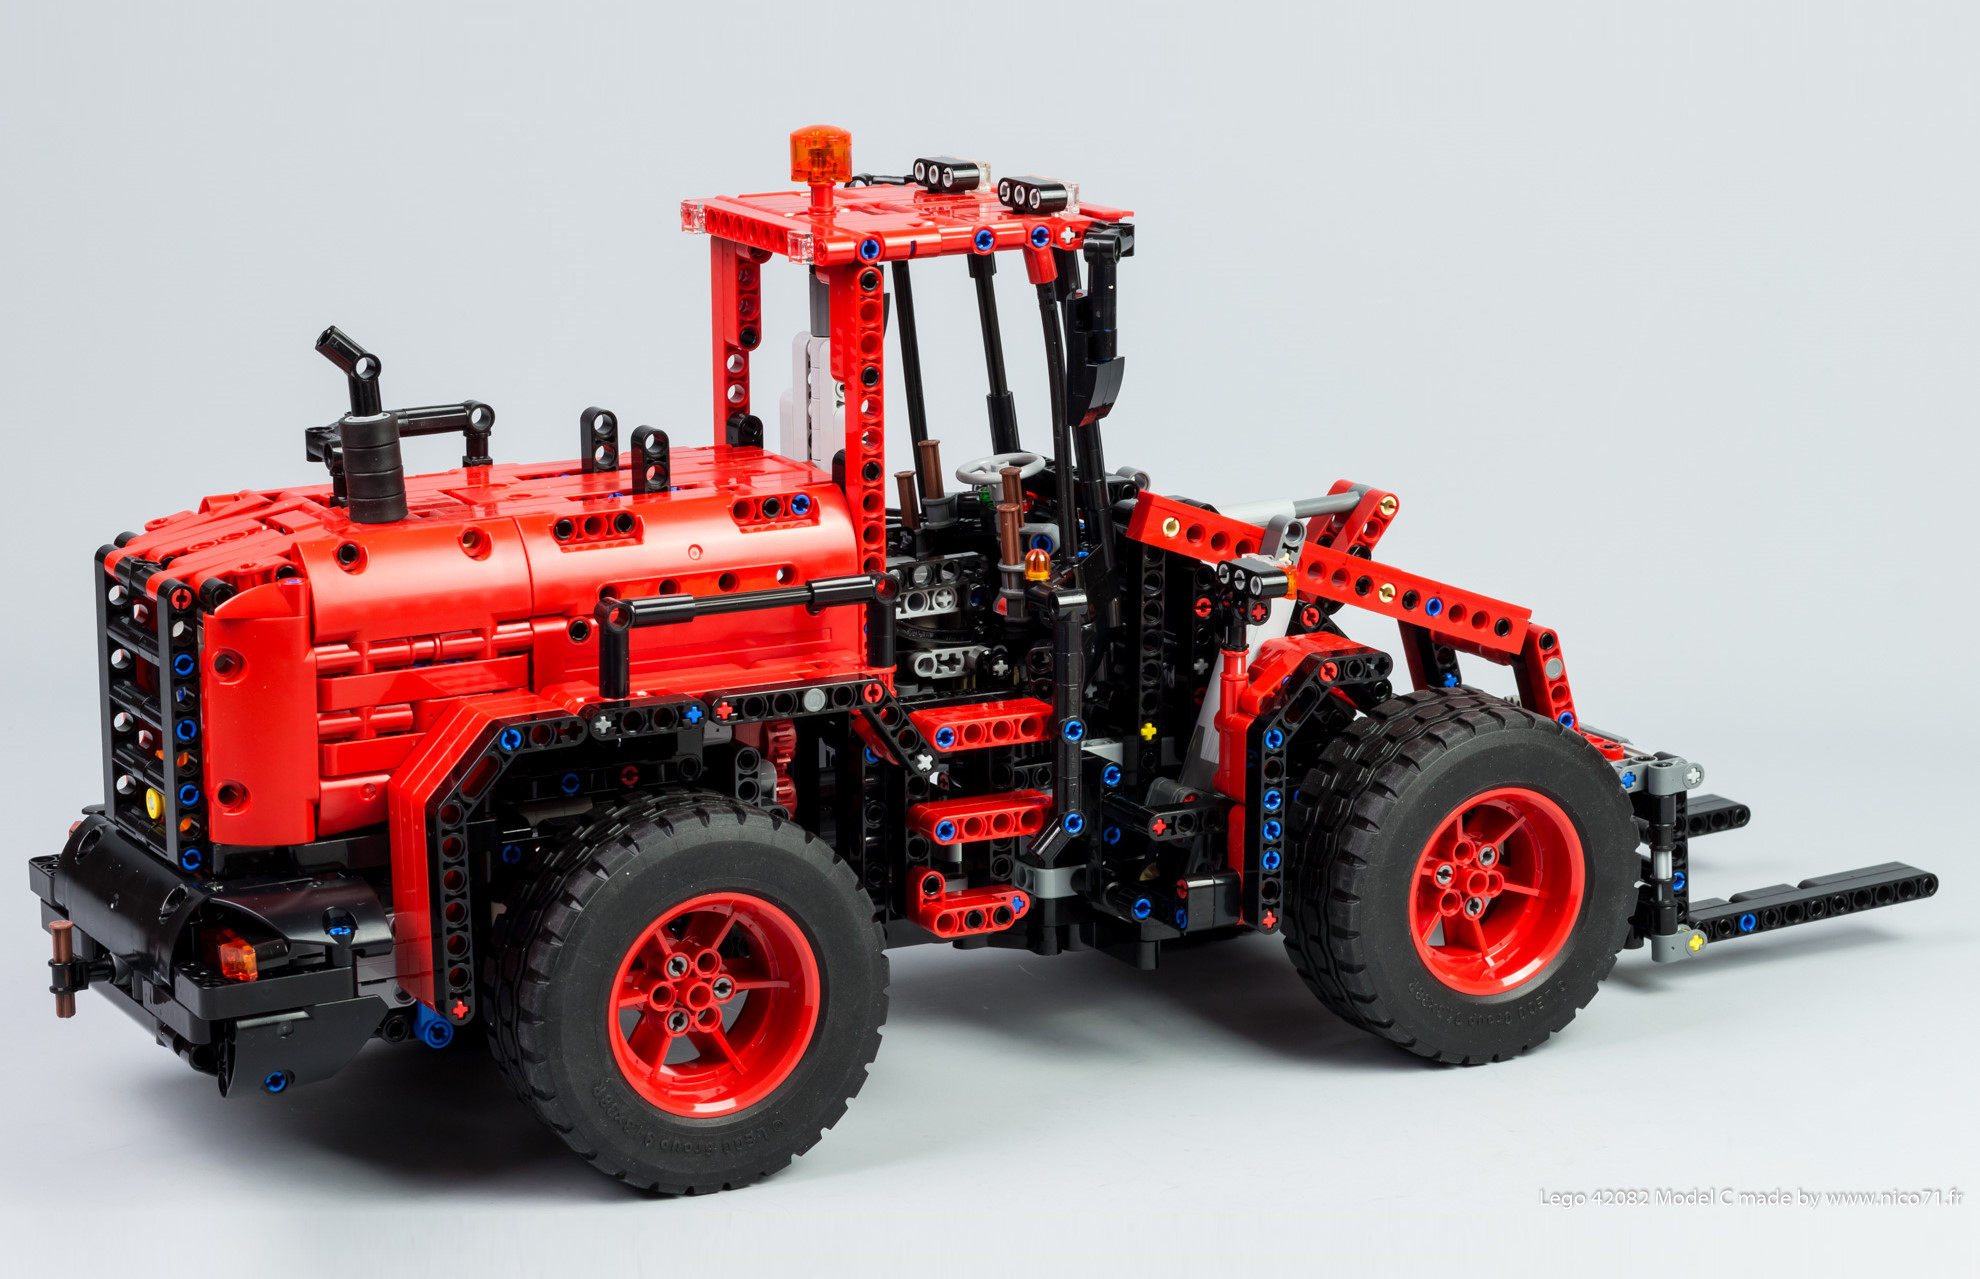
42082 Model C – Wheel Loader
Background
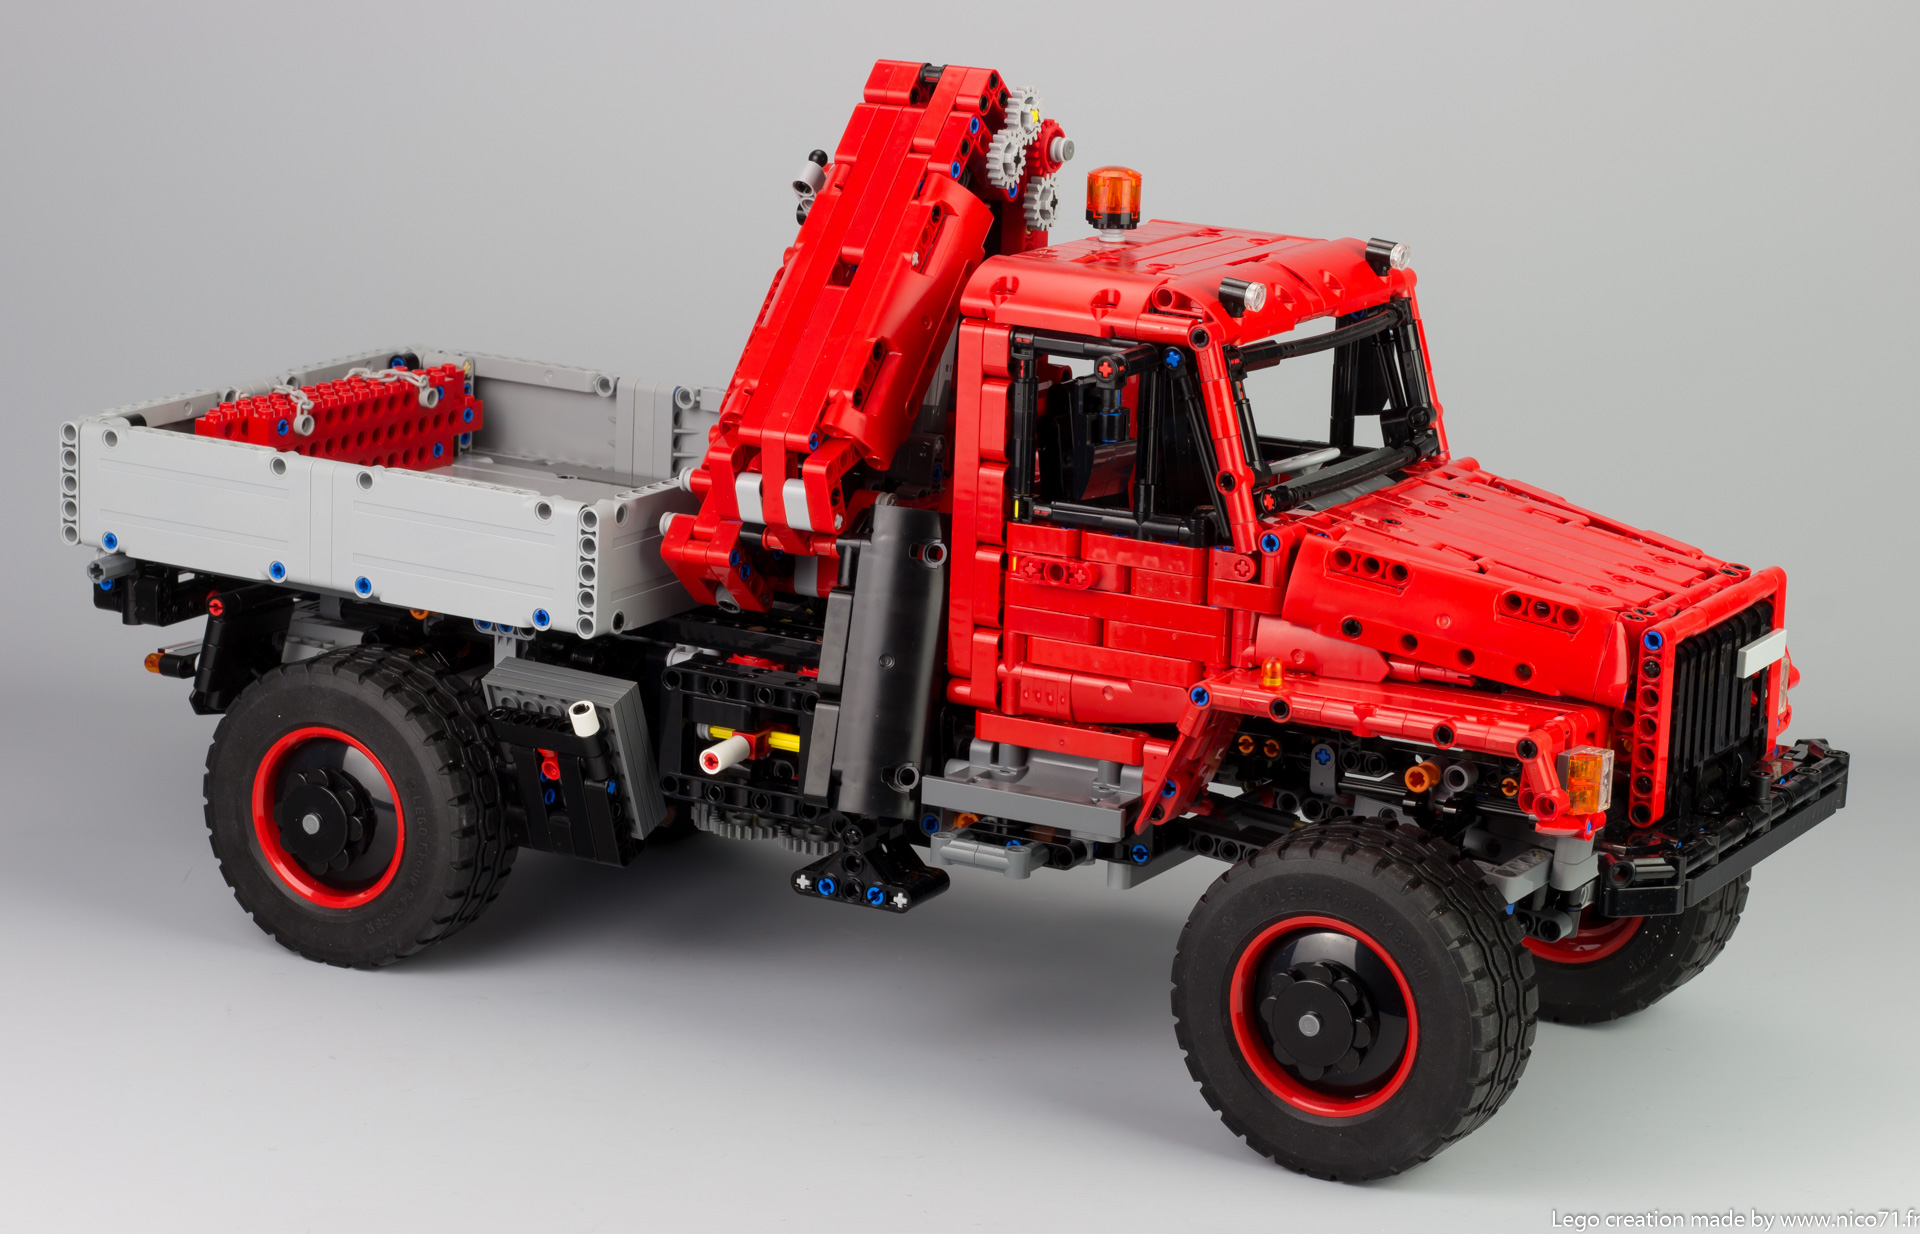
After developing the C and D-model for the 42082 set, I took a break to work on designing other machines, but returned to focus on this set after some months. I discovered a nice C-model build of the 42082 which inspired me, but it included some parts not included in the original set. Initially, I wanted to design a Unimog, but the result would have been too similar to existing designs seen on the Lego Technic Channel, so I decided to search for another truck. I settled on the goals of designing an off-road truck equipped with operable tools like a crane or tipper. I found the Gaz Sadko, which was a perfect fit for my requirements. The chassis, nose and cabin looked proportionally large enough to fit Power Functions within the model.
Functions
The first C-model I designed for the 42082 set has two motorized functions. The D-model has four, and this E-model will have one more, for a total of five. There are many non-motorized details as well. Starting with the manual functions, the truck’s steering is operated by the beacon atop the cabin, which also rotates the steering wheel. The engine rotates under the openable hood, and the doors operate as well.
This truck is equipped with a lockable leaf spring suspension system. The 42082 set does not include any springs, so I’ve used Technic axles which are somewhat elastic under load. To prevent the suspension from sagging over time while the vehicle is on display, orange pinbushes lock the suspension to the chassis. The suspension’s travel is short, but provides a nice off-road feel to the model.

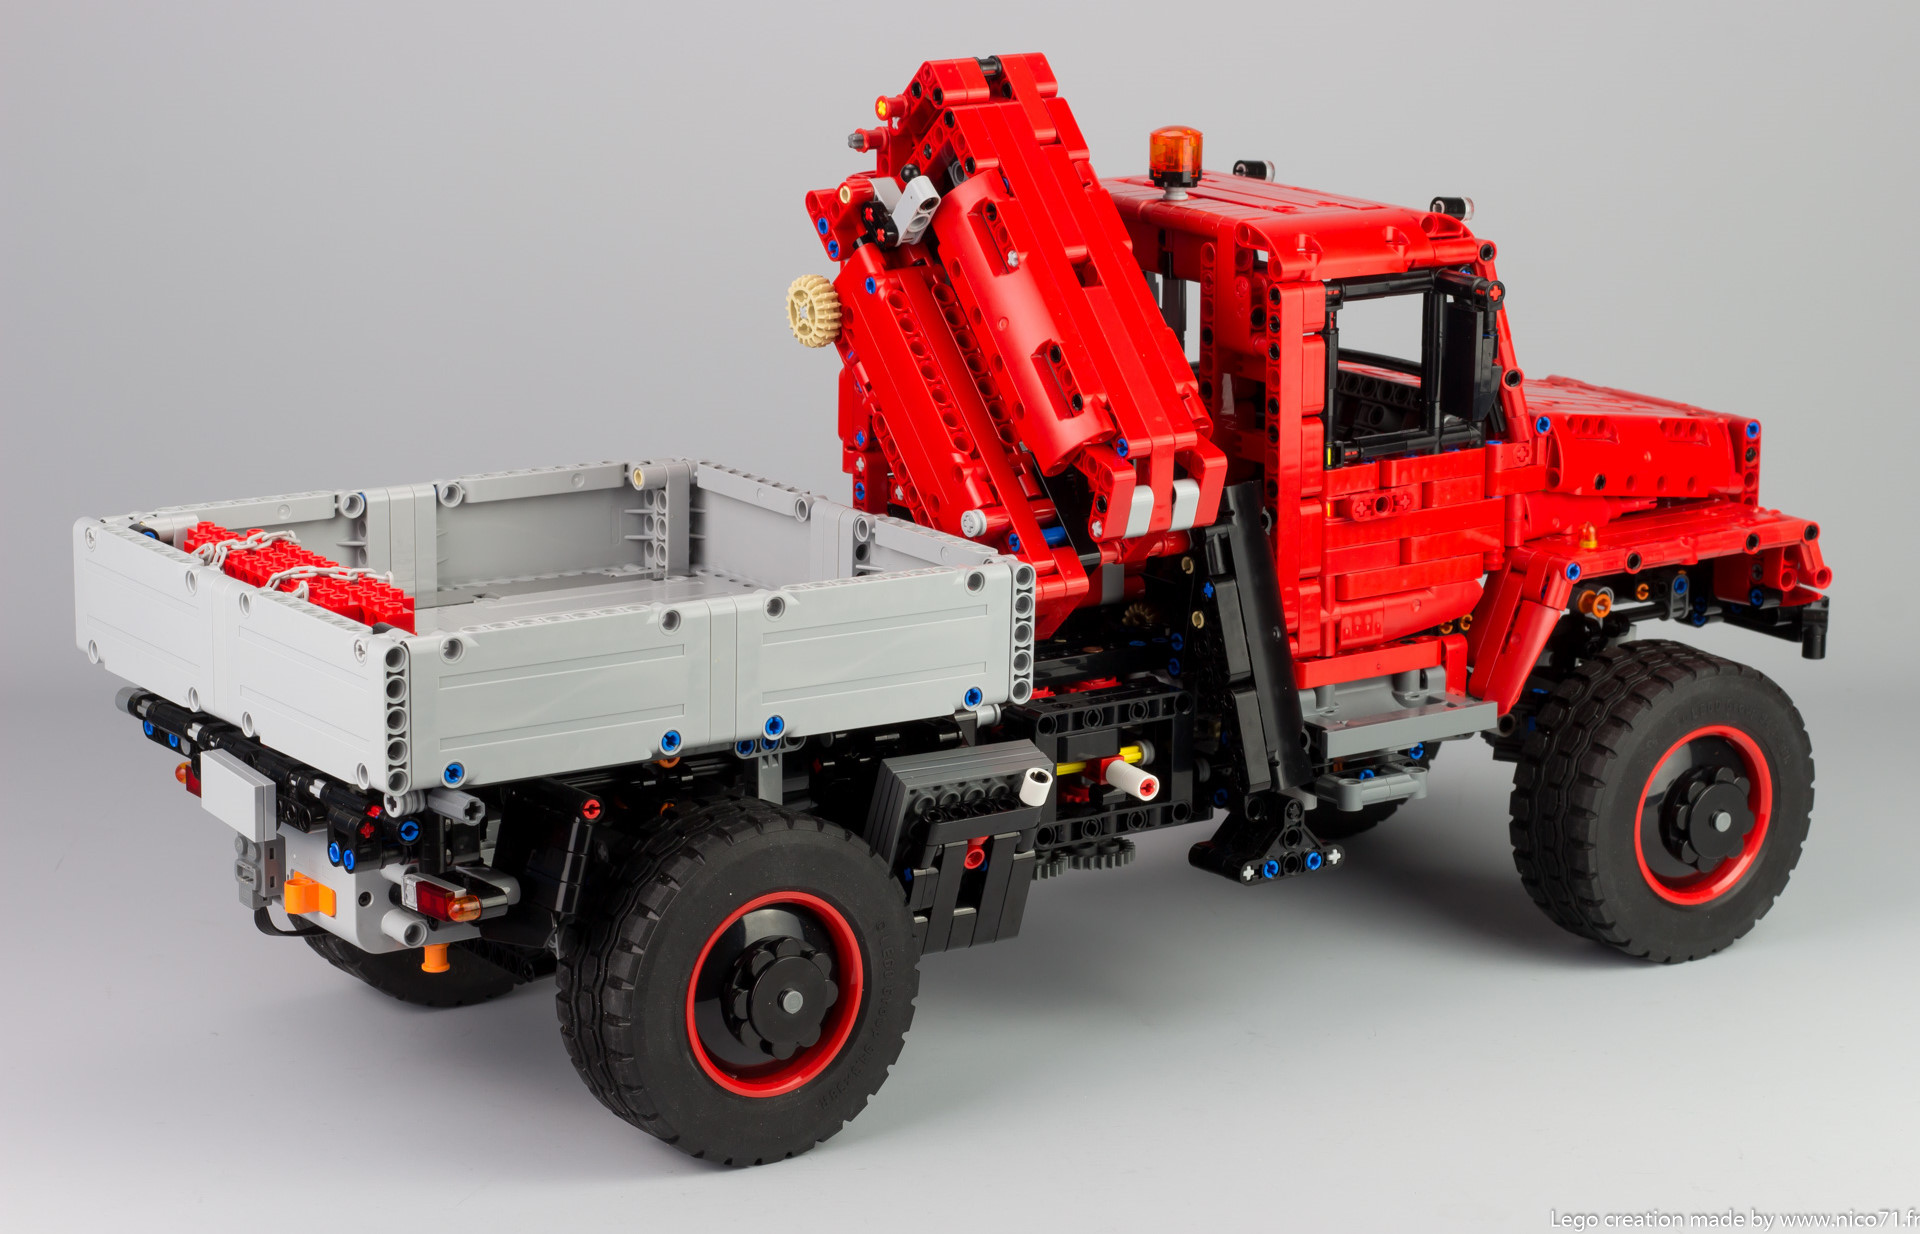
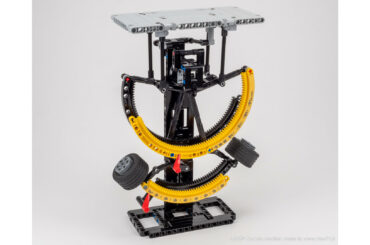
Moving to the remote-controlled Power Functions, they are driven by a single motor, which distributes power to three gearboxes associated with different functions. The motor can drive the manipulator crane, outriggers, and tipper depending on the gear selection by linear actuators. The first group is located at the right and operates the manipulator crane with two linear actuators and a turntable. The second group of gearbox is located on the left and operates the outriggers and the tipper, both with mini linear actuator. The manipulator crane is an inspired and modified smaller version of the 8258 set, with manual extendable boom with fixed hook.

The tipper is an interesting feature, and was the first time I designed a double-sided tipper with an articulated dropside. For tipping, a center actuator raises the tipper with rollers, and movable locks set the pivot points of the tipper. These locks allow the tipper to tip to the side or to the back. Therefore, either the tipper is dumped at the rear by unlock the side lock and lock the rear one, and dump at the side by locking the side lock and unclock the rear one.
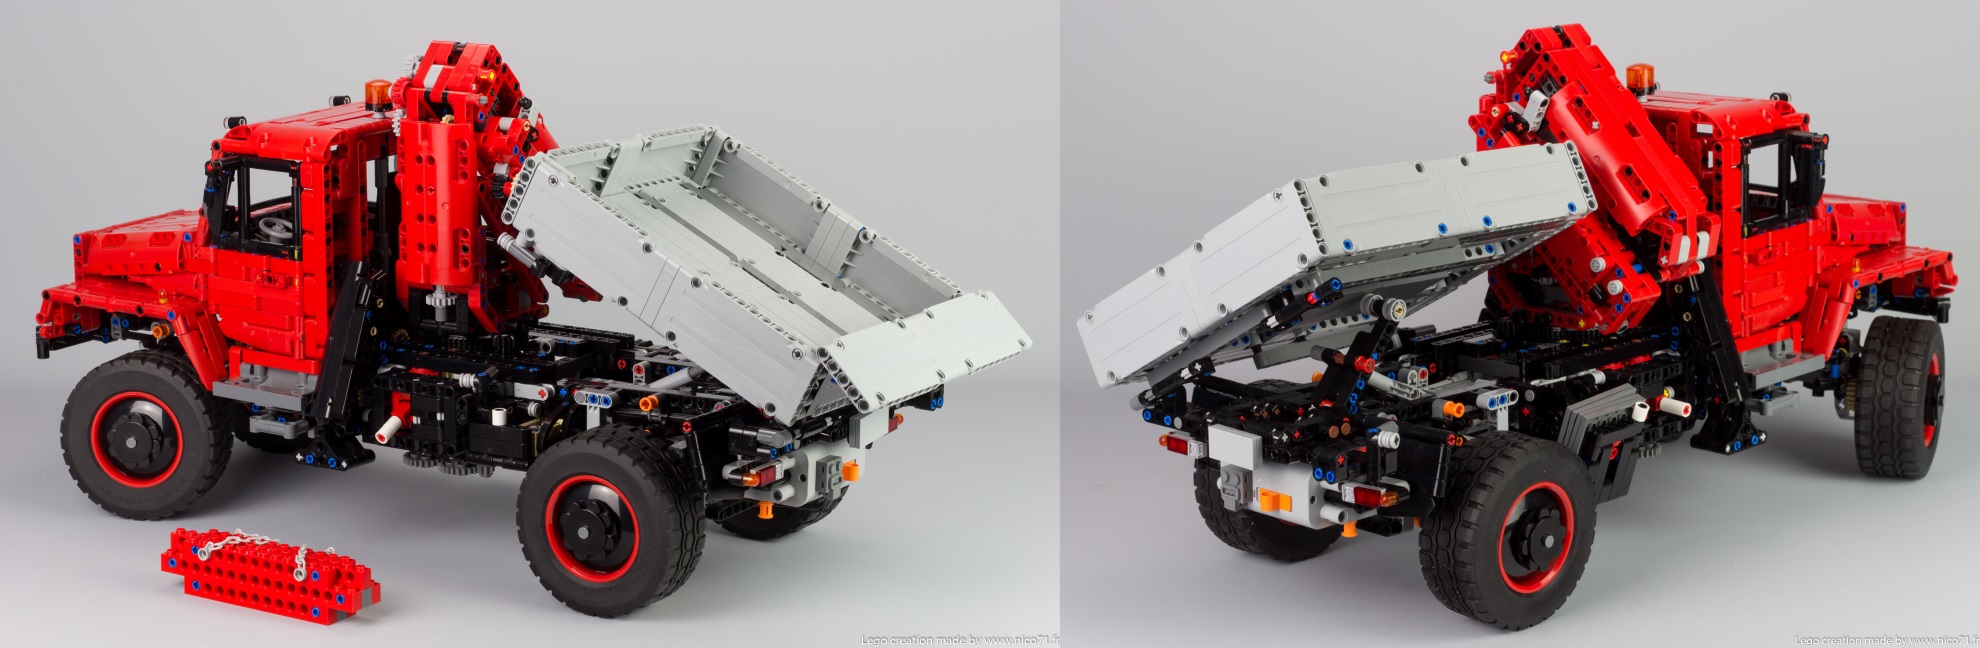
Two pads for outriggers are stored on the right side of the truck in a lockable box, and a compartment on the left opens to reveal two toolboxes. Here is the mechanism:


Design
I’m very happy with the resulting design. I think that the vehicle’s aesthetics are as important as its included functions, and with this project I tried to make the truck look as close to the Gaz Sadko as possible, which I think is a very powerful look. As the inventory of red parts from this set was limited, I designed the crane and cabin to validate the possibilities of the design. Once I was satisfied with the overall shape of the body, I designed the chassis of the truck and its integrated functions. I would have liked to include a powered front or boom winch, but ran out of space. To match the Sadko look, I used curved panels on the cabin and nose, and a Bionicle tooth to round the hood and mudguard. Details like the front grill, bumper, mudguard, ladder, light, beacon, and interior contribute to the richness and authenticity of this model.

Pictures and Video


Building Instructions
This E-model uses 2,697 of the set’s 4,057 parts (65%), and the instructions are 687 pages long, making this the longest instruction set I’ve ever published. As usual, the instruction manualis a step-by-step, high resolution PDF with a parts list included, similar to official Lego set instructions.
If you own the #42082 Lego set, you have all the needed parts already! The exact parts list is available on Rebrickable:
Instructions are available for 15€ via this button. You can also purchase the C and/or D model with a bundled discount! (15% off of 2, or 20% off of 3 PDFs. Offer valid for all nico.fr instructions).
Direct purchase of the instructions (All alternate model I have created with the 42082 LEGO Set)
42082 Model E – Offroad Truck
42082 Model D – Forklift Truck
42082 Model C – Wheel Loader
Price list for example (excluding tax) :
- Model C + Model D or Model C + Model E = 21.25€ instead of
25€(save 15%) - Model D + Model E = 25.5€ instead of
30€(save 15%) - Model C + Model D + Model E : 32€ instead of
40€(save 20%)
After your payment, you will be redirected to a page for downloading your instructions, and will receive also the link to download by email. Please check the spam box and be patient to receive it. If you have trouble to download your copy of the PDF after payment or open the document, do not make a paypal dispute, please contact me using the contact form. The link to download the instructions expires within 24h. Contact me if you have lost your instructions. Note that you can print it, but not copy or distribute. Thank you for supporting my work 🙂
Changelog :
- 25/04/20 : Correction on the left leaf spring suspension page 65
- 30/04/20 : Correction on the hole used for fixed the linear actuator on the tipper lever, page 302.

(19) Comments
Hello Nico,
You did a really good job. I bought the 42082 specially to build your MOC. A nice challenging build with really good instructions. Keep up the good work??????
Hello, thanks for the tips ! Indeed, this is normal in the endstop of the linear actuators. If it is a bit too hard, it can make rotate the assembly instead of simply disengage the linear actuator.
Thanks for a great model that was fun to build and also a challenge.
However, I had a small problem. When I ran the arms on the crane, it tends to rotate. Especially when it comes to the end positions. I can not see that there is any locking mechanism on the rotation. Maybe I did something wrong?
Now I have made a small modification and placed two “32270 Technic Gear 12 Tooth Double Bevel” on friction pins that engage the rotation platform. See picture: https://drive.google.com/file/d/1Qg7wreB7KEumgZr-FT2-dkhKWp2r0Np9/view?usp=sharing. It creates an extra resistance for the rotation without hindering it. This has largely solved the problem.
I see that there are not two of these gears left over from the original set, so you have to have two lying in case.
Hello, thanks for your purchase and your comment ! Regarding the outrigger, sorry I have no clue to solve this, as it is thin, so in normal functioning it works well but do not handle lateral force. For the clutch, every actuator have internal clutch, but If you do not like the “gzzzz” sound they make, you can replace the 24t gear underneath by white clutch, but you will have less force on the arms and other device. So I advice to change only the right side (arms and rotation) if you want and keep the left standard (outrigger and tipper).
Hey, I have bought the instructions and successfuly built the model. It looks great!
I have couple of points to feedback:
– I find the out-triggers extremely fragile, they often fall apart (exact one part)
– is there a way you could add a clutch to the drive system, so we don’t need to fear of breaking something?
Great job man, looking forward for you next models 🙂
Best,
Hello, thank you for your comment ! I am sorry for the gear falling, as written in other comment, I have not this problem on my model but you can build a frame underneath if you want as shown on picture in rebrickable. I will answer to your other proposals :
-I highlight every new parts now on the instructions with red edge, indeed, it is clearer to see where the parts goes (you can see on the example on my last creations).
-I usually build in submodel as possible, in order to assemble many submodel to an other submodel and then to the model (it is called callout building), and I point the arrow of this callout where the submodel is connected to the model. I do not use arrow between parts and model as it requires a lot of work to do and this is not necessary for building (it is called a buffer exchange).
-I usually doesn’t build with floating parts, if yes, I put the peg/pin which attach the floating element directly to the page in same time in order it is locked, but if necessary, I could add temporary pin/bush to lock it and remove after. This is also a buffer exchange and require lot of time to do !
so let’s say that I always increase the quality of the instructions, but in focus to be not as simple as Lego do, to propose a appropriate challenge according the level of the creation 🙂
Hello and thanks for this wonderful build!
Although, the first time I broke it to pieces from frustration, probably due to the large cog falling from below, this time I added some extra pieces to provide rigidity, but I see you are already aware of that.
Anyway, I would like to add a couple of suggestions regarding the instructions. I don’t mind the one-pagers for single pieces, but what I really love about the original Lego instructions are the following – don’t know if your software supports them, but if it does, please use them.
– In certain cases, the newly added parts are highlighted in bright green color
– When large connections occur, using an understandable angle arrows are pointing to the connection points/holes. In this set of instructions I had to check several times and figure out how the connection occurs.
– In certain scenarios, where pieces are ‘floating’ and you have to hold them with your hand until you properly connect them after several steps, consider adding ‘temporary’ bushings, and ensure that instructions dictate to remove them when necessary.
Thanks !
Hi Nico. Continued success in your projects! I look forward to seeing what else you come up with.
Hello ! Thank you for your comment 🙂 I will answer some point :
LEGO rule Nr.1 “if you need force, you are doing it wrong” : I agree with that but I do not consider it forces when you use the play in lego. But I know that on the lockable suspension it is a bit tricky but as it is used only for display the model and not the functions, it were “acceptable”. Regarding the building step, this is the best I can do with the original design, if I want to modify it, I have to rework completely the design. An interesting note is that I have seen some people build the model in real and not use correct technique to assemble parts. For instance, force on pin instead to search the hole alignment and then push it, use fingers to hold the parts though the chassis instead of letting fall the parts in this place and put the axle for instance or move something on the assembly (functions) instead letting it as displayed on the instructions. I do not know you use the wrong technique, but this is just to say this point is very subjective and dependant of builder skills.
Bad : I am considering make a V2 to put this beam to prevent the gearing slipping because some people have the same problem but I do not understand why because I had not. As I said, I would have do something if I had the problem, so maybe I will change the design and make a rework on it.
Regarding building instructions, I totally agree with the zoom, I would be able to do it, but the software do not authorise it yet, I know stud.io do it but stud.io is a poor instructions makers (no flexible parts, not buffer etc). As soon I have the possibility to improve it, I will. Regarding the single part step, I choose this because of readability because some people complain it was too complicated and too small (they do not want to zoom on computer for instant or on tablet), so as soon I can make a subassembly I do with callout which is very nice to build, but when I have to display the whole assembly, I use the callout structure to put arrow on the parts to add which give often a part by step. But for this one, it do not represent many step (maybe 100 of the 600 pages). It is slaos more stable for me to work like that to avoid the problem of software bug, the more I have view on page, the more the software can bug and display wrongly the assembly.
Good : thank you ! I hope you have enjoyed the building despite those points 🙂
Additional ideas : I think the speed is good, I have no problem to operate the functions even in end stop. Of course you have to know in which way each functions work. The top of the top would be to make the same functioning on the switch as the 8480 with rubber band, to make a return to centre but I have not figure out with the room and part I have.
I personally hate sticker so I do not use it, and therefore I do not take care of it during design, but I think I should as many people use it. It is also a thing which is not very interesting to think for me (in terms of design) and if people like to find which parts to reuse the sticker or hide them, I can let them figure out. I have seen very nice Model E with good sticker placement. So I assume I have to take care when the sticker is really important (like an indication on a tile, or on a big single panel like set number on the 42100 liebherr) but also let people figure out.
Hi Nico,
I know that quite a few negative points will follow but they are my real life experience. All and all I am very impressed with the model but it have its quirks.
So here goes the good, bad and ugly review.
Ugly:
My only real issue with the build. At few places it violates my LEGO rule Nr.1 “if you need force, you are doing it wrong”. In few steps you really have to use force or bend the structure quite a lot to connect some subsection – mainly during building of the chasis. In my opinion it should realy be avoided (by rearanging the building steps).
Bad:
Same experience as Nikolay with the falling gears and loose support legs. I noticed the shafts holding that gears are quite worn off – it seems there are some radal forces involved but hard to tell if from model design or inaccuracy of wheel dimensions. The support legs should use different solution…
Building instructions are not so great this time (when compared with the C model for example). There are sections with lots of consequent “add a single part” steps that could have been joined. On many places zoomed out picture of whole model is used instead of detail and its hard to spot what changed. Sections with missing and reapearing peaces between building steps.
Steering is quite stiff especially when truck is not moving.
Good:
Challenging but satisfying build.
Great looking model with lot of details and accessories.
Tons of functionality.
Lots of great ideas and inovative building techniques.
Additional ideas:
It would be worth to slow down the motorized functions a bit, or guard some of the axis with the white slipping wheels – movements are relatively fast and it is easy to hit mechanical end (it is general problem of most mechanized LEGO models though).
You dont take into account that people have parts with stickers from the original model. They can be used on quite meaningfull places and add to models aestetics only builder have to think about it in advance. But from what I see on your other creations you are “LEGO purist”, right 🙂 ?
Keep up the great work.
Thanks for your comment ! The slipping gears problem is very strange as I have not problem with them on my build (my parts are not new), if so I would have do something to prevent it for sure ! Regarding the attachment of the crane, yes it is simply attached with 4 pegs but as it is not very powerful, you can not lift heavy object. For now, I do not know how to enhance this point as there is not many room to fix it.
Hey Nico, i was really enjoyed to build this model, it was completely different experience than official lego set. I really like the attention to detail, model looks very impressive.
But maybe i can offer a couple improvements:
First, I added two beams below mechanism for holding gears, without them, gears loose over time.
And Second, I think a different attachment of the extendable crane supports is necessary, because in the current version they are not able to withstand any additional weight.
Anyway, thanks for your work and I so exited to build your next model:)
[…] https://www.nico71.fr/42082-e-model-offroad-truck-with-manipulator-crane/ https://rebrickable.com/mocs/MOC-40482/Nico71/42082-model-e-offroad-truck/ […]
Hello, thank you for your words, normally the update is automatic. I have resent the purchase receipt manually, I am sorry for the trouble.
Hello
I bougth the instruction on 27/04. I noticed you rrleased a correction on 30/04 but i didn’t received an email of update of this. Have I to expect it when there is an update automatically from you or have I to ask for it?
I take the occasion to make my compliments for the truck model. My son (7 and 1/2) made it and it is enthusiast. Very nice work and i recommend to all! Thank you
Hello, thanks for your comment ! For now no F model is planned but I want to make B model for the 42093 Corvette, 42100 Liebherr, and the Chiron. I am not fan to take many set to build big constructions, in fact neither big creation for only purpose they are big (like the peterbilt with 10cm wheel, it will be massively empty).
Hi Nico,
first of all, I love all of your 42082 alternate models.
The original 42082 is good, but not the greatest technic set of all time.
I wish to be as creative as you and your team are in creating these vehicles.
I´m not but gladly you are so I can rebuilt your fantastic creations.
Just look at all these great technical functions in your works, that’s an engineering masterwork.
I bought three of the 42082 last year when it was on sale after you revealed the C-model to build the original and your C-model and keep one for upcoming projects and I´m happy now to be able to rebuilt all of your alternates together (and forget the original a-model).
Any plans to make an F-model in the future ?. Then I have to buy another one.
I would like to see what truck you would build if you take two or three of them like an American longnose truck like the old peterbilt with or without trailer.
Or what about the original 42082 A-model but with up to 6 axles and a driver cabine like the Liebherr LTM 1300 or such things.
Anyway keep going on with your great work.
Lego should contact you to make your creations official sets, they are foolish not to do.
Thank you for many happy hours by rebuilding your creations.
Greetings from Germany.
Dirk
Salut Nico,
Voici encore une superbe réalisation utilisant les pièces du 42082, je pense que, cette fois-ci, je ne vais pas pouvoir résister… dès cette après-midi je vais télécharger ton instruction en PDF et dès demain la grue va redevenir un grand tas de pièces.
Merci pour ton travail et heureusement que des gens comme toi pensent, et ont le talent de concevoir des modèles alternatifs ?
Comments are closed.