A new small mechanical loom which weaves fabric using 6 reels, faster and more reliable than the previous one, including a many asked computing renderer building instructions !

How to build ?
If you have already the parts : you can purchase the PDF instructions only on the shop and build it with your LEGO parts. The instruction contains the partlist at the end, and you can check individually on Rebrickable, or in the instructions previews below.
If you do not have the parts, you can purchase the complete kit from two different retailers :
- Using Genuine LEGO Parts : This model is available on Buildamoc in a complete package including genuine LEGO parts plus the PDF instructions.
- Using non-Genuine LEGO Parts : This model is available on LesDiy Store in a complete package, including the parts (alternative bricks from China) and the PDF Instructions.
Please note that you can use any rubber band you want, as they are 2x2L lenght (arround Ø16-20mm) in rubber. You can also use any power functions motors you want, the loom has been tested with M, L and XL motor.
Direct purchase of the instructions
Small Mechanical Loom
Preview of the instructions at the end of the article.
Context
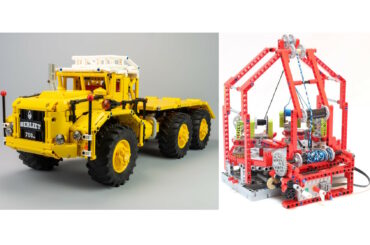
After succeeding in building my previous mechanical loom for the 2011 Fana’briques exhibition, I was proud to solve any problem I had with this construction but some points were not as I wanted. first of all the speed, even with a good motorization, at the high speed, the loom remains a little bit too slow. Then, the reliability, the loom was made with 2000 parts with a lot of lever, connecting rod, rotating mechanism and still deserve fine tunning to work well without monitoring. To overcome this, I built a limited torque system to prevent damage on component when problem occurred. Since 2011, I was looking for for a new loom, faster and more reliable. But there is impossible to think that with the same mechanisms had used in this loom that it can be possible to obtain what I want. That is why, I decided to build this new loom by keeping the good mechanism which works fine and design new one for improving reliability and speed. Today, I present you the final version of my new small mechanical loom.
Basic Functioning
The basic functioning remains the same as I have already described in the article of my previous loom. I encourage you to read the article on Wikipedia : http://en.wikipedia.org/wiki/Loom it explains very well the functioning. Which iscomposed of:

- The heddle frames move up
- The shuttle moves from righ to left
- The reed moves and press the weaving pattern
- The heddle frame moves down
- The shuttle moves from left to righ
- The reed moves and press the weaving pattern
You will not that there is 3 basic motions which had to be sequenced : the up and down movement of the heddle, the right to left movement of the shuttle, and the front and back movement of the reed. Of course during all this sequenced actions, the reels is slowly rolled out.
How does it work in Lego Version
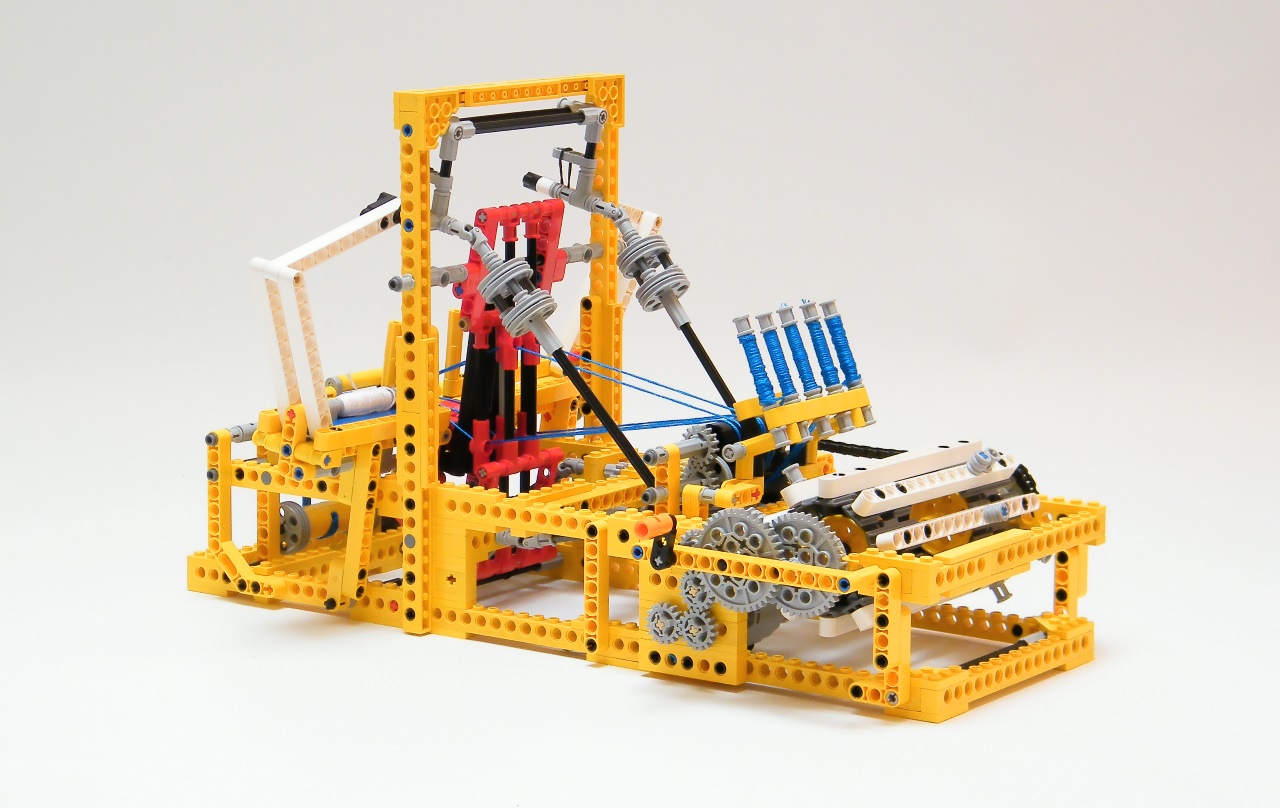
Now I will present the different solution I have used to make the movement. The heddle frame is composed of two frame which supports 2 of 3 string, and are connected together with a beam. This beam rotate to cross alternatively the string from the up to down and so on.
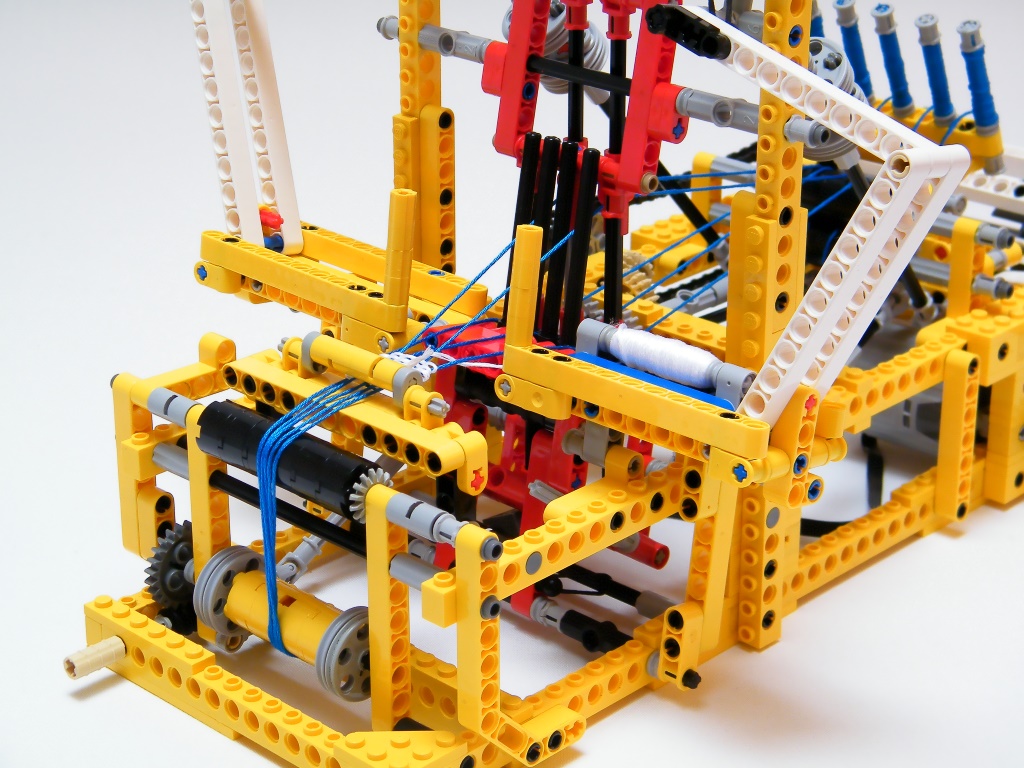
The flying shuttle displacer is the same thing I have used on my previous loom, on each side, there are articulated beam connected to an axle which can rotate. When this axle is rotated, the first beam section pushes the second, which pushes the shuttle. The articulation of each section is important in order that the shuttle displacer push the shuttle inside the string but without touching them.
Then, the reed is simplier than on my previous loom. Rather than building a dedicated system which move the reed independently of the main movement of heddle frame, this is the heddle frame which moves the reel. In deed, a connecting rod is connected from the heddle frame to the reed, ensure that the pattern is pressed when the heddle frame rotate.
Now the important new features is the sequencing of the whole movement. On my previous loom, I use simply dephasing axle. First instance, on the first 90° of rotation of, the main axle, the heddle frame was operated with the reed (with a small phase shift for the reed), then, on second 90°, this is the right shuttle displacer, next the 90° was for the heddle frame and the last 90° was for the left shuttle displacer. The problem is that the movement was too continious and not enough impulsive. Combined with a classic lever and connecting rod, the system can not run very fast because I was limited by the continuous movement effect. That is why I decided to redesign completely the system which sequenced the loom.
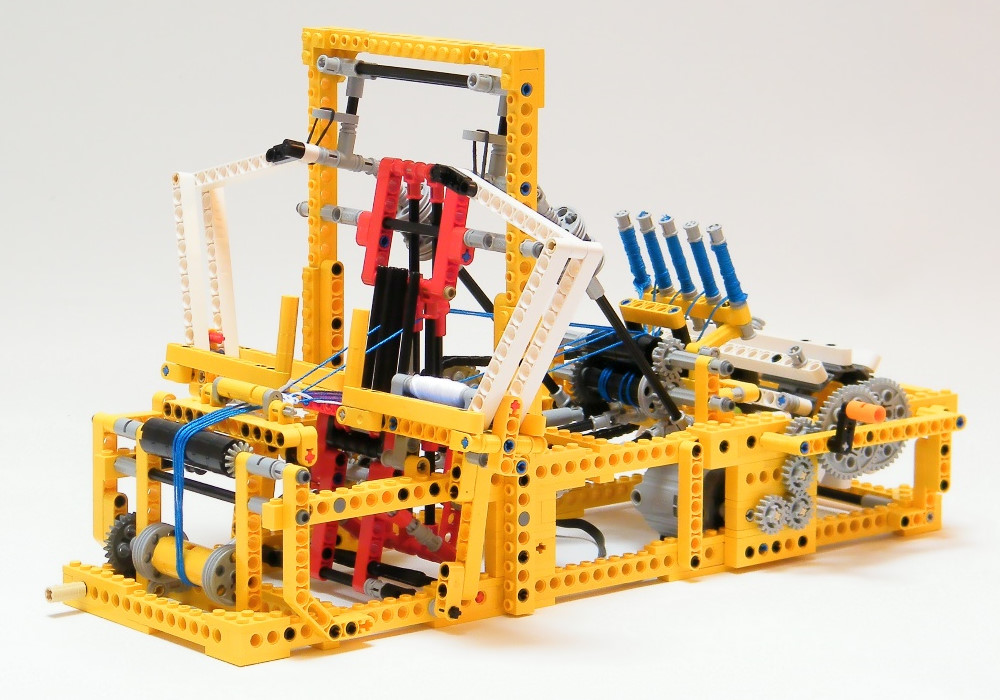
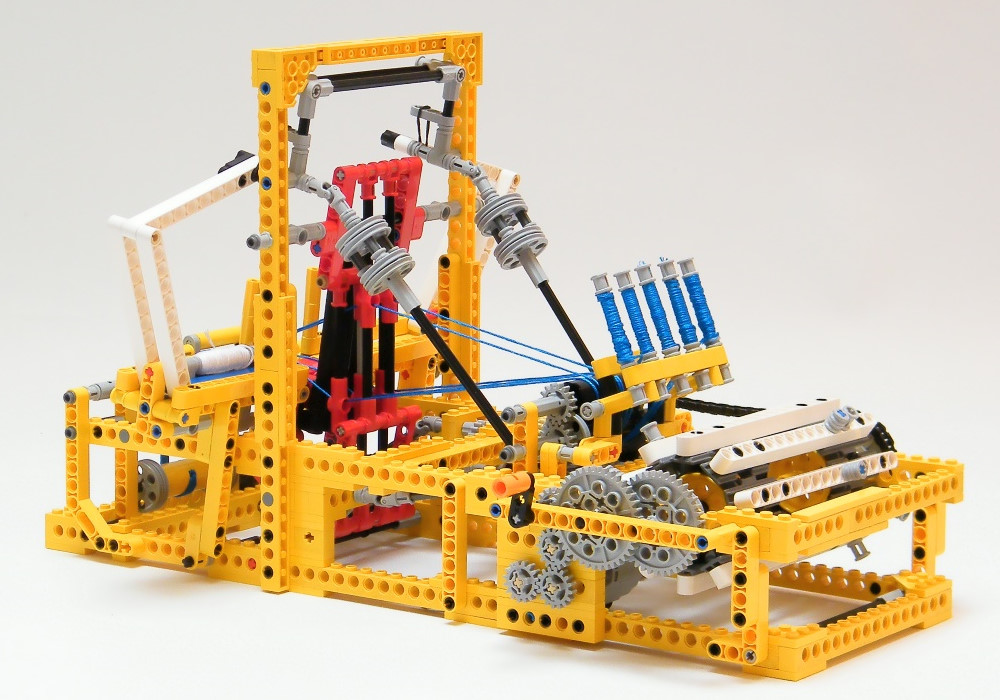
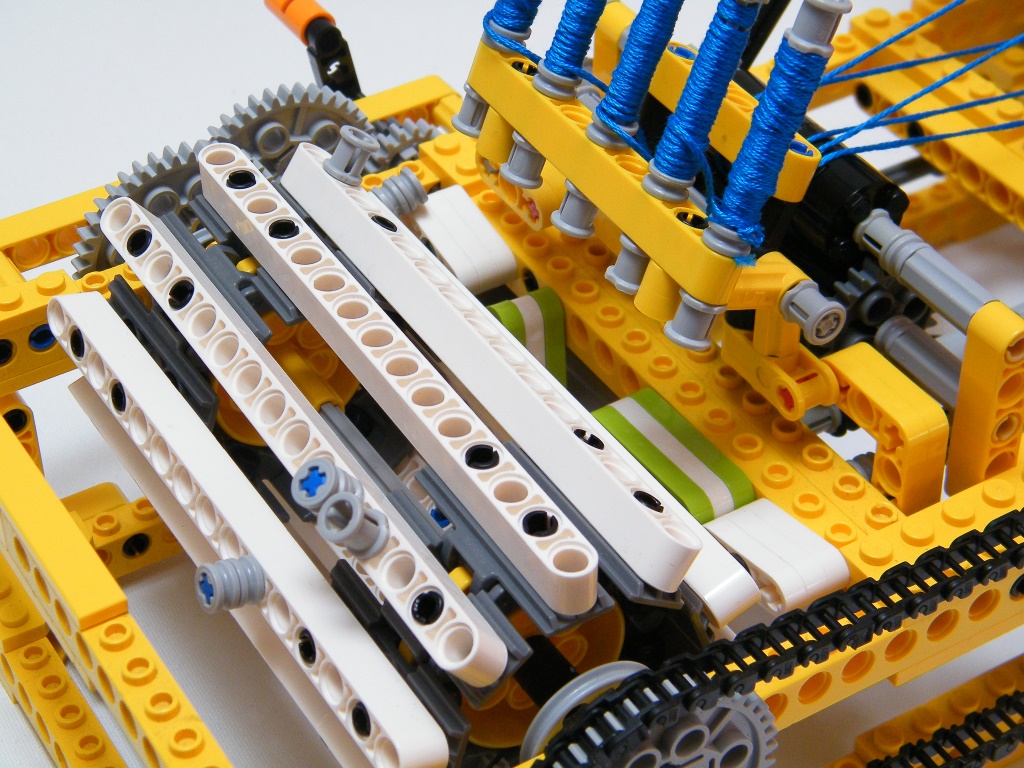
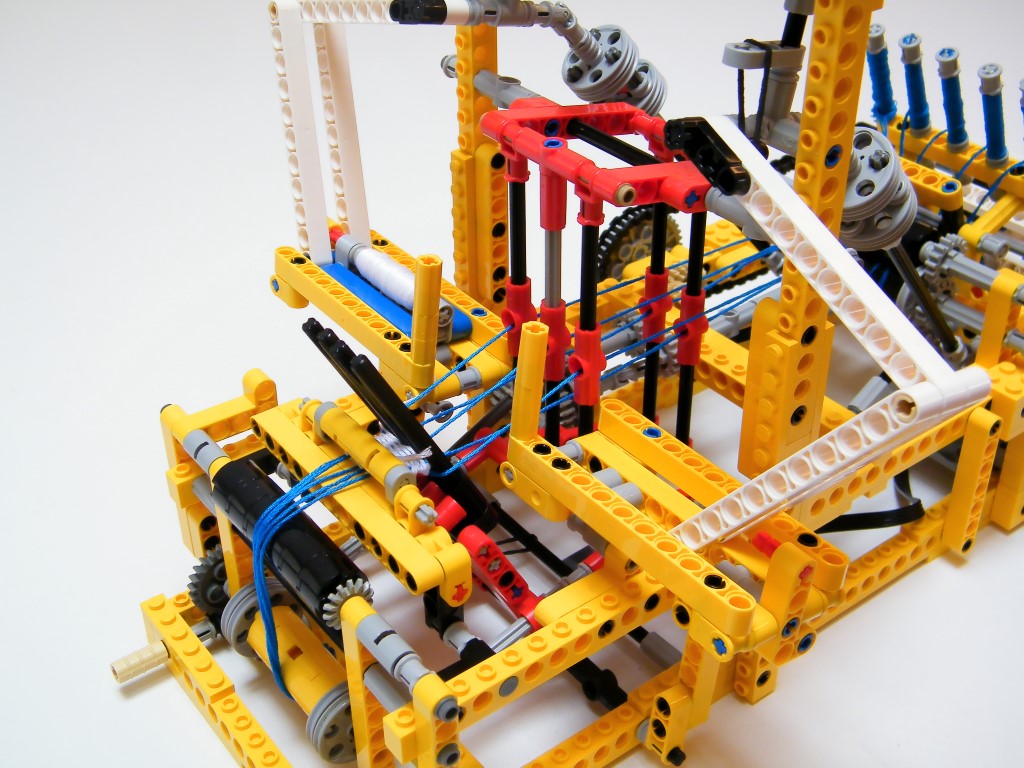
The solution I have used is a timing drum. It is composed of 10 segment with white 15L beam with obstacle on certain place composed of bush. This bush, by rotating with the drum comes to push 4 lever placed on the frame of the loom. each lever is connected to a system. The white are connected to the left and right shuttle displacers, and the lime green on the heddle frame. Like that, each rotation of the drum, the 4 levers are operated alternatively. This mmechanismis like the small music box which play song depending of the asperities of the coded drum. Thanks to that, for instance, each the shuttle displacer is operated one time on 10 segments in a rotation fo the drum, ensuring a good impulsive functioning.
The lever of the shuttle displacer is connected the displacer by an axle with 2 universal join with a system of 6-hole pulley which enable me to set up the correct phase shift and consequently the position of the lever and the shuttle displacer.
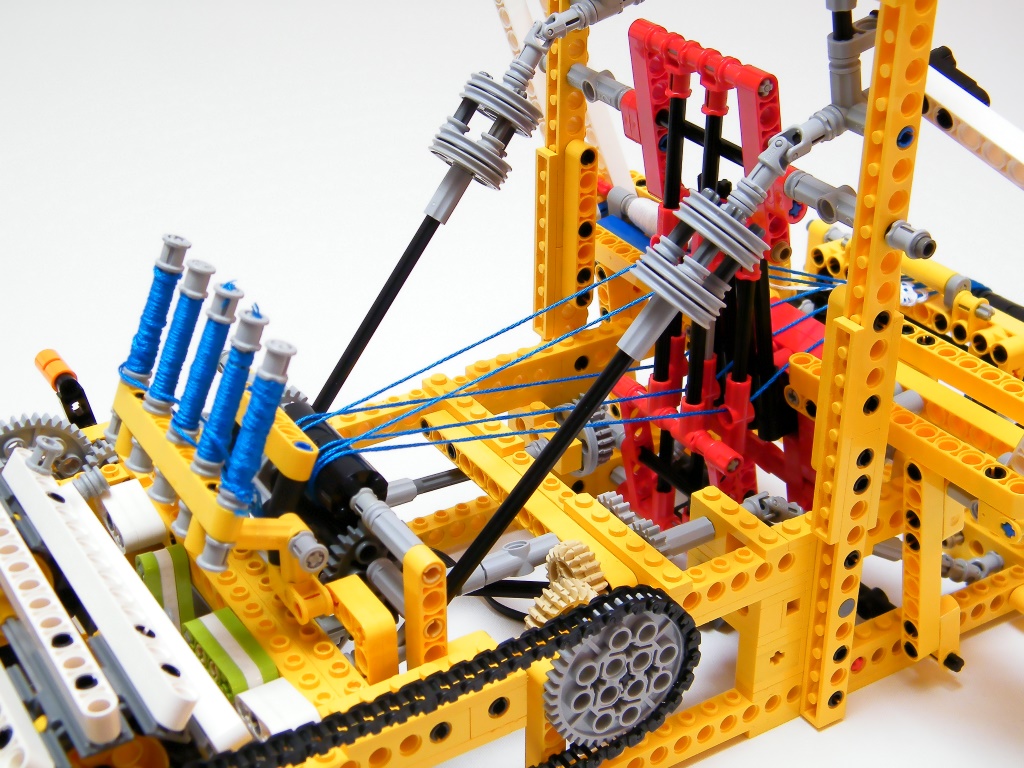
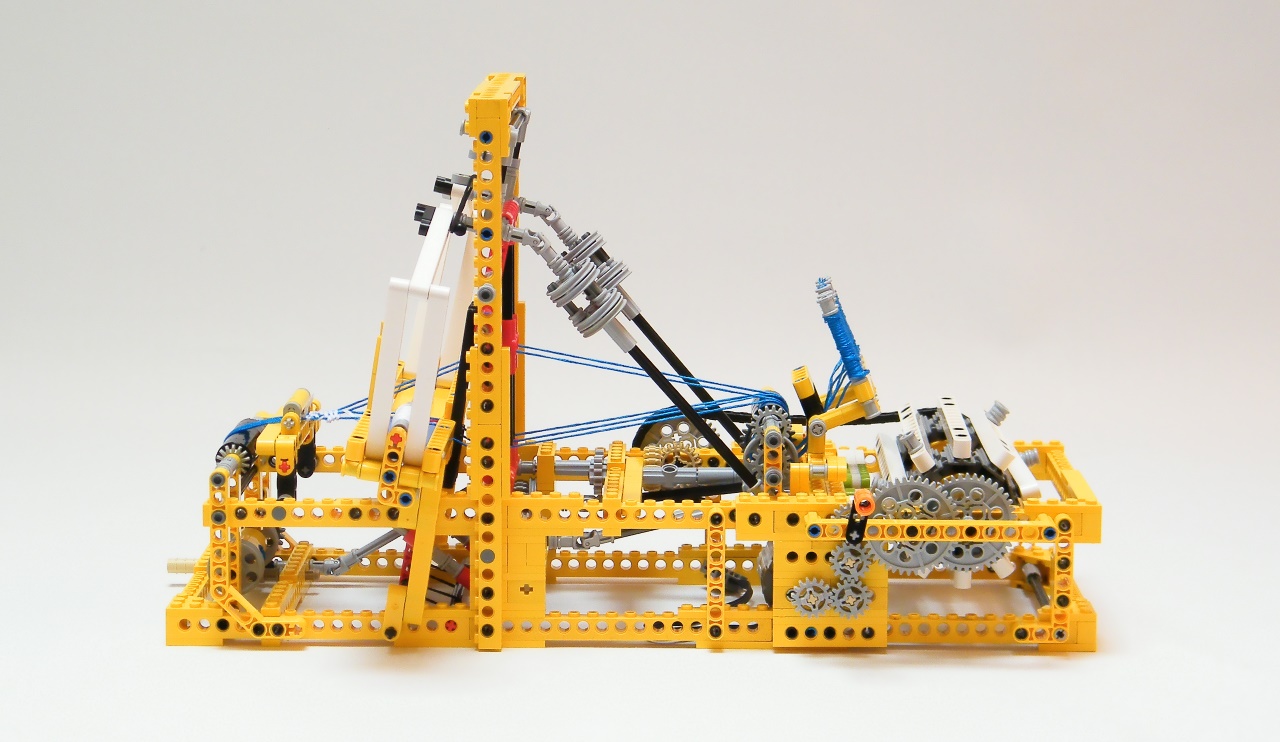
The heddle frame is connected to two levers with a more complex system. On each side of the axle of the heddle frame is set a 12 tooth gear which is connected to a 20th gear. then the axle of each 20tooth gear is connected using two universal joins to each lever. Each lever are antagonist because connected together by the axle of the heddle frame. When the left lever is horizontal, the right is vertical, and when the left is vertical the right is horizontal. Like that, the bushes on the timing wheel can operated first the left pusher (which make the right move too), and then the left pusher (which remains the right one on this initial position).
You will not also that on the timing drum, for each lever, there is not only on bush which push the lever, they are 2 or 3 to obtains the correct movement I want. For instance, for the shuttle displacer, the first bush which pushes the lever is placed as far as possible to obtain the maximum torque on the lever. When the lever begins to rotate, a other bush push the lever the nearest as possible in order to complete correctly the movement and set the lever to the vertical. Then, the lever is released and the shuttle displacer comes to the original position, using rubber band. This type of coding using a timing wheel enable me to delete all tuning regarding the rubber band, there is no need to set up correctly the strength of the rubber because the mechanism has many time to recover its position comparing to my previous loom. Then, the reed, as mentioned below is operated by the heddle frame rather than a dedicated system. This is why there are only 4 levers to operate the loom, as the reed is connected to the heddle frame. I connected it by using a simple connecting rod placed on the extremity of the rotating beam of the heddle frame, and on the middle of the reed in order to have the same movement whatever the movement of the heddle frame. Finally, two rubber band connected to the reed ensure the return in stable position, ensuring also the good locking in two position of the heddle frame.
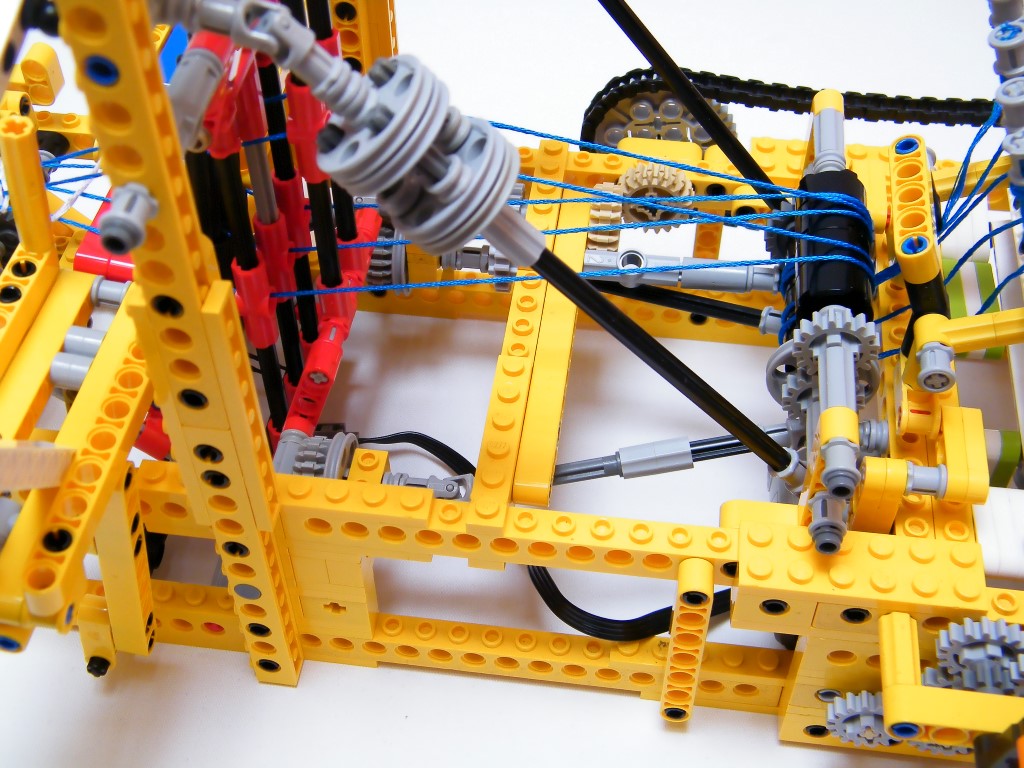
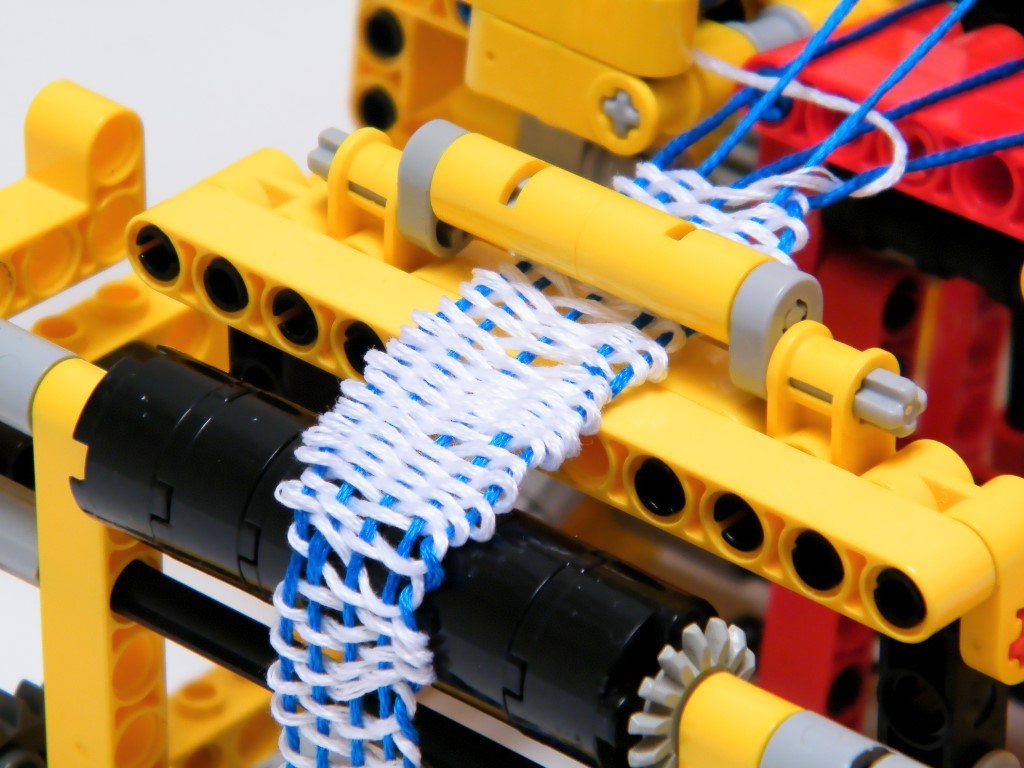
Finally, the last system is the lead of the 5 string used. On my previous loom, I use two rollers at the beginning and one big roller to the end to lead the string from the reel. This solution with two rollers at the beginning enable to control a good tension of the string, which is very important for weaving. That is why I have keep this system for the beginning. But for the end, I use a single roller but with the same diameter as the back. It enables me to have not gearing reduction between the rollers, which was very complicated to set on my previous loom. Consequently, the gearing is very simple than my previous loom. A chain set on a 40 tooth gear on the axle of the drum is connected to an other 40 tooth gear. After a 20 tooth double spur gear, the axle goes to the beginning rollers and to the end rollers using two universal joins and a worm and 24 tooth gear. Consequently the whole transmission pass though the frame and not as the exterior, which is better for looking. Regarding the gearing, I have chosen this reduction (1/24 finally), to have a fabric -according the the used strings- which is not too tightened which permits to see the weaving process with the two colors. It is of course possible to obtain more tightened final fabric by replacing the second 40 tooth gear (near the tan spur gear) by a 24 tooth gear. The gearing ratio will decrease and the fabric will be more tightened.
Picture and Video
Here is the video which shows you the functioning and the abilities of the creations and after the pictures.


Purchasing the creations or the instructions
You can purchase either the whole creation on the website Buildamoc or LesDIY whenever your preference in terms of parts provenance (Genuine or not), or just the building instructions on this shop
If you do not have the parts, you can purchase the complete kit from two different retailers :
- Using Genuine LEGO Parts : This model is available on Buildamoc in a complete package including genuine LEGO parts plus the PDF instructions.
- Using non-Genuine LEGO Parts : This model is available on LesDiy Store in a complete package, including the parts (alternative bricks from China) and the PDF Instructions.
I wanted to build a new loom for a while but I have also discover after uplaoding my previous loom in Youtube in 2011 that you are thousand of want the instructions ! Nevertheless, I did not make the building instruction for my previous loom because it was composed of many parts, some rares, and was not enough reliable for me. But this loom was developed to be reliable, simple, fast and using standard parts, that is why I was motivated to create the building instructions for you !

I have consequently spend many hours on MLcad to build the CAD model and Lpub to rendering the building instructions and after some pictures adjustment I was abbe to propose a beautiful PDF of my building instructions, in 96 pages / 170mo and 908 parts ! This building instructions was made to make possible the print after with a white background and high DPI definition in standard A4 size, that is why it doesn’t look like the Lego Official Instruction graphically. The bill of material can be download for free, and it is also available on rebrickable online (for matching your parts with the needed parts).
- Bill Of material : Pictures.png – 1mo
- Bill Of Material : Rebrickable link
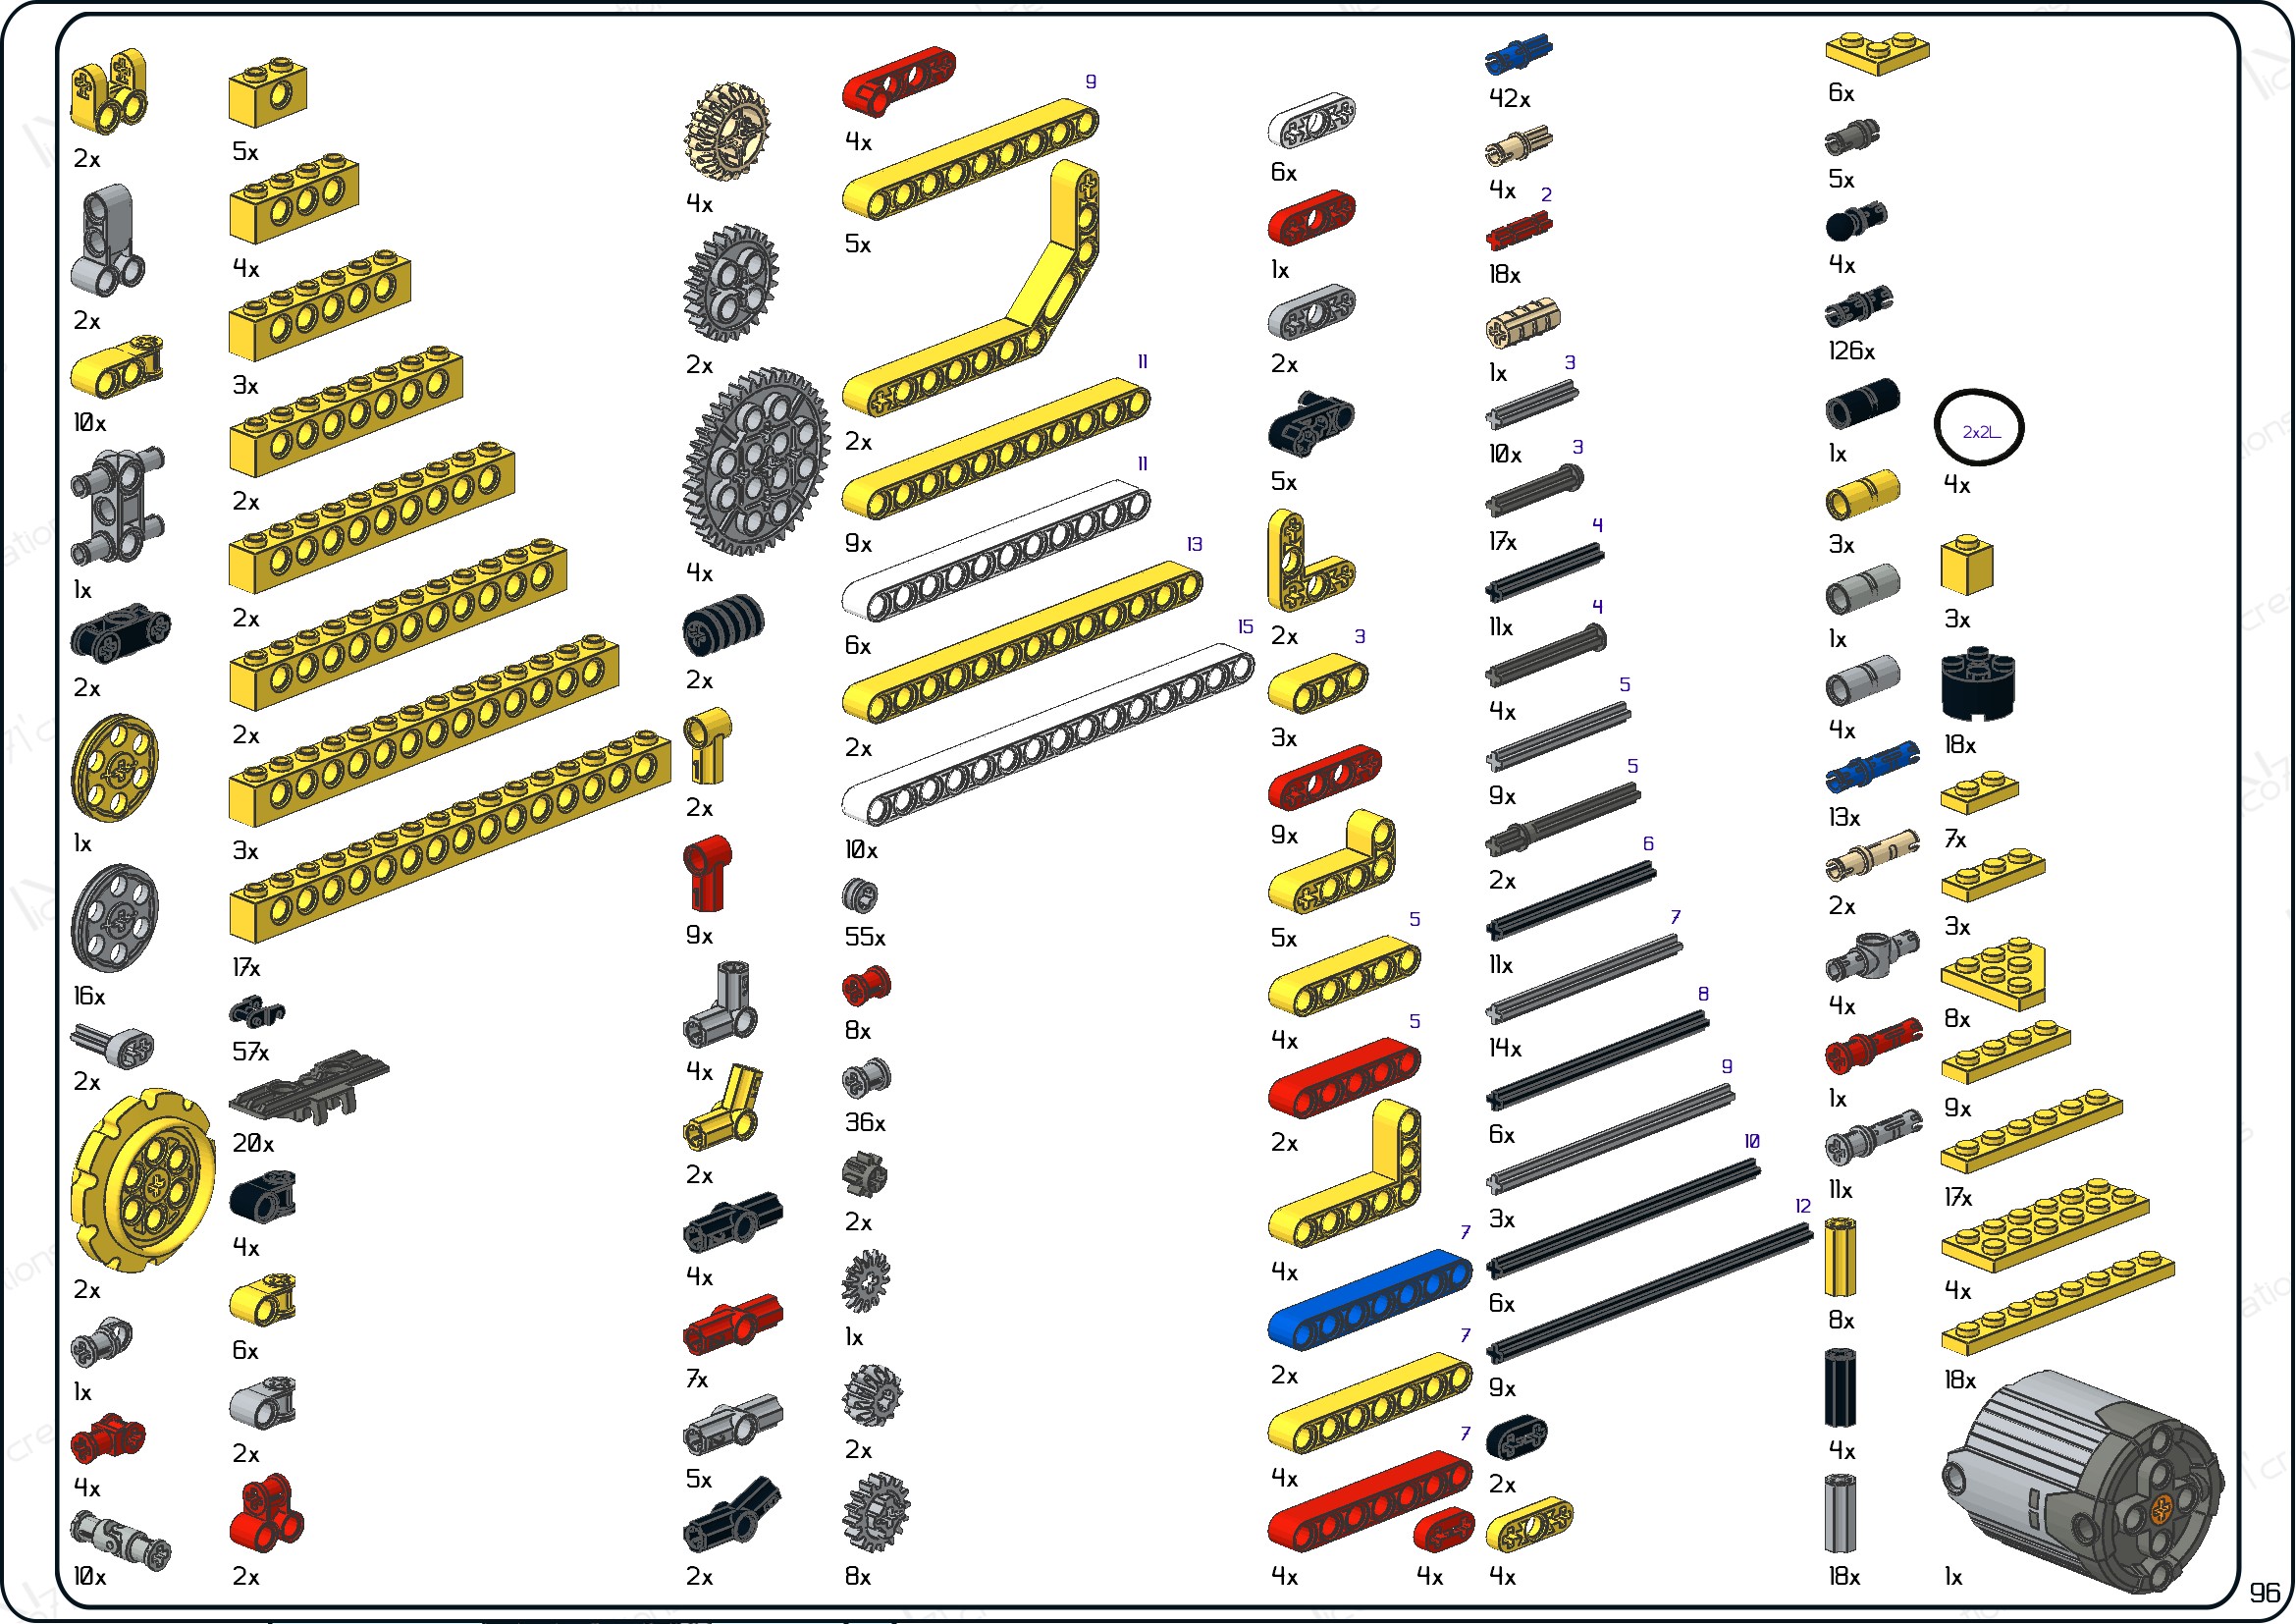
Please note that you can use any rubber band you want, as they are 2x2L lenght (arround Ø16-20mm) in rubber. You can also use any power functions motors you want, the looom has been tested with M, L and XL motor.
The building instructions PDF is not available for free, due to considerable amount of time spend and in the only aim to allow you to rebuild this creation. Consequently, the building instructions are on sale for a minimum amount of 10€ with free donation. It is possible for no-beginner builder to build my loom using the pictures, but buying the PDF instructions ensure you to have the correct tuning of the loom and to encourage my work 🙂
You can buy the instructions with the following button for 10€. You can also buy other building instructions and get an automated discount. You will get 15% off for 2 PDF, and 20% off for 3 PDF on the total), available for all the instructions for sale on nico71.fr.
See it on the shop :
Small Mechanical Loom
After your payment, you will be redirected to a page for downloading your instructions, and will receive also the link to download by email. Please check the spam box and be patient to receive it. If you have trouble to download your copy of the PDF after payment or open the document, do not make a paypal dispute, please contact me using the contact form. The link to download the instructions expires within 24h. Contact me if you have lost your instructions. Note that you can print it, but not copy or distribute. Thank you for supporting my work 🙂
Here is some preview of the building instructions :


How to sep up the loom
Here is a video to show you how to set up the loom follow carefully and enjoy your loom !


(12) Comments
Hello Pam, I have answered by email, sorry for the late answer.
Hello again,
I have contacted you before.
My name is Pam. We run a Robotic’s Club at our school in Ontario, Canada.
Where are your offices located?
How much is international shipping? How long will it tale for the package to arrive? Does the kit use an EV3 ? We are interested in either the simple loom or the rope / bracelet type.
I understand there is NO programming involved as they run on a battery and motor. Is there someone we can count on for support in case we run into problems?
Pam
Bonjour Nico.
Je viens d’investir 5 € pour cette machine extraordinaire.
Merci pour tes inventions, j’avais déjà fait la jeep 4*4 qui était un joli morceau.
[…] この新しいプロジェクトは、インターネットを通じて、どのように、互いに関わり合っていくかを示す好例だと思う。Makerコミュニティはみんなのプロジェクトを改善してくれる。そして、よりよいプロジェクトになるように互いに刺激し合うことができる。(KnitHackerより) […]
Make a video on how to make one of the bigger looms
[…] Der Ingenieur tüftelte bereits 2011 an einem automatischen Webstuhl und stellte vor kurzem eine verbesserte Version seiner Konstruktion aus Lego und Lego-Technik vor. Über eine Ansteuerung via Mindstorms-Modul können so auch kleine Muster realisiert werden. Lust auf einen eigenen Webstuhl und viel Arbeit am Wochenende? Dann gibt es die Anleitung von Nicolas Lespour für 5 Euro zum Download hier. […]
[…] Lespour. What’s great (if you have the time and the LEGOs) Lespour also included links with instructions on how to build the loom. So, we can now all make tiny blankets. […]
[…] Der Ingenieur tüftelte bereits 2011 an einem automatischen Webstuhl und stellte vor kurzem eine verbesserte Version seiner Konstruktion aus Lego und Lego-Technik vor. Über eine Ansteuerung via Mindstorms-Modul können so auch kleine Muster realisiert werden. Lust auf einen eigenen Webstuhl und viel Arbeit am Wochenende? Dann gibt es die Anleitung von Nicolas Lespour für 5 Euro zum Download hier. […]
[…] 이 프로젝트가 발전해 나가는 모습은 인터넷을 통한 격려로 메이커 커뮤니티가 우리의 프로젝트를 개선하고 다른 이들의 프로젝트에 영감을 줄 수 있다는 사실을 보여주는 훌륭한 사례입니다! […]
[…] Lespour aka Nico71 konstruiert fantastische Maschinen aus LEGO Technic. Sein jüngstes Projekt: ein funktionsfähiger Webstuhl, der dank Motorantrieb ein beachtliches Tempo vorlegt. Die Idee eines LEGO-Webstuhls hatte Nicolas […]
[…] AAAAHHHH A MECHANICAL LOOM MADE OUT OF LEGO BRICKS. […]
Thank you so much for putting this together.
My son and I saw other loom projects based on the Mindstorm NXT, and we were excited to try to build them, but did not know where to start. This “all mechanical” design actually may be more instructive and beneficial for us to put together. It shows how to create a “mechanical program”, which was the basis of the original looms and mechanical automatons.
I have bought the instructions, printed out the parts list, and look forward to putting it together.
Thanks again!!!
GadgetNate
Comments are closed.