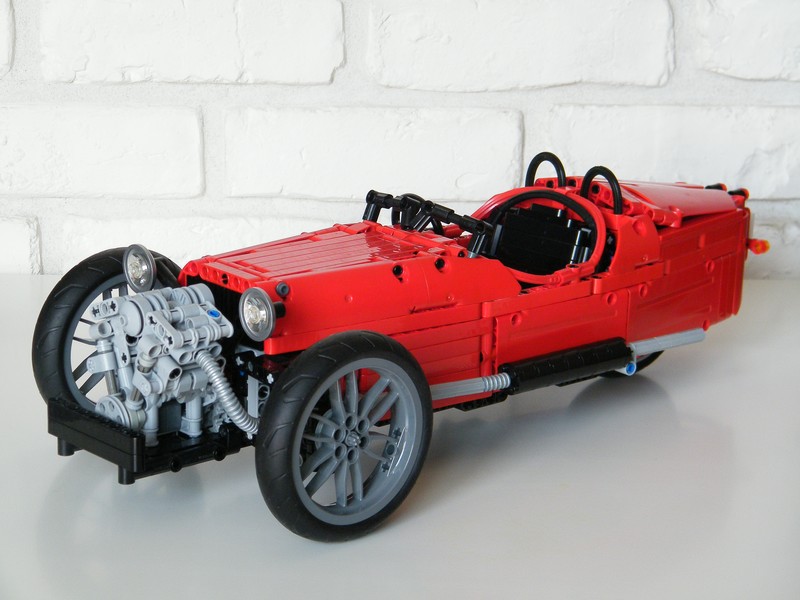
An English exotic car, features steering, suspensions, big block Harley Davidson engine with pushrods and rockers, gearbox and boot which opens.

How to build ?
You only need the parts and the instructions. You can purchase the PDF instructions on this shop which contains the partlist at the end, and you can check on Rebrickable.

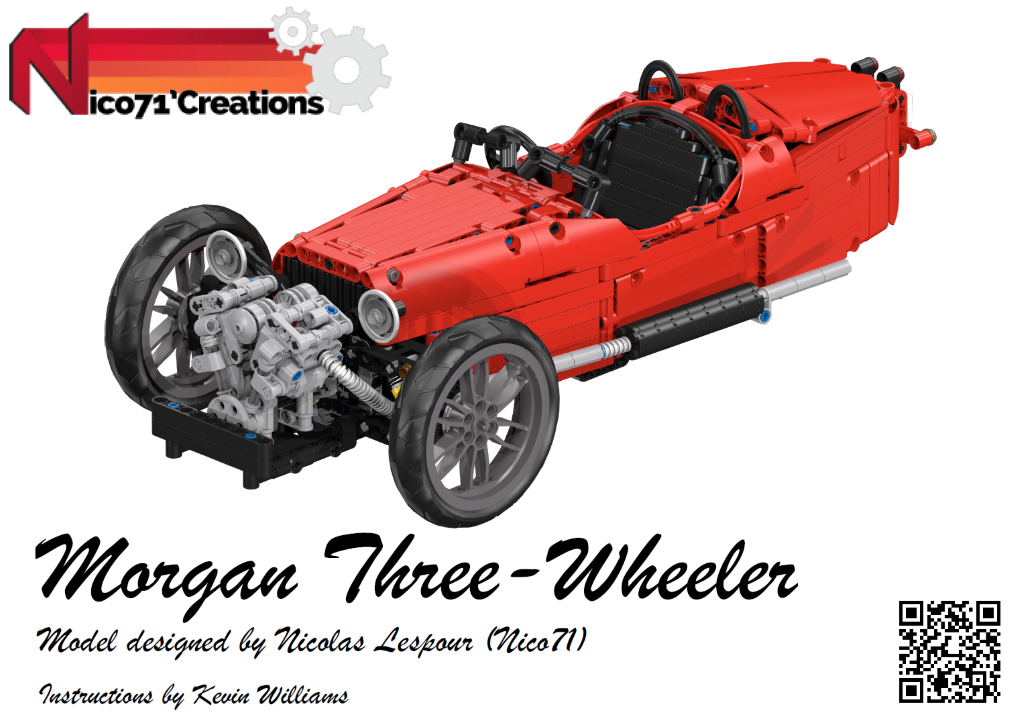
Morgan Three Wheeler
If you do not have the parts, you can purchase the complete kit from retailers :
- Using Genuine LEGO Parts : This model is available at Buildamoc, in a complete package including LEGO Genuine Parts and PDF instructions.
- Using non-Genuine LEGO Parts : This model is available on LesDiy Store in a complete package, including parts (alternative bricks from China) and PDF Instructions.
The build
I have been planning for a while to build a 3-wheel car. This exotic car is made by the British manufacturer Morgan. The big block Engine is a Harley Davidson’s Engine with pushrod system and rockers. Usually, the engine has two push-rods and two rockers by cylinder (inlet and exhaust valve). But on the lego version, I had only 3 stud-width available so I decided to put only one pushrod with rocker because of the room. I also decided to have visible moving part to be more expressive (real version doesn’t have visible pushrods or rockers). Then the drive-shaft goes to the gearbox ,which is an 4-speed gearbox based on #8880 modified version. The following ratios are : 1:1 1:2 1:3 1:6. Then, the drive-shaft goes to a bevel gear, and finally the main drive-chain.

Regarding the suspensions, the front suspensions are composed of double wishbones with hard shock-absorbers. The rear suspensions is a swinging arm with two soft shock-absorbers. Note that the center of rotation of the rear arm is not the center of rotation of the pinion-chain. The body was the most difficult part of this moc, because of this shape and the room. The first thing I have done is to design the hood. Then, I designed the right and left panel while trying to be homogeneous in the shape (discontinuity in alignment). To finish, I have made the rear shape and that was the most difficult part. All designed lines had to cross each other to be elegant, including the opening of the boot.
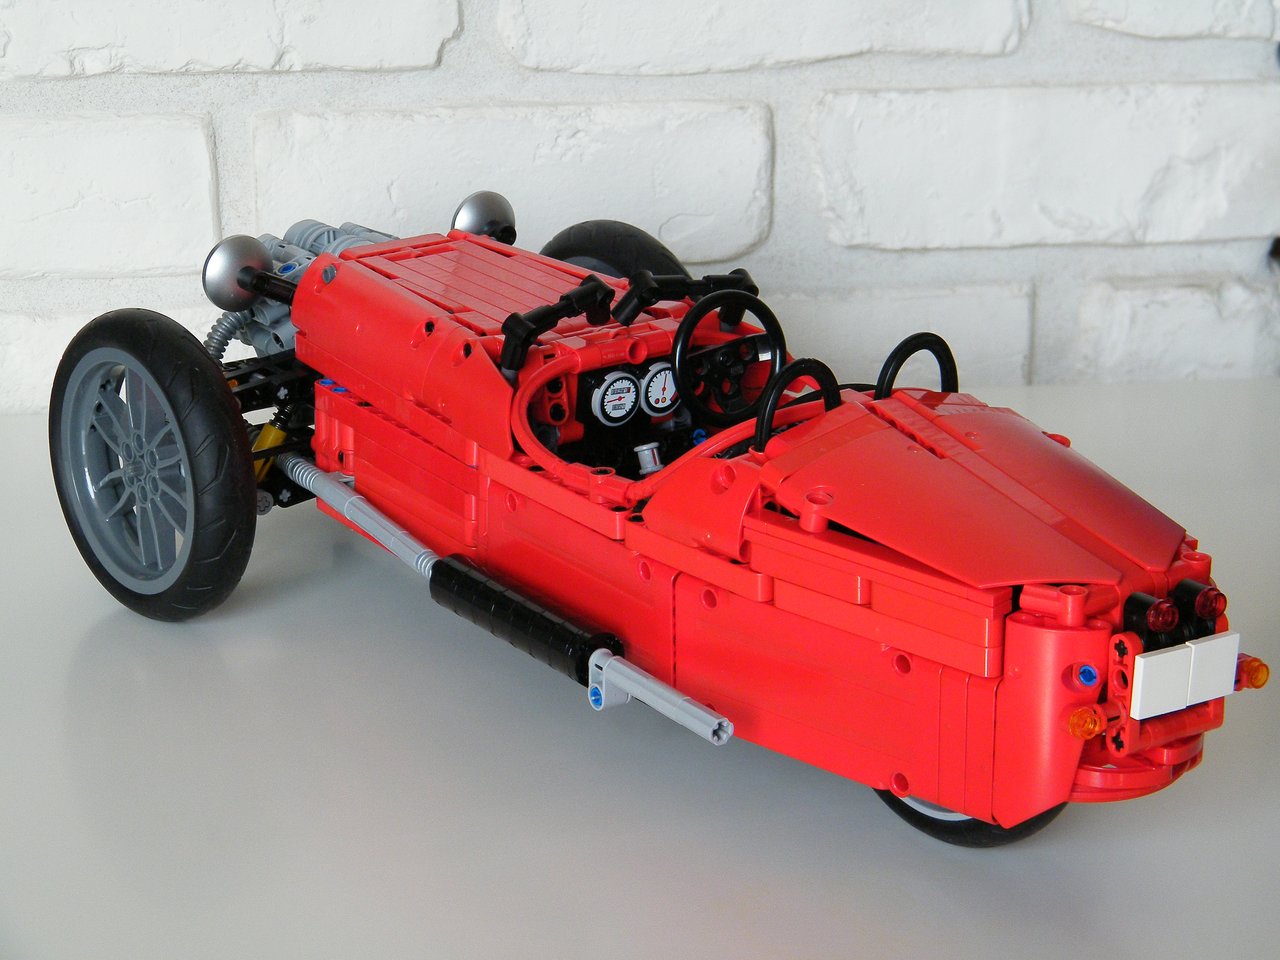
The interior shape has also received a lot of attention. I have managed the global shape by using flex parts all around the interior and by matching the panel with the flex (there was not much space to include gearbox, seats and interior). The shape is not perfectly accurate but the global shape and scale are respected. Also, the boot can be opened (in the correct direction) and the Hood can be removed as on real version.


How to build ?
You only need the parts and the instructions. You can purchase the PDF instructions on this shop which contains the partlist at the end, and you can check on Rebrickable or in the instructions preview below.
If you do not have the parts, you can purchase the complete kit from retailers :
- Using Genuine LEGO Parts : This model is available at Buildamoc, in a complete package including LEGO Genuine Parts and PDF instructions.
- Using non-Genuine LEGO Parts : This model is available on LesDiy Store in a complete package, including parts (alternative bricks from China) and PDF Instructions.
Building Instructions
I have made firstly a photo sequence instructions for free. Then Kevin Williams has made in 2017 the pro instructions with 144 pages which is for sale. This is a huge amount of work from him and so many thanks, the result is beautiful. You can either buy the Pro Instructions with rendering step by step instructions in 124 pages, or browsing the free one based on photo sequence.
You can watch the bill of material here as png file :
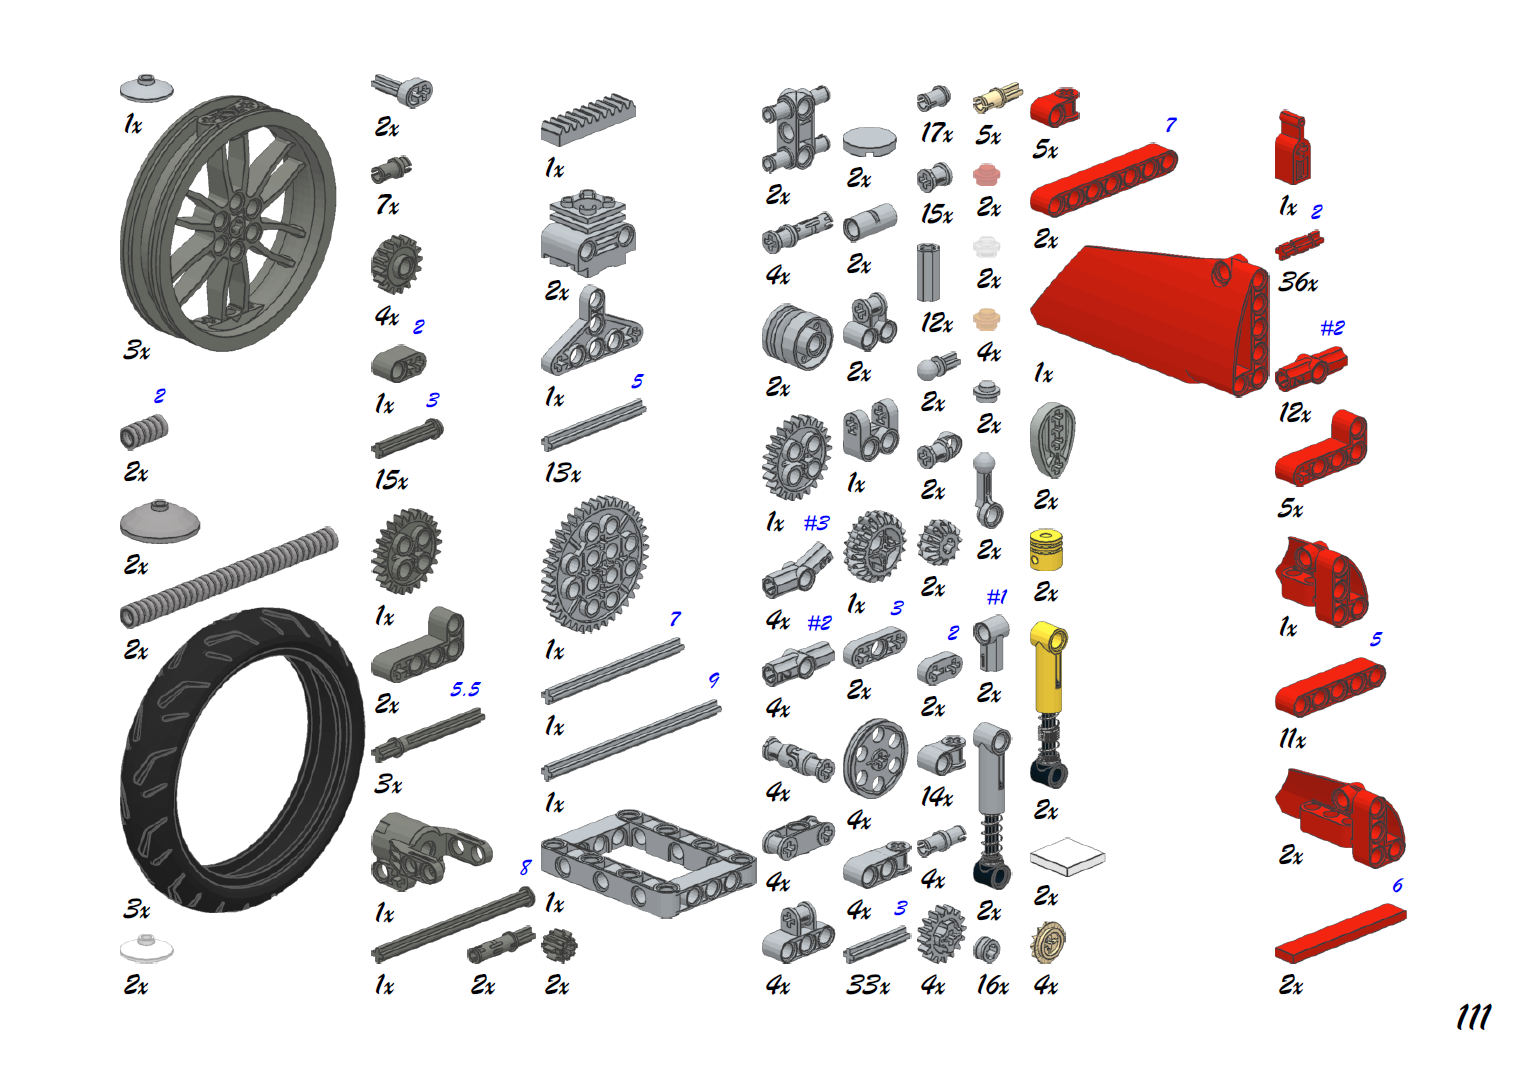
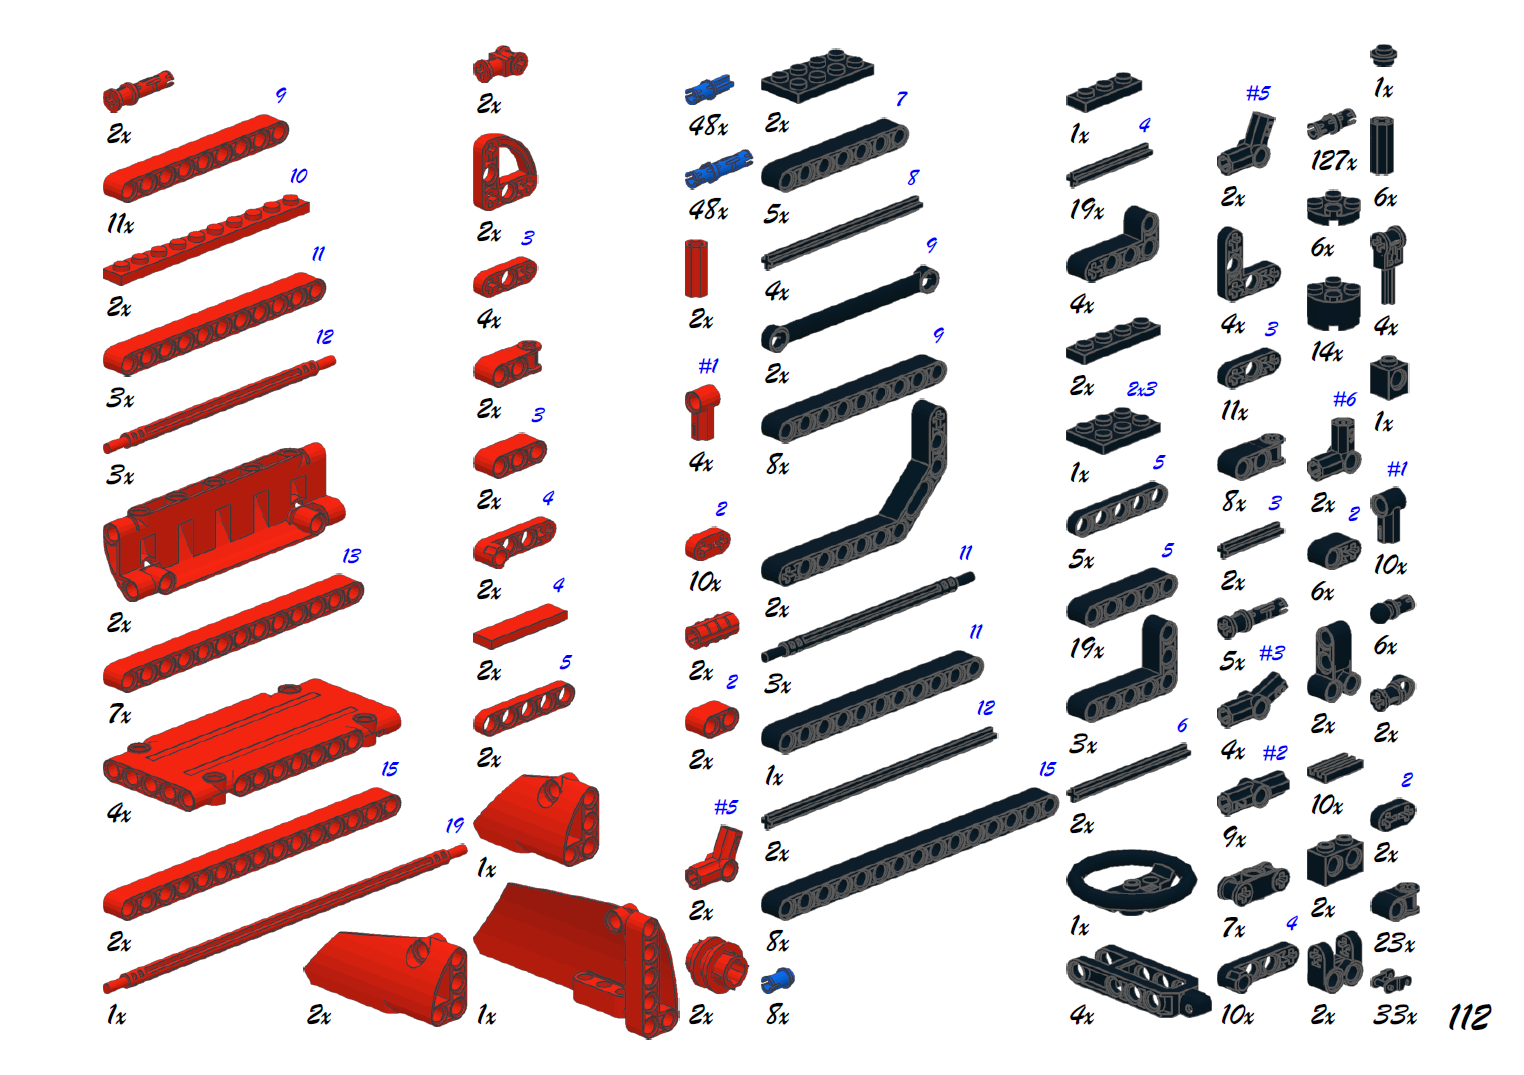
But you can also checked it on rebrickable (or make any export you want)
You can buy the instructions with the following button for 10€. You can also buy other building instructions and get an automated discount. You will get 15% off for 2 PDF, and 20% off for 3 PDF on the total), available for all the instructions for sale on nico71.fr.
See it on the shop :
Morgan Three Wheeler
After your payment, you will be redirected to a page for downloading your instructions, and will receive also the link to download by email. Please check the spam box and be patient to receive it. If you have trouble to download your copy of the PDF after payment or open the document, do not make a paypal dispute, please contact me using the contact form. The link to download the instructions expires within 24h. Contact me if you have lost your instructions. Note that you can print it, but not copy or distribute. Thank you for supporting my work 🙂
Here is some preview of the building instructions :


Free Photo Sequence
You can either download the PDF of the instructions based on photo sequence or browsing direclty the pictures below.
Designed in 2011, instructions made in 2017.


(20) Comments
Hi,
Awesome car, great model.
I was wondering if you could sell me one built.
Thanks
Joe
Please post it on LEGO Ideas ! 😀
good thanks for it
Hello Nico,
Thank you very much for making these building instructions of the Morgan Supersport 1937.
If have build your model for my 75 year grandfather for his birthday in white, he used to own a creme one in the 1950’s.
I have mode some small changes with his model, a brown dashboard, gearbox and a chrome rollbar.
Also I changed the rear lights, I have made them the back (you used 2 liftarms at each side 1×5) I have changed 1 liftarm into a 1×3 and above 2 connectors 1×3 with 2 round holes and 1 x hole to place the rear lights (indicator and brake).
My grandfather is very happy with your model, and also on behalf of him, we thank you for this model.
Currently, I am building my own red one.
Ronnie 15 years, Amsterdam
Where do you get the parts from?
Can you tell me where you get all the parts from please, as i dont have all of the parts and i want to build the 3 wheeler asap, cheers
Astonishing design! These smooth curves look just great!
Of I want picture ! You modifications seem to be very interesting. 🙂
First of all, I’d like to thank you a lot for sharing instructions for this wonderful model.
I just finished building the car and it’s really impressive and fascinating.
I just made some minor changes that, IMHO, make the model even better:
1 – I used chromed parts (custom) to build motor and radiator, the final effect is wonderful!
2 – I changed the technic connector and axles used to build the windscreen with a combination of windscreen 5x2x1-2/3 (part 6070) and Hinge cylinder + hinge Plate 1×2 to support it through the same axle (reduced to a 4 studs); the effect is awesome.
3 – I used 8420 disk brakes for front wheels, much more realistic.
4 – I used 2 Pins 3/4 (part 32002) between the side panels 1x5x11, to fix them better.
5 – I changed the two soft shock absorber used for rear wheel with two hard one, due two short movement range of rear axle.
The final model is really wonderful!
If you like it, I can send you pictures of it.
Thanks again
Enrico
comment fais tu pour faire des voitures télécommader ?
Moi j’arrive a les faire avancer et reculer mais j’arrive pas a les faire tourner .
Peut tu m’expliqué ?
Hello, Read the FAQ please. Regards
I really love your creations! I’m a novice lego builder and what I do is taking old lego parts to assemble a new model.
How do you design your creations? Do you design them using LDD and then buy the bricks online to join them together ?
There are like thousands types of bricks. How do you find the right ones? There are so many bricks in your models I’ve never seen in my life…
ok d’accord
Non, comme expliqué dans la FAQ. 🙂
salut tu vend le unimog u 500 ?
magnifique !
Fantastic moc Niko71, I finish build it and it`s amazing. Thank you for all your models.
You are always welcome David. Byes
Thanks for making these Building Instructions!
I really appreciate the sense of humor you bring to your videos.
Comments are closed.