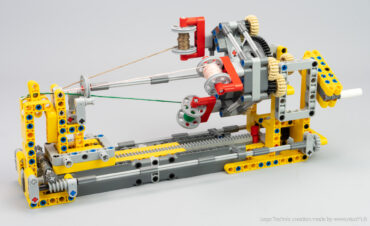
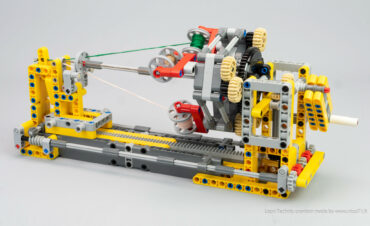
A manual braiding machine features three counter-rotating reels and a pull system to create a braided bracelets, with building instructions.

Context
In 2014, I have created a big braiding machine, with 9 reels and motorized functions. It was the first time I created a braiding machine and have liked a lot the principle. That is why I wanted to create a more affordable version with less parts and without motorized functions to propose a simple and reliable braiding machine to create bracelets.

How it works
The machine is composed of three important elements : the counter rotative reels, the spinning spinneret and the main pull system. The counter rotative reel is made with a fixed turntable gear, where a 20t gear rolls and transmits motion to the reels with a 12/20 gearing reduction. It enables to not use chain links which are expensive (see this picture of my old braiding machine), and also to change easily the gearing by replacing the 12t/20t for a 16t/16t depending of the raw material use (thread, wool etc.)

The second element is the spinning spinneret. I have used the same part as on my old braiding machine which is a 6-holes pulley which rolls on two bushes for bracing it. This part is fixed on the whole assembly of the reels and rotates with it. As the other end of the braid is locked, it forces the three reels to match together in one weaved braid. As the reels turn in another direction, they tend to unwind tightly on the braid so that it does not come apart. This is the key feature to understand how the braiding works.

The last element is the pulling system. The motion of the crank is transmitted though gears to a worm screw on each side, which operates a 8t gear on racks. It enables to pull the whole braid when the crank is operated. I have made this choice to avoid the diameter variation of a drum and to have the braid visible to check the correct braiding. Of course the speed of the pulling system has to be chosen depending of the size and the torsional strength of the raw material, that is why it can be replaced. An other key feature is the sliding worm screw. It is used to shift the moment when the pulling system starts relative to the rotation of the reels. It enables to not have unbraided start on the final braid (visible at 0:47 in the video).

Regarding the result, it is pretty good. I have made lot of tests and adjustments to find the most versatile setting depending of the raw material used. The final braid is tight enough to not take apart, but not too much to have a nice looking and homogeneous braid. The fact that the crank is manually operated is also very cool for varying the speed and understanding how it works.
Pictures and Video
Find this article in video here (youtube)
How to build ?
📕 You only need the parts and the instructions. You can purchase the PDF instructions on the shop and build with your own parts :
🎁 If you want to purchase the LEGO parts + PDF instructions, have a look to my creator page or request a quote from :
- Using Genuine LEGO Parts : Available at Buildamoc
- Using non-Genuine LEGO Parts : See it if available on LesDIY Store
The instruction contains the partlist at the end, but you can check individually on Rebrickable, or in the instructions previews below.
I recommended to use milled embroidery threads like DMC but you can test with any other raw material. You only need to change the gearing accordingly (spare parts included in the bill of material).
Here is some preview of the building instructions :


I recommends DMC thread but you can test any thread you have by adjusting the gearing, for instance like this for the bigger thread like wool (slow down the reel rotation, accelerate the pull speed).
Changelog :
08/03/21 : change placement of a blue 3L pin on page 40 step 73. No change on bill of material.