I have made a video in french to know how to create a building instruction. For English readers, you can follow the steps under.
Note : this article is out to date. Please use all in in Ldraw installer with LDcad and Lpub3D. Use Ldcad to create the model following the tutorial. And Lpub3D for creating the instruction following this tutorial. You can post your questions on the Ldraw Forum.
—————————————————————-
Step 1 : create your model with SR3D builder or Mlcad. You can insert the Step in SR3d, they are understood by Mlcad. Please note :
- Assemble the parts in the same order as the building
- At the end, rename the extension from .L3B to .ldr
Step 2 : open the model with Mlcad and start to add the rotation step and the flex.
- Prefer the relative rotations to the absolute
- Use “File / Save images / jpeg” to generate quickly the building instruction in order to test the layout.
- Be sure to have added the whole sub-model with “multi-part / import model”. Then the sub-models are in the “document field”
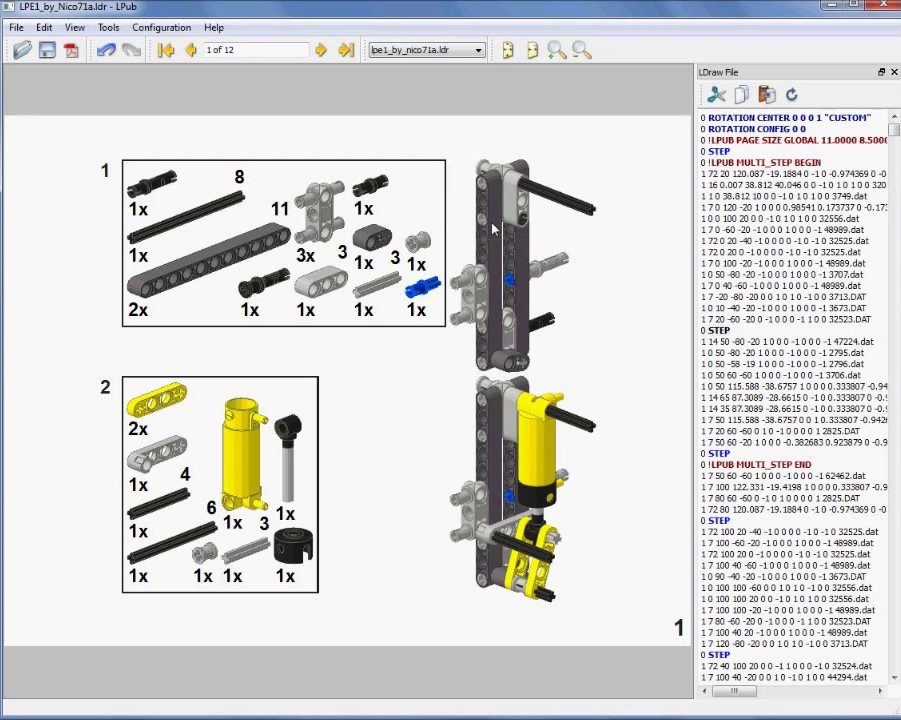
Step 3 : open the model with Lpub4.0 and start to create the instruction :
- Start to modify the size of the paper, you can modify unit and DPI (default : inch and 150DPI)
- Lpub use a contextual righ click, that is why you will not have the same choices if you click on the model or on the page. Try to click on different things to see the different choices
- Regarding the multi-step : right click on the page (not on the model) and “add next step”
- To convert in a callout : in a sub-model assembly, right click on the page (not on the model) and “convert in a callout”, then you may modify the size and the shape in order to fit with your layout
- To add a divider : “add next step” to have a multi step page, then on the second step, right click and “add divider” The divider is only vertical
- To add a BOM (bill of material) : “Edit / insert page” then “Edit / add bom” you may modify the size and the shape in order to fit with your layout (right click on the bom to see the choices. You can also paste this code to add the bom after a step in the assembly file (right column ) :
0 STEP
0 !LPUB INSERT COVER_PAGE
0 !LPUB INSERT BOM
0 !LPUB BOM CONSTRAIN LOCAL HEIGHT 11 (change the 11 with the height of your page)
0 !LPUB BOM MODEL_SCALE 0.6000 (if the bom is to small, try 0.8 or 1)
0 STEP
You can also add : 0 !LPUB BOM CONSTRAIN LOCAL WIDTH 11 instead of 0 !LPUB BOM MODEL_SCALE 0.6000
- Then replace the whole flex parts (for a flex) with this code :0 !LPUB PLI END
0 !LPUB PLI BEGIN SUB 32235.dat 4 (the 32235 is the part that you will see in the bom instead of the whole parts of a flex, the number 4 is the color, here is red)
0
0 (here is the whole parts of one flex)
0
0
…
0 !LPUB PLI END
- you can also insert a cover page with an image, but it doesn’t work very well, try with : “Edit / insert cover page” then “Edit / add picture”. You can also add a cover page after the generating of the instructions.
- when the instructions is finished, generate the instructions with “print to file” or “print in a pdf” or “export as pnj”. The export as bmp or jpeg looks very bad. The PDF looks good.
Step 4 : finalise your instructions :
- You can add a cover page, I make it with Paint.net of Gimp
- After having a cover page, I print in a PDF file the whole images generated by Lpub with my cover page thanks to PDF creator (print in the same size as you have chosen in Lpub and at the same DPI : 150)
- Finished, you have now a beautiful instructions, start to share with the community !
Ressources and links :
- A good tutorial-website to start with LPUB4.0 : https://sites.google.com/site/workingwithlpub/
- The development page at SouceForge : http://sourceforge.net/projects/lpub4/
- The download page at SourceForge : http://sourceforge.net/projects/lpub4/files/
- A short video showing the basics of LPUB4.0 : http://www.viddler.com/explore/anoved/videos/22/
(1) Comments
Bonjour,
Merci pour cette video,tres instructive.
amicalement.
seb.vdn.
Comments are closed.