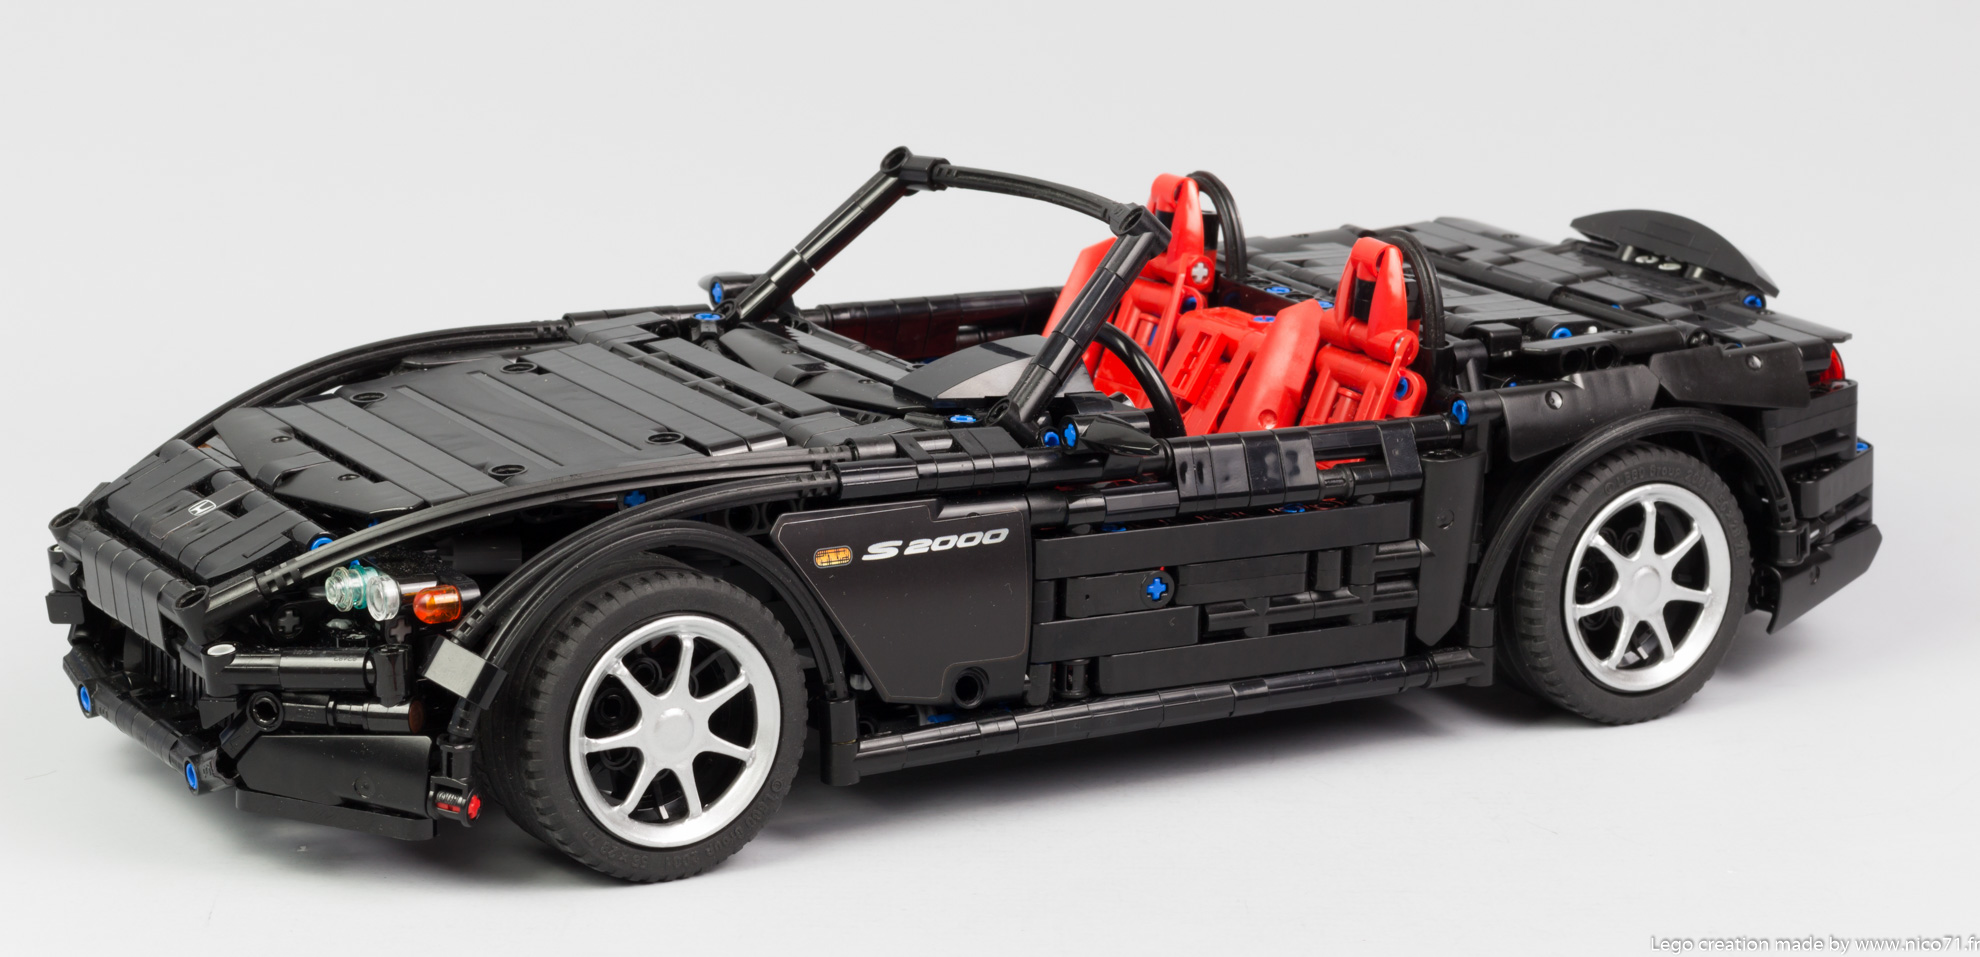
A replica of a the Honda S2000 AP2, with steering, double wishbone suspensions, detailed tilted engine F22C1, opening doors, hood, trunk and manual convertible top. With custom sticker and 3d printing wheel, and building instructions.
Direct purchase of the instructions (black and red version available)
Honda S2000
Preview of the instructions at the end of the article. Presentation Video (YouTube).
Context
Yes, again, a Honda. After finishing my Honda NSX in lego technic, I had on my todo-list several other honda like the civic EG, the new NSX and the S2000. But there was a common point : I wanted to make it in black this time, that is why some months ago I have bought some flex axles and panels. I wanted also to push the details and design to its limits, with 3D printed rims, and sticker but also a (nearly) perfect shaped bodywork . That is why, this creation took months to make but it worth it. Consequently I have made the pro building instructions.

As usual, I have chosen the medium scale. This the perfect scale for me because it enables to have enough place for some mechanisms like drive-train, suspensions (with some tricks) and steering but also make easier the making of the bodywork. Indeed, people who will judge the creation will be more responsive to the compromise, and the empty space or gap will be less important. With a big scale, you can put many functions in it but the bodywork has to be perfect in shape and homogeneity, if not the creation will look bulky, or with two many empty spaces. This balance is easier to find at this scale and the result is good with a proper density of elements.
Functions
Regarding the scale and the high level of detail I wanted, I have mainly focused myself on important functions without forget the details. That is why there is a drivetrain from the rear axle to the engine but not a gearbox, there is a steering wheel which is connected to the wheels but not a Hand Of God. But there are also some tricks to have for instance the suspensions and the drive-train at this scale which I will explain.

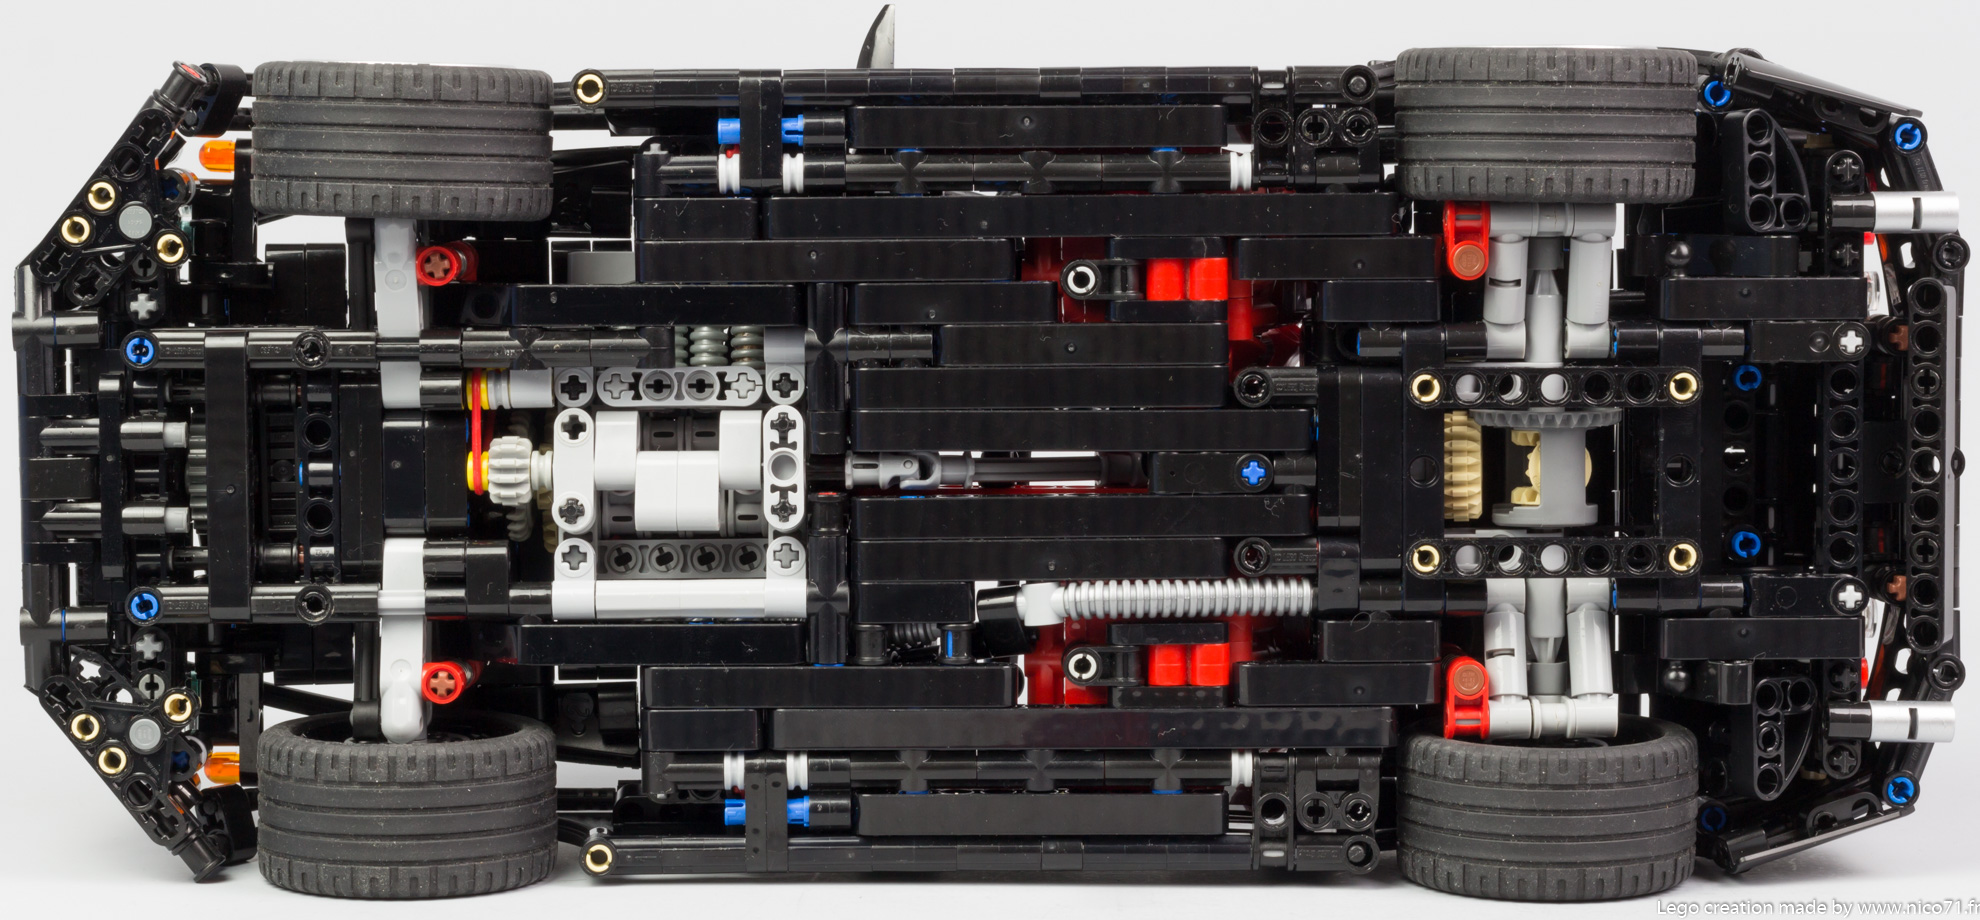
The first function is the drive-train with the detailed engine. The rear axle is equipped with a floating differential to accommodate the scale and having suspensions. I use for that the ball joint and pivot frame to create this. then the motion goes to the engine with two U-joins. I have chosen to make the engine using the same building as the mack anthem (known before but first use in a lego set). It enables me to make the 4 inline cylinders engine in only 6-studs long. I wanted also to make a detailed engine, with the camshaft, belt and so on. I use for that the 12t gear with 24t gear to have the correct ratio, (in real it is a belt but using a chain was not really good and smooth) to rotate the camshaft. I have also put the complete exhaust, air intake, accessory pulley and belt and of course the Vtec sticker (visible here on the instruction sheet). The engine is also build on a frame which is slightly tilted to reproduce the natural tilted angle of the F20C engine.
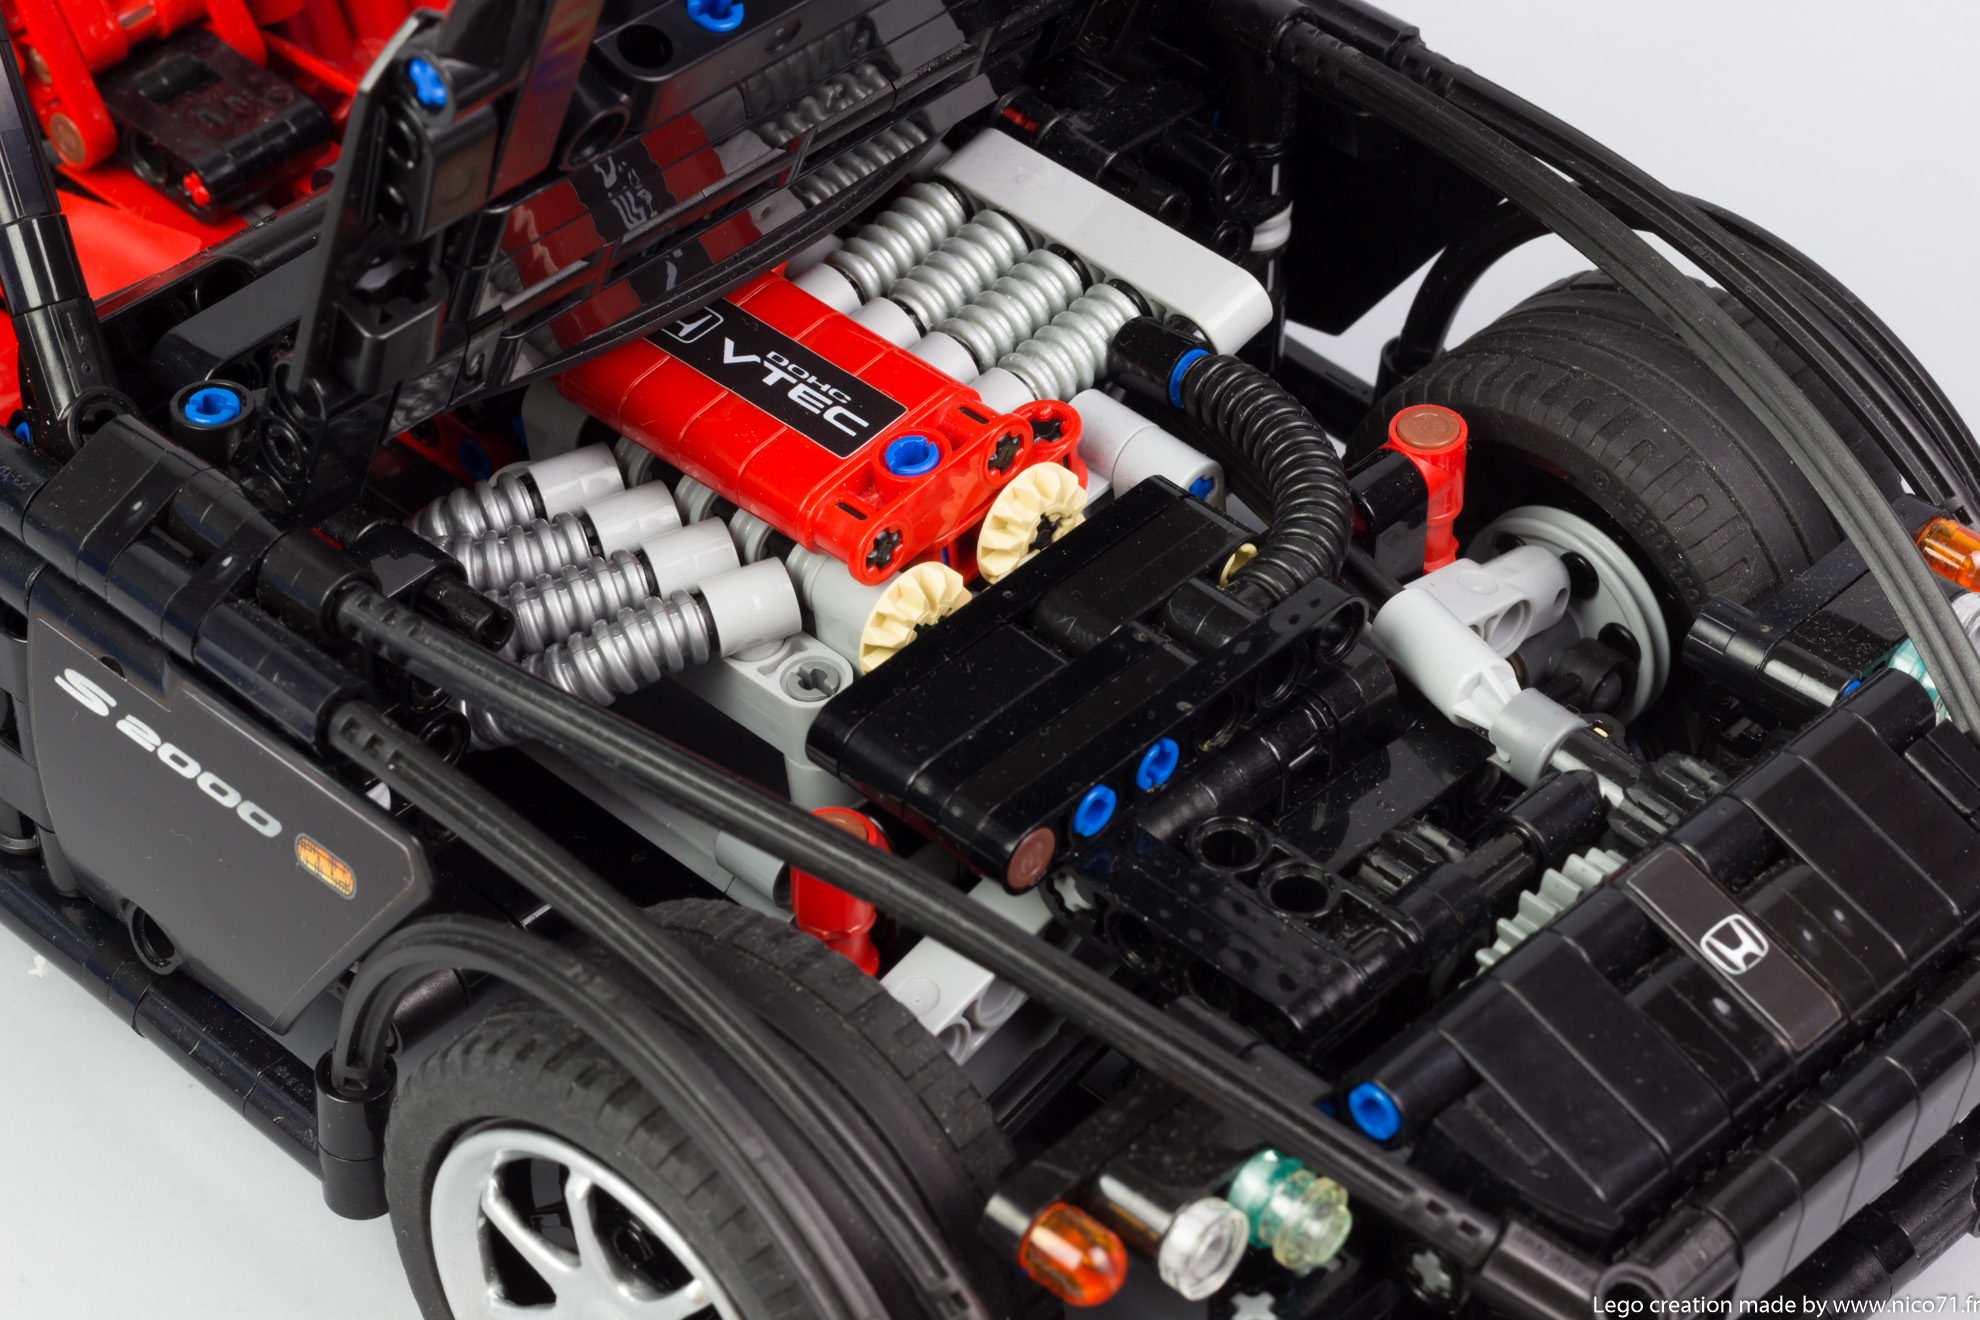
On the front of this, there is the steering. The space between the engine and front axle is very small that is why the command of the steering is located in the front. The steering wheel is connected to the rack and pinion by two U-joins (which pass near the engine), 12t on 24t gear, and 12t on rack and pinion. The small trick here is that I have used some levers on each side of the rack to be guided during the displacement, instead on letting oscillate with the play. It tends to make the steering more accurate.

The suspensions are double wishbones suspension, made with standard element on the front and build one for the rear. The trick is that I used disassembled spring and sliding connector on a axle as a shock absorbers (visible on this instruction sheet) and not connecting the both sides of the bottom wishbone to let pass the drive-train. It enables me to build a very compact and functional solution for the suspensions. You can see the on the picture the underneath :
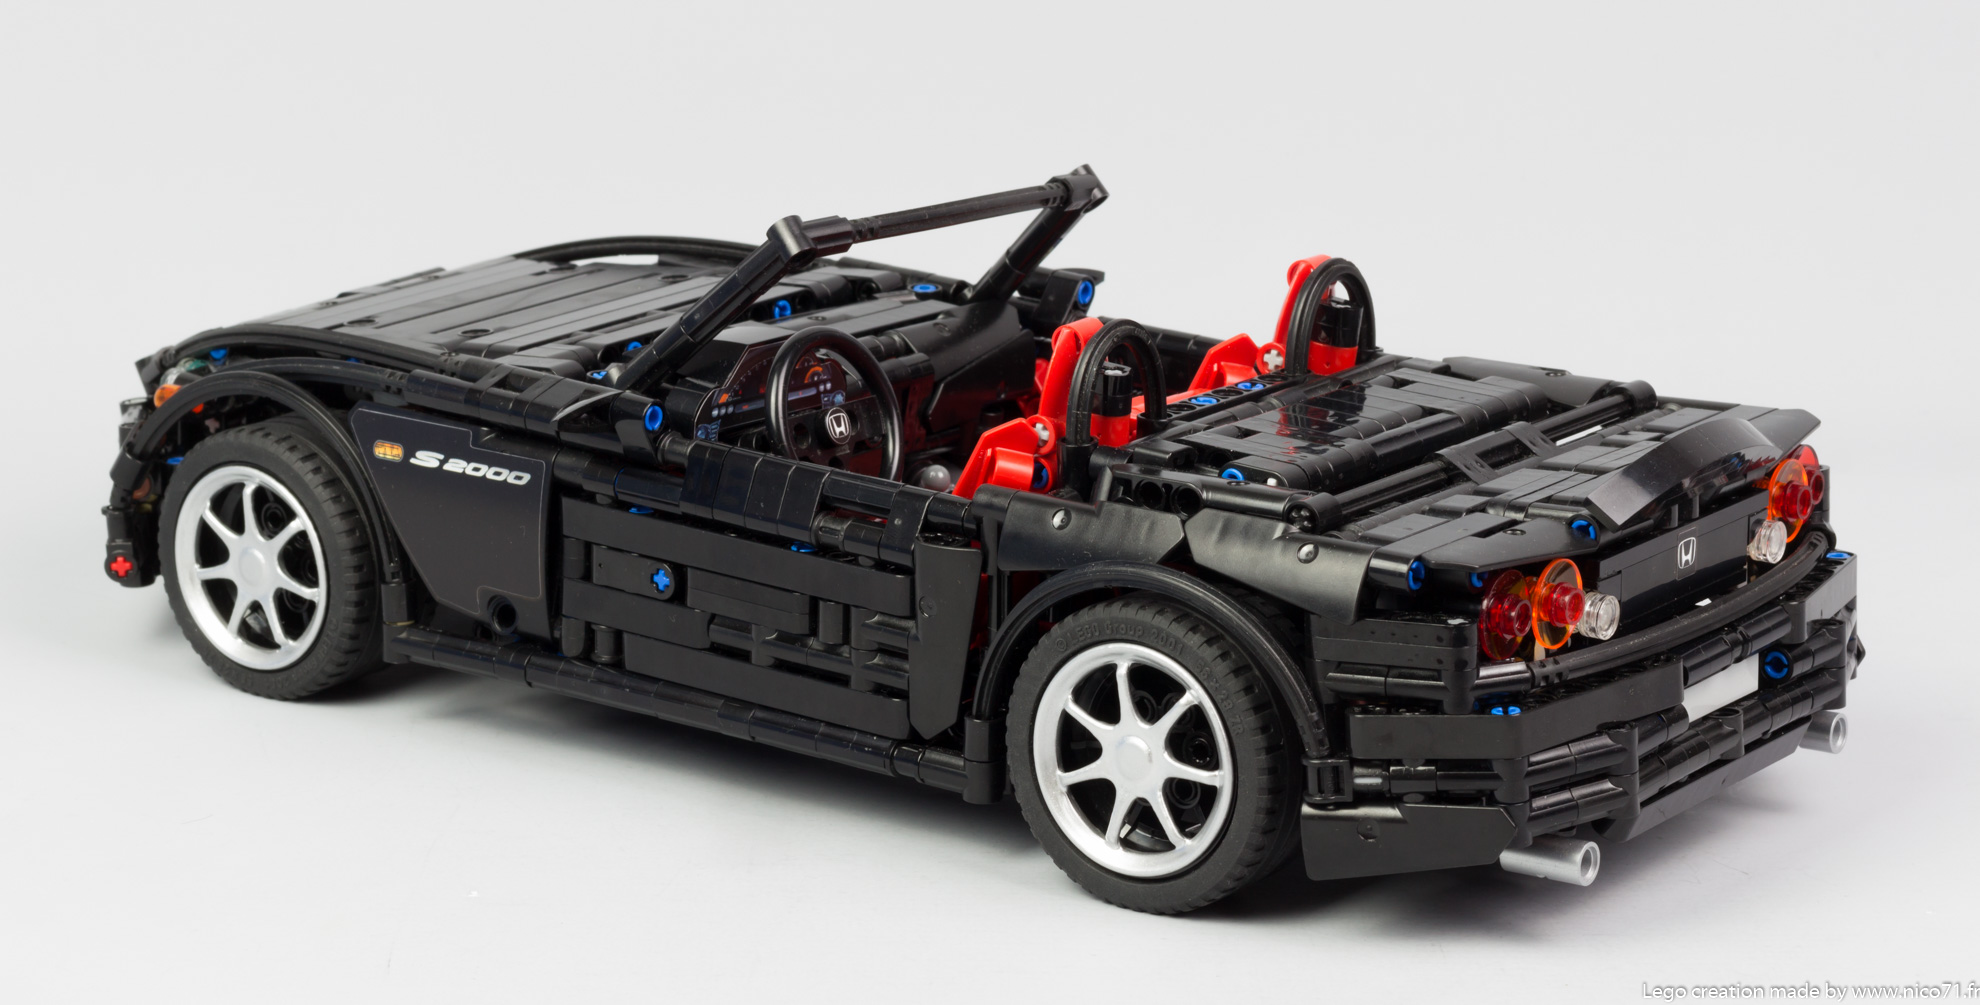
Next functions are the opening functions. Of course the doors can be opened, the trunk (which is ridiculously small) and the hood which is kept in place by friction pin to reveal the engine.
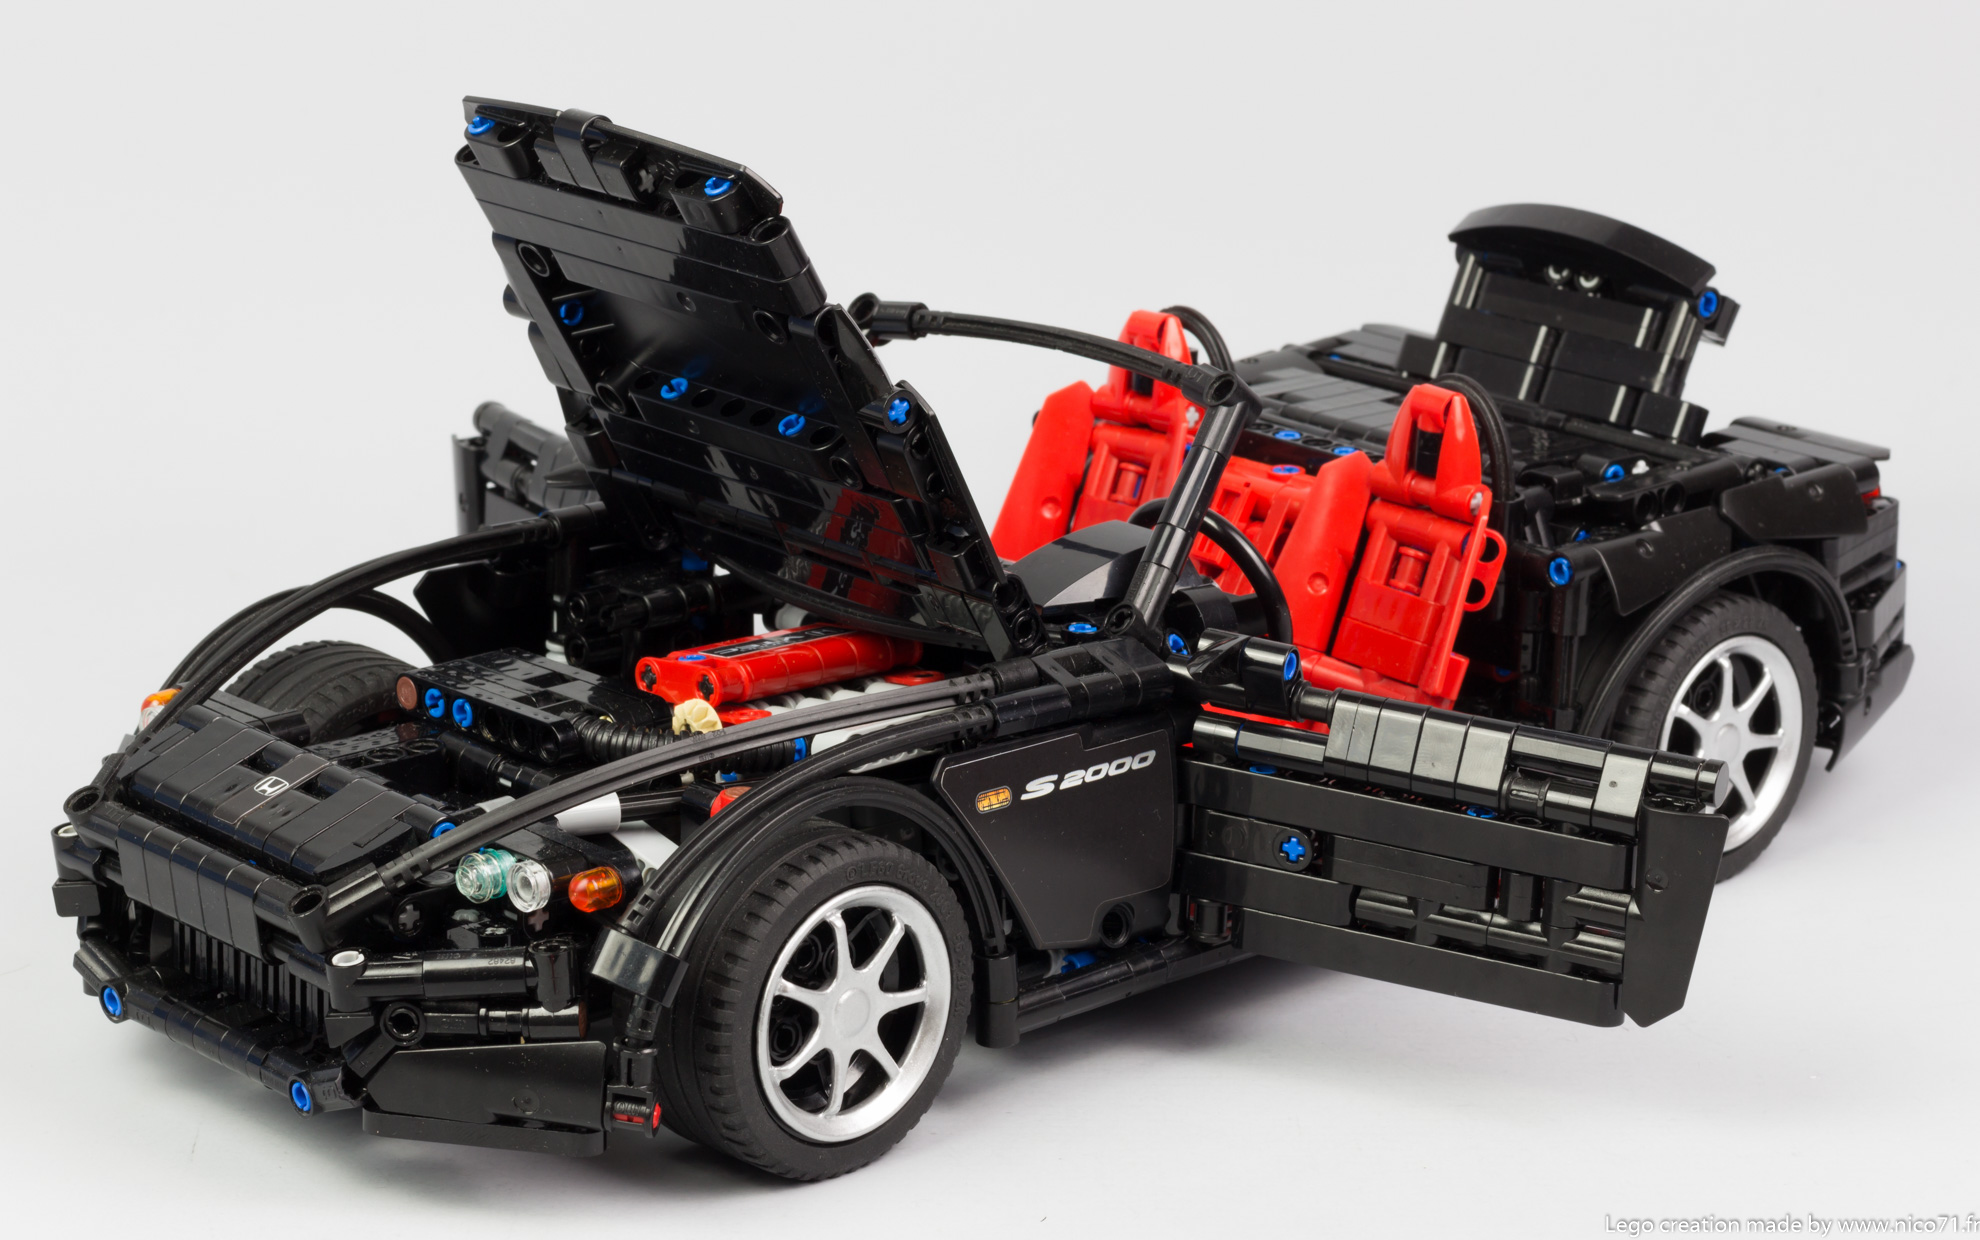
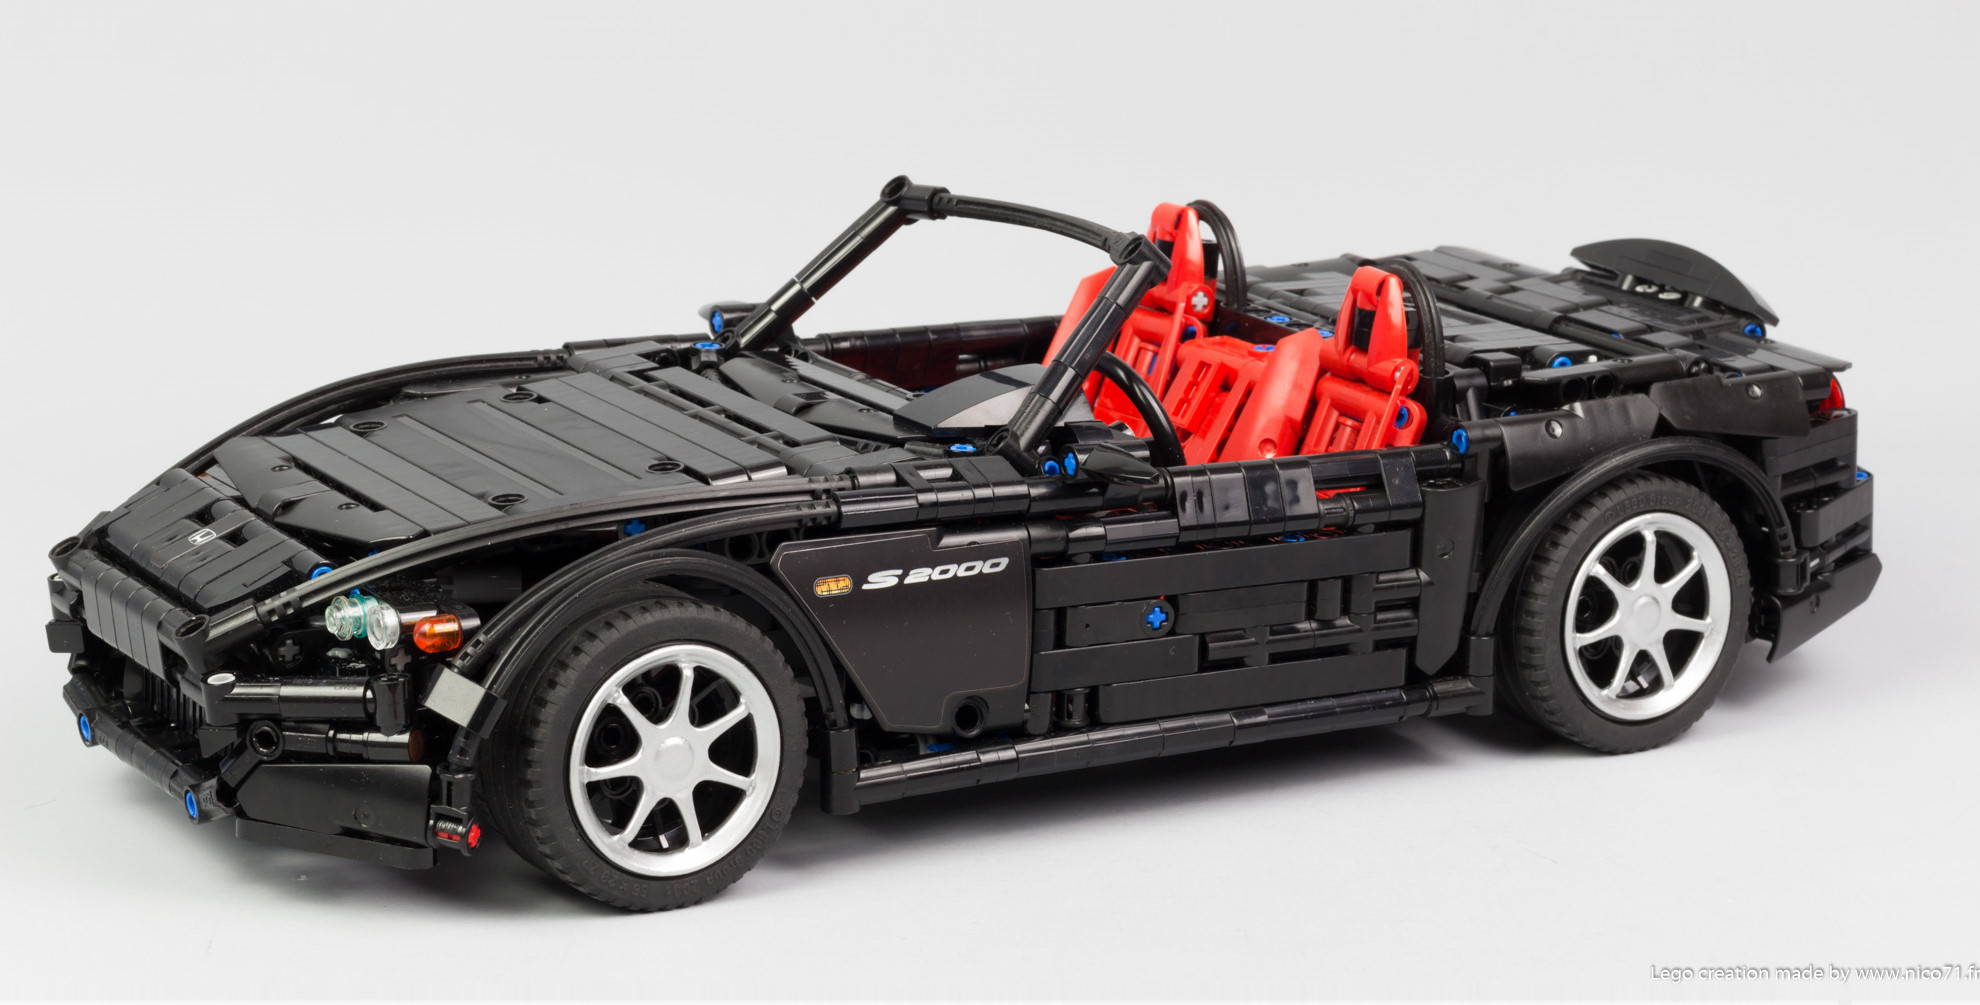
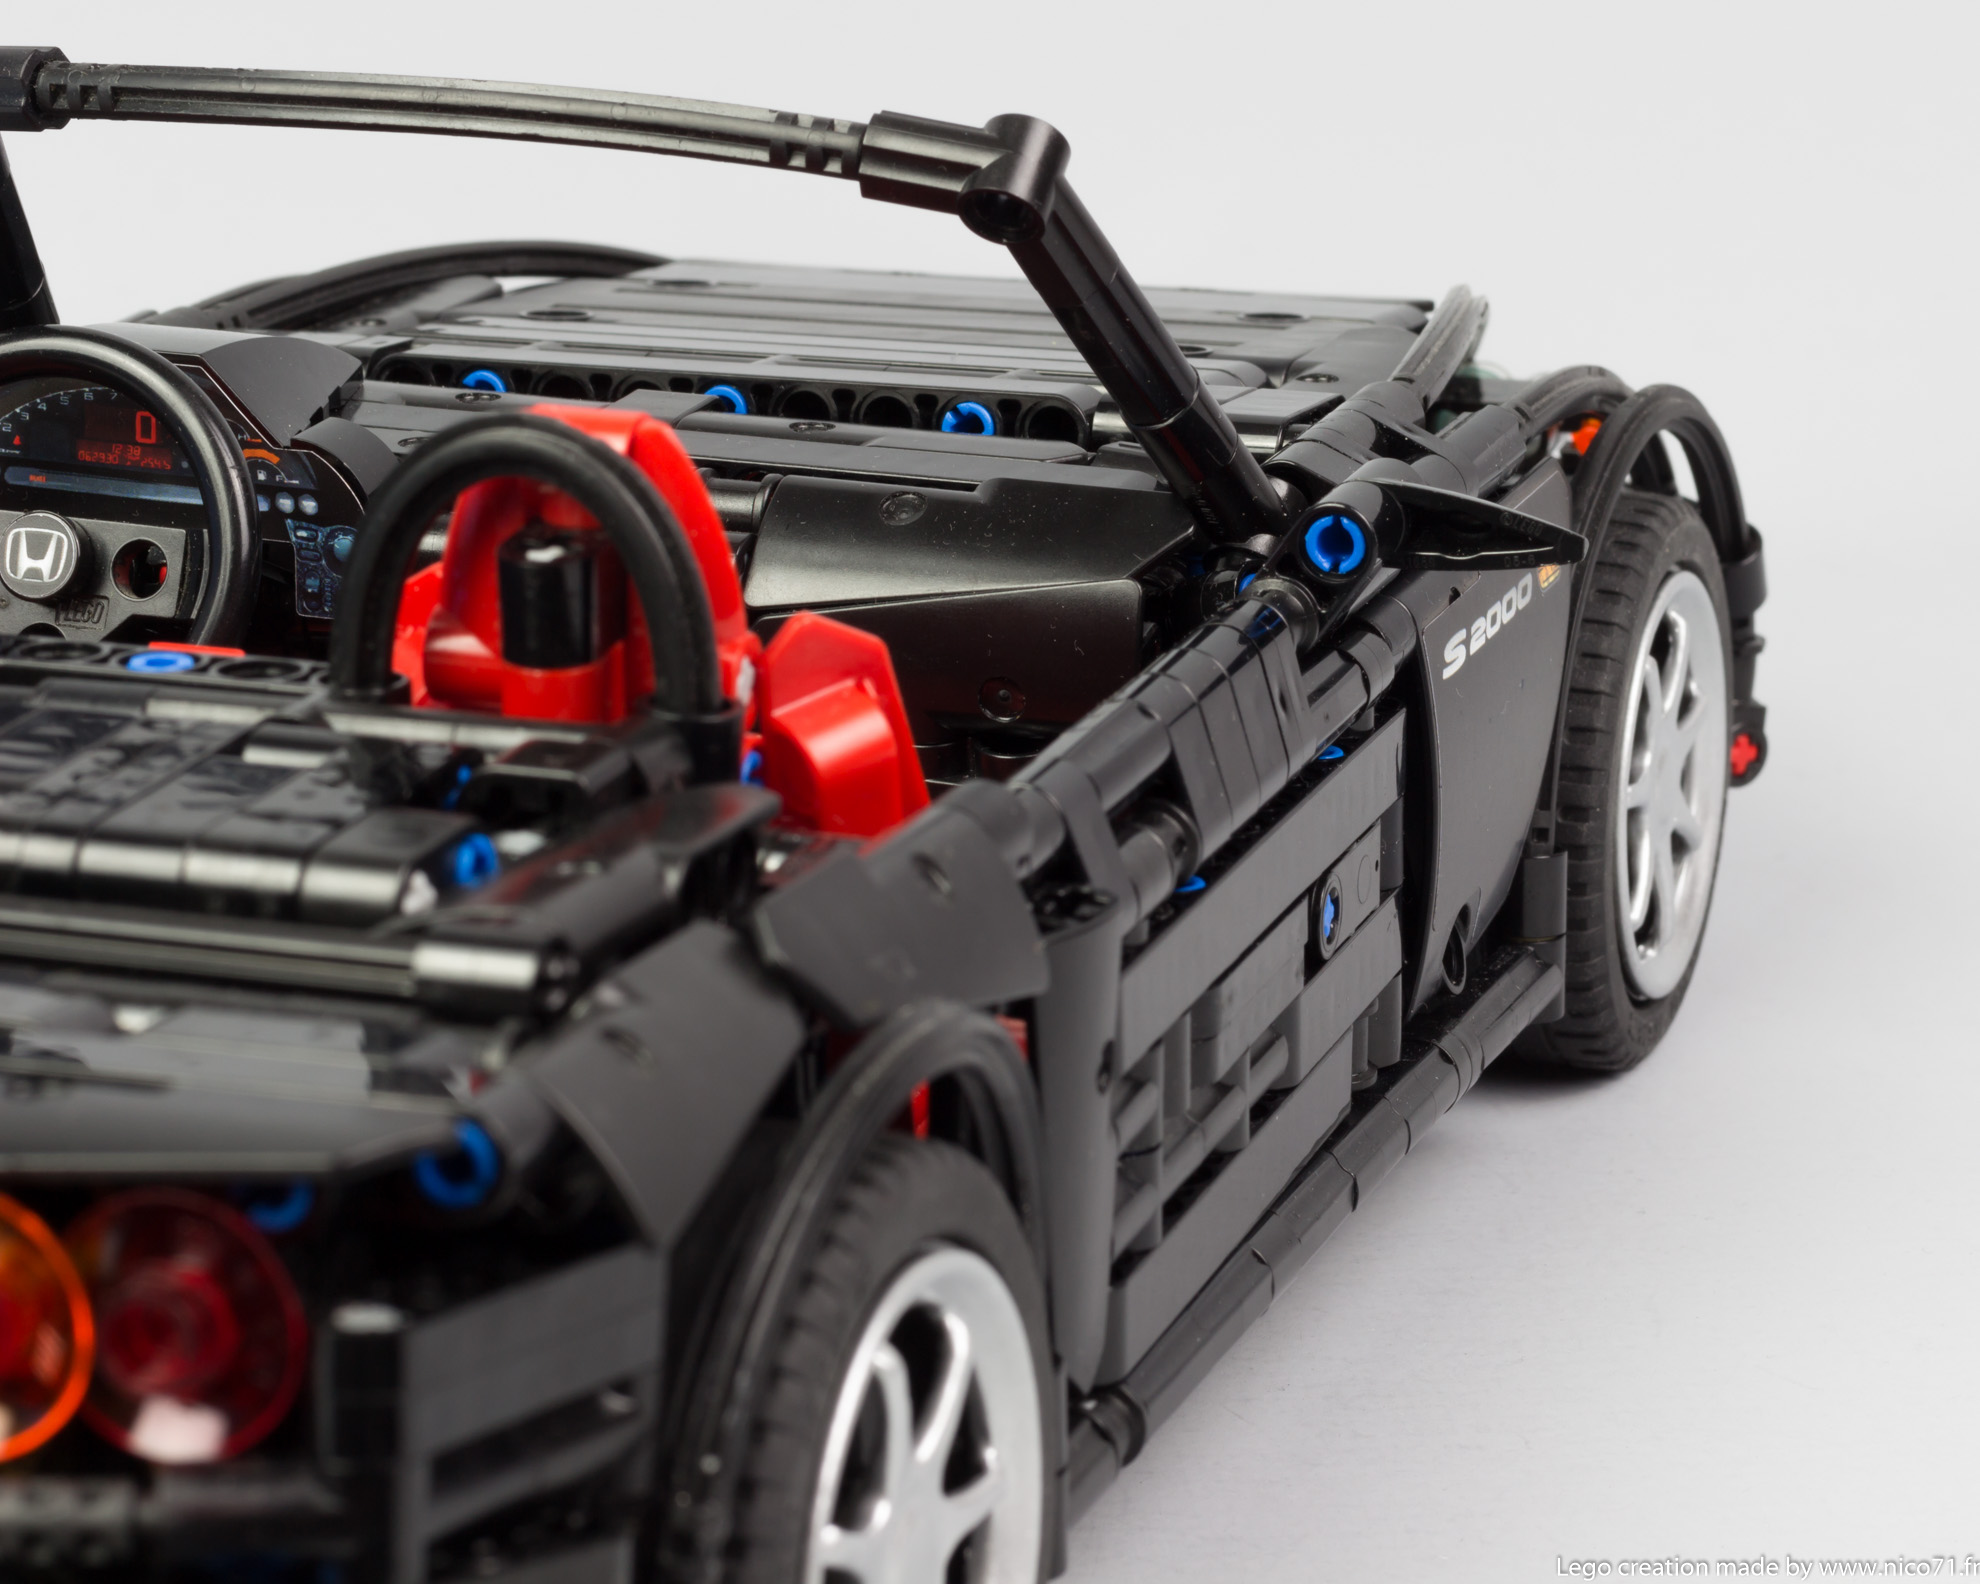
The last function is the convertible top. I did not want to create a convertible top using some leather of tissue which were not lego, but a rigid top which can be folded as the real one. The most difficult part was the C-pillar. As it was rigid, it had to be hide somewhere, that is why I have chosen to use panels and to hide between the wheel and the rear bumper. The other moving parts are folded behind the seat, and the whole top rotates on two arms fixed near the seats. You can see a gif here and overal process here.

I am not entirely satisfied about this, because as the C-pillar are rigid, it has to be enough place to goes in and out. To accommodate the empty or filled space, I design two sides wings cover for it. Of course they are attached to the car but they are not very nice when the top is operated. You can see it on a gif, as two antenna / wings comes up at the beginning of the process. But it enables me to have a rigid convertible top which folds like the real one and have the correct shape for the car. It was definitively the most difficult part to create with the engine.
Design
The design was also a difficult part for this build. Of course at this scale, there is not many possibilities to create the correct shape, but it has also to be as good as possible, to catch the identity of the car, with no empty gap, strange building or shape. The trick is always to reproduce the iconic elements of the car by using the less amount of parts in the purest way to build, the design will look homogeneous and not bulky.
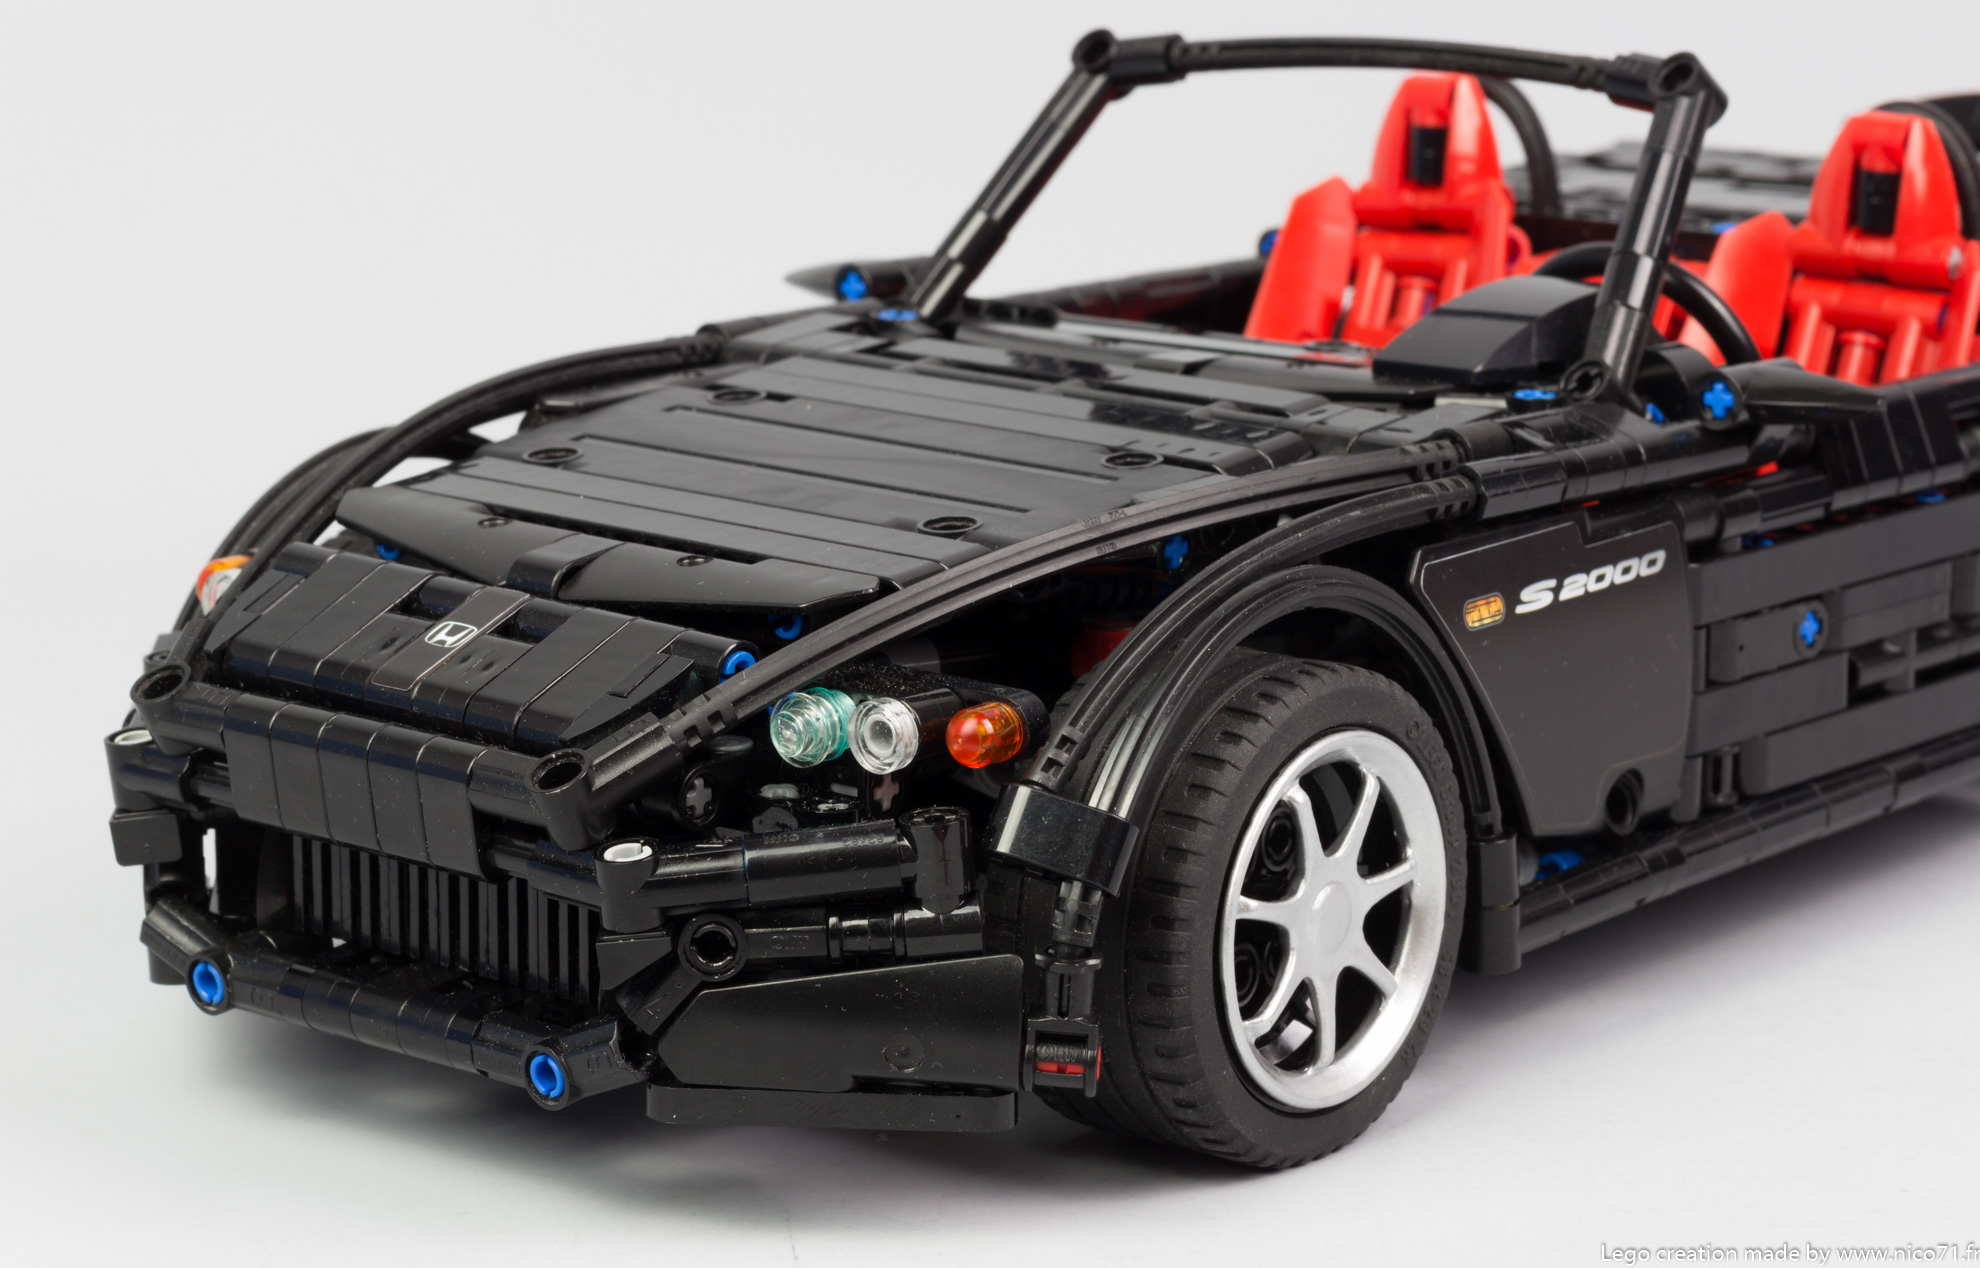
First I have chosen the AP2 version of the Honda S2000, not the first one, the AP1, because the shape of the front bumper has more angle, and the rear light is more distinctive in this lego version. You can note indeed that on the front, bumper, I reproduce the particular shape on the side by using small panel fixed by a think liftarm underneath, which is completed by angled connector on the top, which also joins the radiator shape to create the car’s mouth. This combination of design element was very hard to find and to fix in compact and sturdy way. It shows a important part of the design here, the half stud gap.
Indeed, the half stud gap is the most important technique here in this build to make the bodywork. Because at this scale, if the main unit in the stud, some element may not be very well-placed because either placed too closed or too far, or on a wrong position depending of the chosen stud. With a half stud you can choose the correct place. To create this gap, I use mainly perpendicular connector like this one or this one or this one or the pole reverser connector or the toggle joint. I use this half stud gap on many elements of the car. It includes the side skirts which are slightly stuck out and the mudguards which need it to shape the wheel correctly. The rear bumper uses also this a lot, to first shape correctly the mudguards, but also be a bit higher than the side skirts to respect to overall shape of car. It is also used for the rear light using this part (visible on the instructions sheet). And to finish it is also used for the front side panel where the soft axle comes from to create the shape on the edge of the hood. (visible on this instruction sheet).
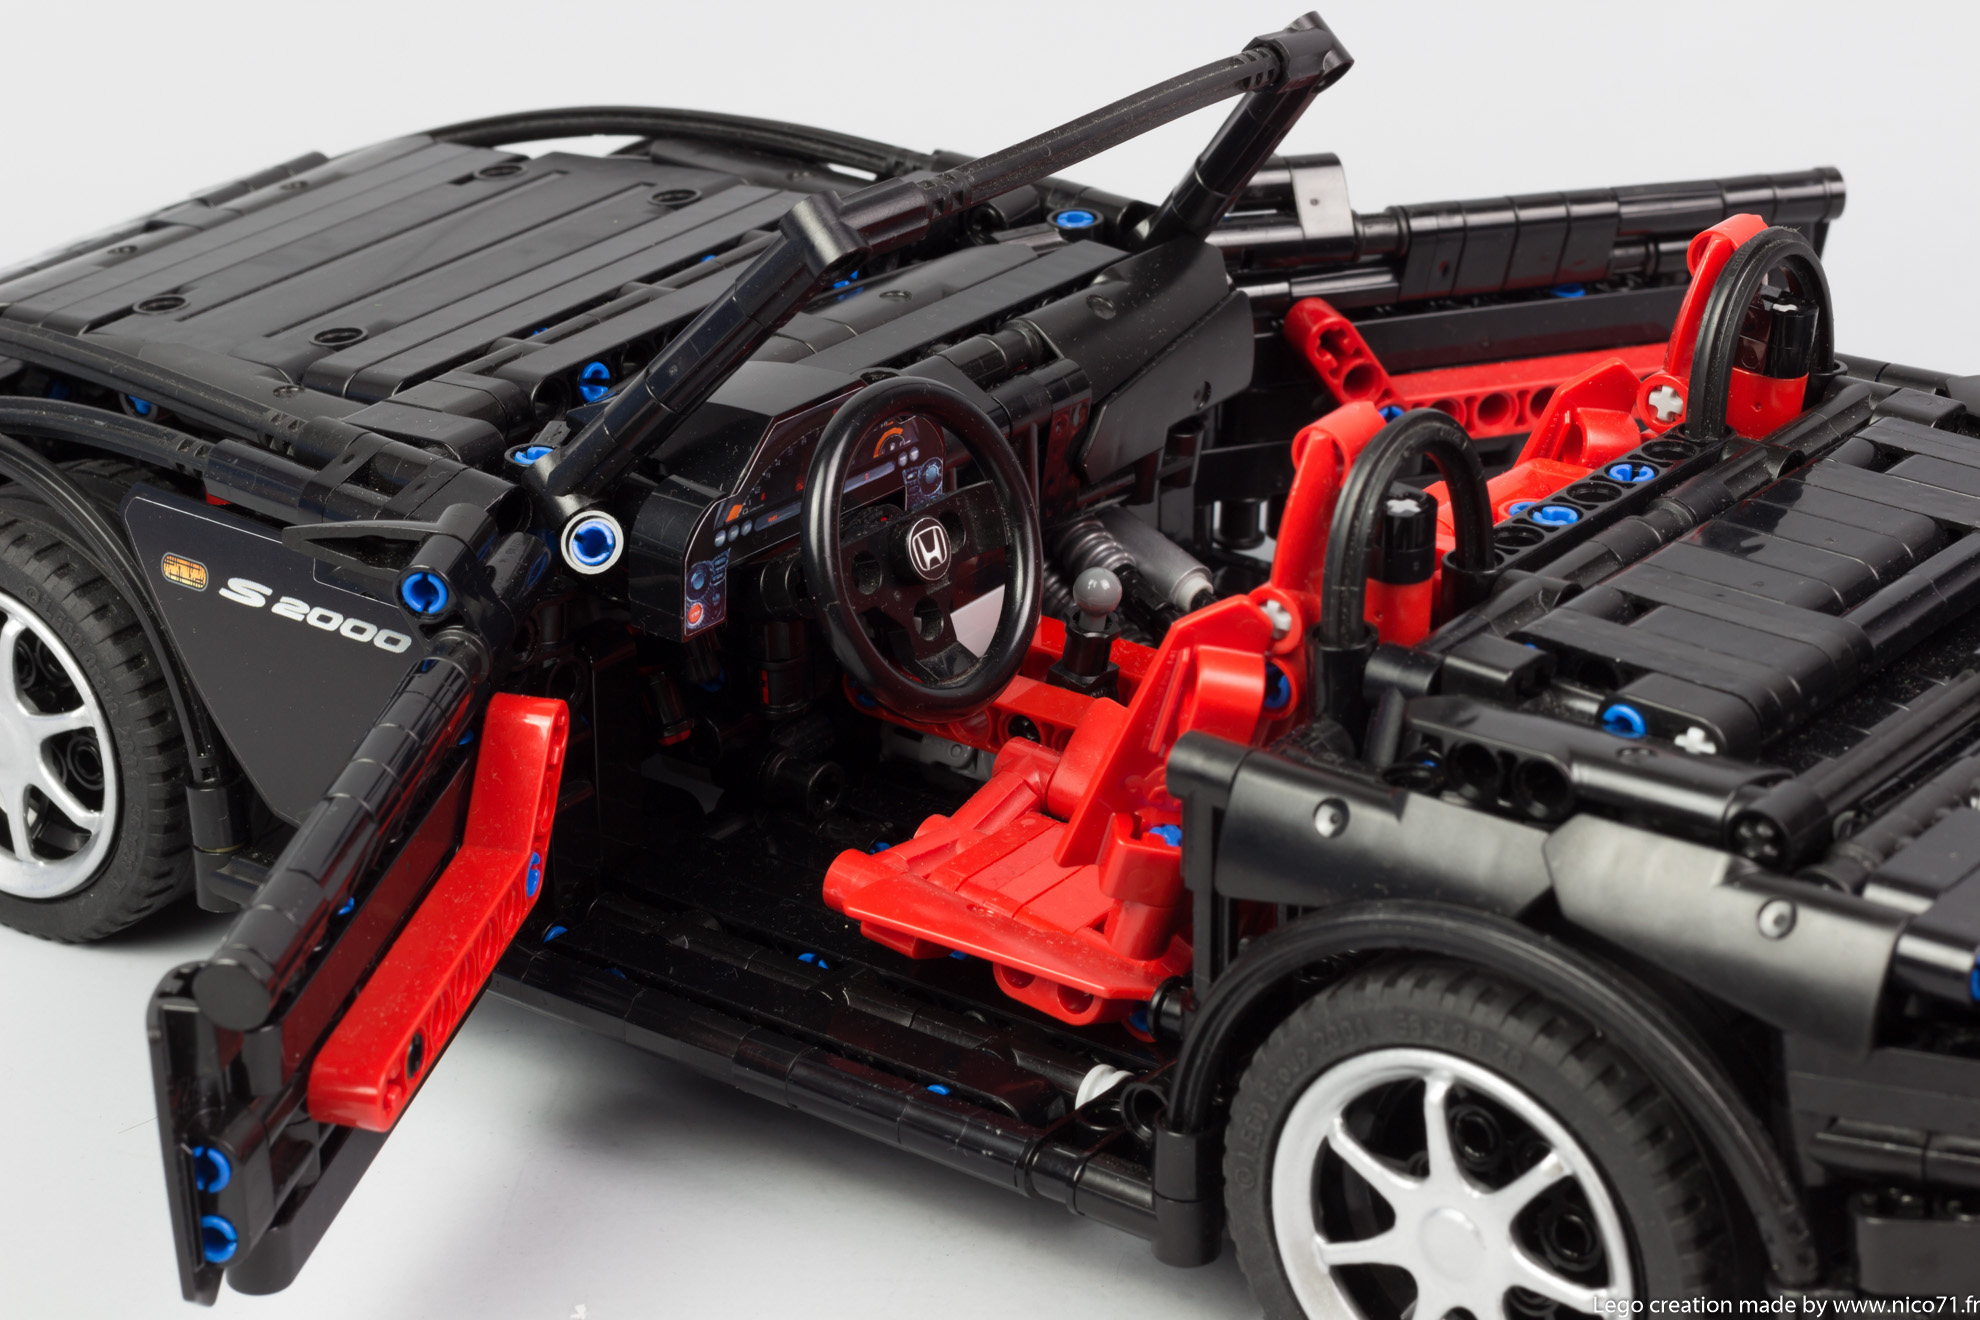
Regarding the details, I wanted to create a high level of details, that is why I have chosen to have a complete detailed interior instead of having a gearbox. The interior is then equipped with the seat, dashboard, gauges, lever and steering wheel (which is always too big at this scale). But I wanted also to have particular identity of the car with 3D printed wheel cover and the stickers. The stickers were obvious for me because it helps to know the brand and the model. They have been made by forwart sticker (black and red version available) which include the one on the dashboard which is very nice. I design the 3D wheel cover on Creo (Pro-Engineer) based on classic Mugen wheel and then modified a bit to enhance the printability. Then Teclem8 has printed it for me and then polish (you can see it in video), and I have paint it it with spray metallic silver .

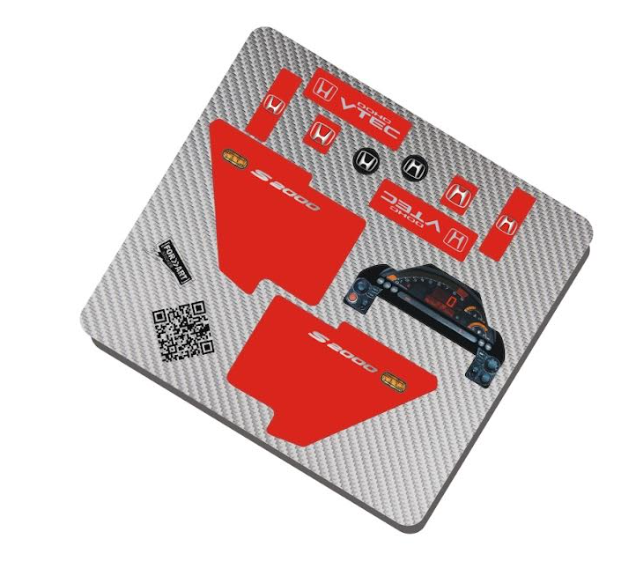
Sticker made by Forwart Sticker (shop)
I will conclude on the design with two tips. I think there are two important points to have a good design. First is to reproduce the iconic shape or element of the car by using small amount of parts in a pure design, which means it has to be not bulky or strange or wrong color etc. It has to catch the identity of the car in a simple way. I can be done by reproducing some details, or particular shape, or color etc. The second point is to not limit your building with the classic positioning and orientation giving by lego parts (like stack it on every stud, and orientating the parts with perpendicular connectors only). It is important to use every building techniques to place the parts where they have to be placed and not where it is easier to attach, by using half stud gap, rotating the parts, using the angled connector and beam, soft axle etc.
Pictures and Video
You can watch the video and the pictures here :
Black Version Gallery :


Red Version Gallery :


Purchasing the creations or the instructions
You can purchase either the whole creation on the website Buildamoc, or just the building instructions on nico71.fr.


Building Instructions

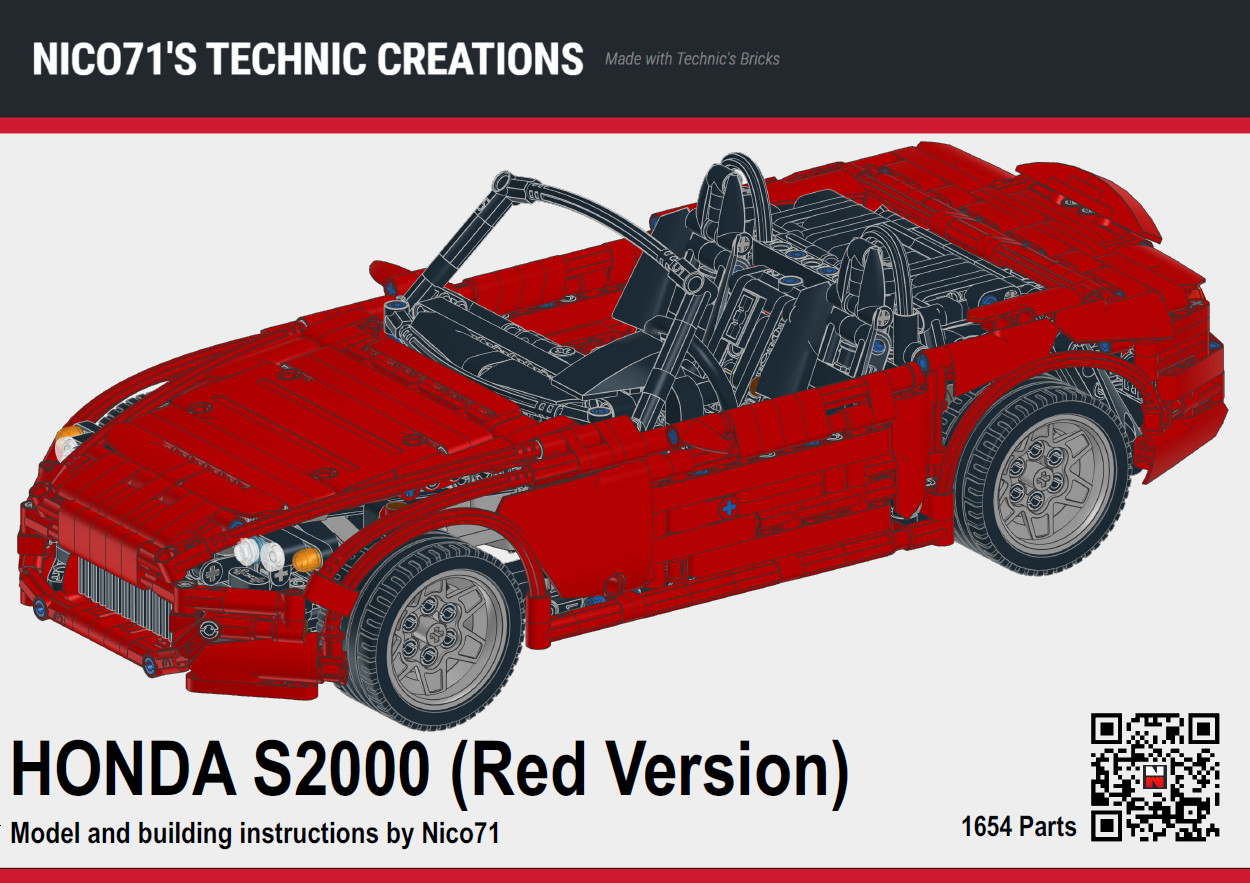
The idea of this creation was to create the best reproduction of the Honda S2000 at this scale, I do not know if I have succeeded but I think it is a very beautiful car and a nice building. As a fan, and knowing there are many fans of Honda and Lego supercar, I have made the pro-instructions for this car in two colors (red version available since 2022 thanks to new red parts). They are complete step by step computer rendering building instructions at the price of 10€. You can find the picturing bill of material in the instructions preview or you can watch online on rebrickable and export in whatever format you want :
You can buy the instructions with the following button for 10€. You can also buy other building instructions and get an automated discount. You will get 15% off for 2 PDF, and 20% off for 3 PDF on the total), available for all the instructions for sale on nico71.fr.
See it on the shop (black and red version available) :
Honda S2000
Please note that ou need to take apart 4 shock absorbers to get the spring. For that, push on the two black claws each side and pull the rod to get the spring. The process is reversible. See the tutorial on youtube to know how to do.
After your payment, you will be redirected to a page for downloading your instructions, and will receive also the link to download by email. Please check the spam box and be patient to receive it. If you have trouble to download your copy of the PDF after payment or open the document, do not make a paypal dispute, please contact me using the contact form. The link to download the instructions expires within 24h. Contact me if you have lost your instructions. Note that you can print it, but not copy or distribute. Thank you for supporting my work 🙂
Here is some preview of the building instructions :


Red :


(2) Comments
[…] lots more of Nico’s superb Technic Honda S2000 AP2 to see at his website by clicking here, including the complete image gallery, full build details and yes – instructions! Click the […]
[…] lots more of Nico’s superb Technic Honda S2000 AP2 to see at his website by clicking here, including the complete image gallery, full build details and yes – instructions! Click the […]
Comments are closed.